Since I started playing with 35mm photography a few weeks ago, I’ve been using Snappy Snaps near Clifton Down shopping centre. It came with the recommendation of a friend.
I’ve simply been asking them to develop the film into negatives and then I’ve been scanning the negatives myself. But I noticed that the first few rolls had scratches and dirt on them. Today when I went to pick up the latest roll, they were still finishing with it when I turned up, so I was able to watch.
The film came snaking out of the machine, and the guy working there yanked it out, treating it with all the care you’d think more appropriate for a roll of toilet paper. He put his fingers all over the film, making no attempt to handle it by the edges.
When he came to cut the film into strips, again he handled the film by touching it all over and cut it roughly. I noticed that one of his cuts went diagonally and took thin strips off the edges of two frames.
I’m no expert on film, but it seems pretty common sense to me that you should handle something as delicate as film with care, and not put fingerprints all over it. It’s not like it’s difficult to hold it by the edges, either.
Accredited professional photographer Glen Smith recommends treating negatives in the following way:
Negatives are particularly subject to damage. The smallest spot of dust, scratch or finger print will be enlarged many times when the negative is printed. Always handle negatives by the edges. A finger print on a negative can ruin a print. Negatives can be gently wiped to remove fingerprints but then there is the risk of scratches. Clean white cotton gloves are ideal if not always practical.
This is exactly what anyone with common sense would suggest as a sensible way of caring for negatives, too.
So now I know how my films get damaged during processing, and I think it’s safe to say I won’t be going to Snappy Snaps at Clifton Down again.
Update: There is an example of a scratched negative here on my photo blog.
Over the years I’ve had a number of cycle computers. Most have been Cat Eye, although some haven’t. It’s clear to me that Cat Eye make the best cycle computers – both in ease of use and in build quality (which is rather important when it will be subjected to rain, sun, vibration, heat and cold).
A few months ago I fitted a Cat Eye Strada Wireless to my racing bike. It was my first wireless computer and I’ve been extremely impressed with the results. The computer itself has a single-button interface and is nice and easy to use. The numbers are big enough to read easily while you’re riding.
But recently I’ve been tempted by the gimmick[1] of seeing my pedalling cadence too. I enjoy cycling and I love gadgets. So I ordered a Cat Eye Strada Cadence for my racing bike, and moved the Strada Wireless to my commuting bike.
The Strada Cadence is a wired computer, and you need to go through the rigmarole of attaching cables to your bike frame with cable ties. Unusually, the sensor attaches to the inside of the chainstay of the rear wheel. The other sensor attaches to the outside of the chainstay so it can sense the pedals going round.
Installation is no more tedious than any other wired computer, and you get loads of tiny black cable ties in the bag. The only tricky bit is strapping up the loose cable by the sensors. They both share a common wire back to the computer, which splits off into a Y around 8 inches from the sensors. If the shape of your bike means the sensors have to be at different positions then you’ll have to take up the slack cable securely. Unless you want it to go in your rear wheel!
I don’t know if my racer is unusual, but with the pedal crank magnet in place, it was a lot more than 3mm from the chainstay sensor, which is the distance it has to be to make it work. I got round this by putting a piece of rubber in between the crank and magnet to move them a bit closer. An easy fix, especially if you have spare rubber feet lying around – but it’s a shame Cat Eye didn’t provide them.
The FlexTight bracket is great, as it easily lets you install the computer on the handlebars or the stem. On both bikes I have the computers mounted on the stem, to save maximum room for lots of lights.
Using the computer is also easy – just press anywhere on the unit to “click” it and cycle through the modes. The Strada Wireless and Strada Cadence both have the same modes, except that the Strada Cadence also has a cadence mode. This simply shows your current pedalling cadence, in revolutions per minute. There are no functions to show you the average or maximum cadence, like there are with the speed.
So, in summary, I would absolutely recommend that you get a computer from the Strada range. Up to you if you want to go for the wireless or cadence options. They might be a few quid more than the competitors, but it’s well worth it for the quality.
[1] Whether you see this as a gimmick or a training tool is entirely your own opinion!
As I said in a previous post, I finally got my TEMPer USB thermometer to work on Fedora, thanks to a patch by Tollef Fog Heen that has now been incorporated into the Fedora kernel.
I’m not familiar with C so I only made minor tweaks to Tollef Fog Heen’s code, which returns a temperature as a number. I wrote a wrapper in Perl that crudely interfaces this program to Nagios. In reality, I should wise up on my C a little and write the whole thing in C. When I do this, I’ll submit it to Monitoring Exchange.
For the time being, I’ll publish my Nagios plugin on this blog, in the hope that it might be useful to someone, despite being incredibly hacky.
First you’ll need the code for the program that reads the temperature from the TEMPer. Compile it like this:
g++ -o get_temper TEMPer2.c
Note that the path to the TEMPer device is hard-coded in the C If yours isn’t at /dev/ttyUSB0 then you’ll need to change the source before compiling.
Then download my Nagios plugin (check_temper), and put both the plugin and the program get_temper in your Nagios plugin directory. This is likely to be /usr/local/nagios/libexec if you built from source, and /usr/lib/nagios/plugins if you installed from RPM in the Fedora repository.
Now all you have to do is the usual Nagios magic for adding any other plugin. Simple!
Update
Forget all that you’ve read above! I’ve now rewritten the entire plugin in C, so there is no need for the perl wrapper. You can download it from MonitoringExchange.
Some time ago I bought a cheap USB thermometer called TEMPer. I was disappointed to find that it didn’t work on Fedora. It would only work on Windows using a poor piece of proprietary software.
I eventually found the blog of Tollef Fog Heen, who had managed to get his TEMPer to work. Unfortunately his solution involved patching and compiling a kernel.
However since then, it seems his patch has been integrated into the stock Fedora kernel and it is now possible to read the temperature from it.
The TEMPer device appears to be a USB-serial adapter, with a serial I2C device at the end of it. It’s not straightforward to extract the temperature from it, but Tollef Fog Heen has written a simple C program to return the temperature.
His program polls the TEMPer every second and prints the temperature to the command line. It doesn’t stop until you kill the program. I made a couple of tweaks to the code so it prints the temperature once, formatted as a raw number with no extra text, and then quits. You can find my modified source here.
Disclaimer: I don’t know C. I haven’t changed any of the logic of the code, only the way it prints the output. If the code is buggy, it wasn’t me! 😉
Now I have an executable that returns the temperature from the TEMPer, I can think about building some application that could use this. How about a Nagios plugin?
Today I read about some various techniques for lighting portraits. Of course it’s not good just reading about things – you have to try them.
These photos were all lit using one flash camera left, 45° from Hana, and one camera right at a lower power, 90° from Hana.
I’m pleased with the way Hana is lit and I especially like the black-and-white high contrast look. But I think something to revisit next time is the backdrop. I’m using a pale bedsheet but it looks dull in these photos. I should probably read up about backdrop lights.
I also took a handful on 35mm, so I may post some of those when I get the negatives back.
When digital cameras came out, people hailed it as a great revolution. You could now take thousands of holiday pictures and simply delete the ones you didn’t like. While this is certainly a bonus for some, it can encourage the photographer to be lazy about setting up the scene properly.
My first “real” camera was a digital one. I do try to think about the composition, the lighting and other things. But often I end up going with the trial-and-error approach, and sometimes for photos like this one I would take hundreds of photos with slightly different settings, just to get the perfect shot.
Since I’ve started using a 35mm SLR, I’ve noticed I think much more carefully when taking photos. Naturally, you think twice before pressing the shutter when you know that it will cost you 25p to do so. I tend to take only one or possibly two photos of the same subject, which makes me carefully consider everything.
This can only be a good thing!
The downside is that it can take a while to fill a roll of film, as I have to have up to 36 pieces of inspiration before I can get the film processed 😦 When I get my current film done, I’m looking forward to seeing some of the shots I’ve taken over the last few days.
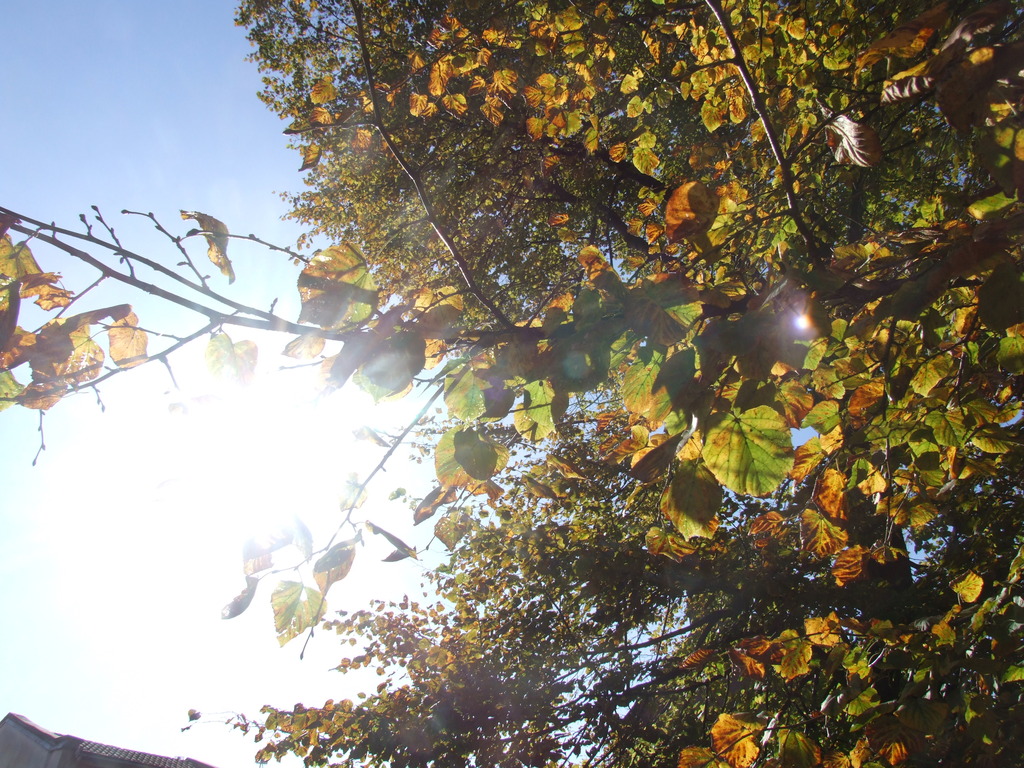
In my opinion, it’ll be hard for me to beat last year’s Autumn colours photo. But I still think this photo does a pretty good job of capturing the strange interplay between bright sunshine and wet leaves.
Today my new bike lights arrived – a pair of RSP Asteri 2 LED lights.
The manufacturer’s website has hardly any details and reviews of these lights are scarce, so it is practically my duty to write this review, for the benefit of anyone else who is considering buying them. Also note that the pictures on the manufacturer’s website are wrong. Both the battery pack and the lights are different!
What you get
In the box, there are two lights, each with one 1W LED. There is a battery pack which actually contains 4xAA NiMH rechargable batteries. There is a Y-adapter to attach both lights to the shared battery pack, and there are two velcro straps to attach the battery pack.
The box
Build quality
Build quality is not actually as good as I might have hoped.
The lights themselves seem sturdy. The silver ring around the front is metal and feels solid. But the attaching mechanism is made entirely from rubber. I don’t know how supple this will be after a couple of years. Other rubber cycling products I’ve seen have perished after a few years and no longer stretch, eventually causing them to crack.
One of the lights
The battery pack is flimsy in my opinion. It has a belt clip which can be used to attach it in a number of ways, but it looks brittle and would expect it to snap off before too long. The lid of the battery pack is held on by a single screw, which could be damaged by over-tightening. Be careful! There is also no rubber seal between the lid and the body of the battery pack, so I don’t know how it will fare in rain. However, the box does claim that the set is waterproof, so we will see.
The battery packThe battery pack
The cables are thick and appear suitably strong. Their connectors are all standard push connectors, but they have a “click” to keep them in place. The strength of that “click” seems to vary across the connectors and some are not as strong as I would like. I don’t plan to unplug mine very often so I will probably tape them up with insulating tape.
Mounting
The mounting facilities are not as good as other sets of lights I have used. The headlight units attach to the handlebars with a rubber strap with holes, and a plastic peg that pushes into the hole. There is no way to set the tightness to a setting between holes (e.g. the way that other lights have a screw).
Mounting of the battery pack doesn’t seem great either. The pack itself simply has a belt clip. There is a velcro strap in the box, presumably to attach the unit to part of the frame. However you’d have to figure it out yourself, and loop the velcro under the belt clip. Luckily I have some other rubberised velcro strips from other cycling products I’ve bought over the years.
Bear in mind that you will probably have to remove the battery pack in order to charge it (unless you leave your bike within reach of a mains socket overnight).
The cables are not curly, so if they’re too long then you’ll have to put up with them being saggy, or tie them up. You’ll need to be careful running the cable between the handlebars and the frame, in case it gets pulled taut when you steer. Nothing is provided in the box to attach the cables to your frame. I plan to use regular cable ties.
The lights have short (5cm) cables and the Y-splitter is perhaps 15cm long. The battery has the longest piece of cable and this is rather annoying. To remove the battery, you also have to remove the cable from the frame, so there’s not much choice to fix it permanently.
The system boasts a low battery warning so you don’t over-discharge the batteries and break them. Unfortunately you are unlikely to be able to see it as it’s on the battery pack, which will probably be on your luggage rack, on your frame or in your back pocket! Never mind.
Both the lights and the batteries are very light.
Performance
Despite my grumbles so far, these lights are really bright. Much brighter than any other so-called “1W” lights I’ve come across. The beam is fairly narrow, such that no light is wasted but it’s by no means a narrow beam. It can be seen from all angles.
Lights running
Each light has its own button, so you can use one light or both. The button cycles through 3 modes – dim, bright and flashing. The separate buttons means you can have one flashing and one on constant. Nice and versatile. Other twin lights I’ve seen have a central button on the handlebars. I guess each system has its pros and cons.
The battery pack contains 4 x AA batteries as opposed to simply being a proprietary NiMH battery pack. The intention is to keep the pack sealed and simply plug the charger into the battery pack to charge it, but of course you can remove the batteries to charge them in a conventional battery charger if you wish. See Modding for other ideas.
Modding
The system is quite simply put together, so it should also be nice and simple to take apart! 😀
As I mentioned above, the battery pack takes 4 x AA batteries, and a set of 1600 mAh batteries are provided. This immediately gives you options – you can replace them with more expensive rechargeables (such as the 2500 mAh ones I use in my camera) or simply use regular alkaline batteries.
Using the included batteries, the manufacturer quotes 1-2 hours runtime at full power, and up to 6 hours flashing. Swapping these for 2500 mAh batteries immediately adds 50% to those figures for not much outlay.
Using AA batteries also has a huge bonus in that you can always keep some spare alkaline batteries in your rucksack so you’ll never be caught out if your rechargeable batteries go flat on you. This is often a problem with rechargeable light sets that use proprietary battery systems.
The battery pack has a standard power connector that you can buy from any good electronics shop. Maybe even a bad electronics shop, too. You can create your own battery pack so long as you use the same connector, and you won’t have to alter (and risk breaking) your light set.
The power connector
I plan to build a bottle battery with D batteries, for long runtime. Naturally I will post about it here when I get round to it.
Verdict
As far as lights go, this is a good, versatile, powerful set. Shame about the build quality. If you buy these, expect to have to do some DIY when you install them. You will probably need cable ties and insulation tape – the kit isn’t even in the same league as a CatEye set. However, it is a fraction of the price!
Some simple oversights exist in the system, such as the battery back not being detachable from its cable. It would cost pennies to rectify the design, but you’ll just have to make those changes yourself, or work around them.
Overall, I would recommend this light set to a fellow cyclist, on the condition that they weren’t expecting miracles, and that they were prepared to do a little work to install it.
Pros
Cons
Bright
Good beam pattern
Individually controlled lights
Has flashing mode – unusual for rechargeable light sets
Rechargeable battery pack
Able to use AA alkaline batteries so you’re not left stranded
Easy to make your own battery pack
Price – I paid £80 for this kit
Poor build quality
Not enough accessories to complete installation. You’ll need to provide some
You’re on your own mounting the battery pack
Light mounting seems pretty sloppy compared to other lights – even cheap ones
No curly cables
Fairly poor battery life at full power with supplied batteries
Some practical design mistakes. You either have to repeatedly unscrew the battery cover, or repeatedly detach the entire cable from your bike.
My installation
Here are some photos of how I’ve got my lights set up. The other headlights are a pair of CatEye ABS-35 halogen headlights. They’ve long since been discontinued but are still going strong. There’s a 20W spot and 15W flood, with individual handlebar-mounted switches. With both lights burning, you get around 45 minutes runtime…
The new RSPs are mounted below the handlebars, and the CatEyes are mounted above.
Front viewSide view
You can barely see the RSPs hiding below the handlebar in this one. Each light has a switch on its top (so underneath, in my case) which can be a bit fiddly to press while riding. The CatEye lights have the yellow/grey switch to control them.
Cyclist’s eye view
I’ve fixed the battery pack to my luggage rack with a rubberised velcro strap.
The battery pack
Another shot showing the CatEye batteries under the bottle cage, and the loose cable for the RSP lights along the top tube. It’s held in place only with velcro straps as I need to remove the cable every time I want to remove the battery for charging.
The cabling
After I’ve used the lights for real, I will post more pictures of them working outdoors at night.
This week’s Tuesday Challenge from Stu is a good one.
Do you find yourself asking questions as you travel about? What’s down that hole those workmen are looking in? Where is she going dressed like that? How can that little old lady manage to carry such heavy bags?
Your challenge this week is to capture a question you’ve asked yourself. Make it clear from the photograph what the question is. It shouldn’t require any supporting information.
This is my first attempt at this Challenge, and not necessarily the one that I will submit.