Digitising a Super 8 film

[toc] Over the past few weeks I’ve made digital copies of quite a few Super 8 films. The proper way of doing it is by scanning each frame individually but this involves expensive and hard-to-find equipment. You can send films away to various companies to be digitised properly for not too much money, but that seems to defy the whole point of most of my hobbies. I like to learn to do things myself, not pay other people to do it (even if they could do it better!) I’ve put some effort into finding the best way of doing the conversion at home with the equipment I have and getting the best possible results out of what I’ve got. So here are my notes with some handy hints for people who want to make their own digital copies of Super 8 films. This will probably make more sense if you read it as a list of things to think about, rather than a direct set of instructions.

Equipment

The projector

First things first – if you want to play a film, you’ll need a projector. They vary in price and in specification, but there are some things you might want to look out for. Before you buy, check that bulbs and replacement drive belts are still available. These are the most common parts to fail.

The ability to play back sound Ideally it should also have a convenient sound output other than the main speaker, which you can connect to your sound capture device
A fast lens (low f number) Makes the projected image brighter, and easier to capture with a camera
A zoom lens Not essential, but handy for matching your projected image to the angle covered by your camera’s lens
Switchable 18/24 fps speed Most amateur movies were shot at 18 frames per second. Most professional ones were shot at 24 frames per second.
Fine-tunable speed On most projectors, the 18/24 speed is only approximate and will vary. Your digital camera will give you exactly what it says on the tin, so use the fine speed control to exactly match the two speeds. More on this later.

My projector is a Chinon Sound 7500 which is hardly a top-of-the range model, but it has all of the above features.

The camera

I am using a regular DSLR (Canon EOS 600D) which has a movie mode. I can’t speak for other brands or models, but the 600D lets you choose the resolution and the frame rate, which is important for this application. A fast lens is useful for this project as the projected image is relatively dim. I used an inexpensive Canon EF 50mm f/1.8 for its speed and sharpness. A slower kit lens would do if you were prepared to boost the ISO a bit.

The sound equipment

For silent movies, a DSLR on its own is fine. If you want to capture sound, some DSLRs might let you connect the projector’s sound output via a cable. Being an audio geek, I happen to have an audio mixer with a digital interface. This will record the audio onto a computer where it will later be reunited with the video from the camera’s memory card. Most laptops do not have a line-in socket (the microphone socket will not work) so you will probably need to use an external USB sound card with line-in. These are quite cheap now and reasonably good quality. You’ll also need the right kind of cable to connect your projector to the USB sound card. This might be 3.5mm jacks, RCA phono jacks, or something else entirely.

Setting up your room

  1. Make your capture room as dark as possible – any stray light will reduce the contrast of the projected image.
  2. Make your capture room as quiet as possible, if you are intending to keep the sound of the projector in.
  3. Ideally, project onto a proper screen. These are more reflective and purer white than a white wall, but of course a wall will do if you don’t have a screen.
  4. Make sure the projector is square on to the screen. Make sure it is central from left to right, and central from top to bottom. This will minimise distortion of the image.
  5. Using a tripod, place the camera’s lens as close as possible to the projector’s lens. This also minimises the amount of distortion.
  6. Determine the distance between the projector and screen by trial and error. Making the distance shorter will give you a brighter but smaller image. This depends on what angles you can achieve with the projector’s lens and the camera’s lens. In my case, the throw of the projector was about 5m down the length of my living room, with an image about 1.5m wide.
  7. Carefully focus the projected image. You can’t pause a Super 8 film in most projectors, so you may need to run the film through a couple of times until you’ve got it in sharp focus. Get someone to stand close to the screen and check while you focus the projector.

Digital camera settings

Focus

When the projector is focused, focus the camera too. Depending on how bright the image is, autofocus may or may not work. I found it easier to focus manually. Either way, once you’ve set the focus properly, set the camera on manual focus so the camera won’t “helpfully” change it for you later on.

Frame rate

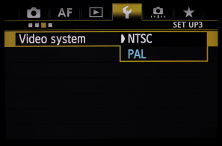
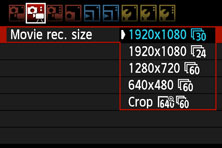
Decide on the camera’s frame rate. For a 24 fps film, most DSLRs will be able to capture at 24 fps. If you have an 18 fps film, capturing at 24, 25 or 30 fps (common digital movie formats) will give you a flickery image. You could project an 18 fps film at 24 fps just to make it easier to capture, and slow it down later. Top tip: on Canon DSLRs such as my EOS 600D, the frame rates available to you vary depending on what video format you choose. When my camera is set to PAL (UK), I can choose 24, 25 or 50 fps. In NTSC (USA) mode, I can choose 24, 30 or 60.

5Dmk3_video_system Untitled-1-43

Once you’ve decided on the nominal frame rate, you need to finely set it. For me, it took quite a bit of experimentation with the fine speed tuning knob before the projector’s “approximately 24 fps” was the same as the DSLR’s exact 24 fps and the flicker disappeared. This is just a case of trial and error. Be aware that your camera’s LCD has a different refresh rate and a low resolution, so flicker is often not visible until you play your footage back on the computer. If you’re feeling adventurous, you could adjust the fine speed control (if you have one) on the projector to project at 20 fps, and then capture on your DSLR at 60 fps. 60 is a multiple of 20 so there shouldn’t be any flickering, and you can downsample your movie to 30 fps on the computer later on.

Exposure

Pretty much every camera with a video function will offer you auto-exposure for videos. In this case, we don’t want this as the camera will try and compensate for the exposure when a dark scene is played back. Choose manual exposure. This will be easier if you have a fast lens – I found my 50mm f/1.8 very useful for this. Experiment and set the exposure to a value where neither the blacks nor the whites go off the end of the histogram scale (on Canon, press DISP to bring up the histogram). Try and get the main bulk of the histogram roughly in the middle.

Video histogram
Video histogram

If you have chosen a high frame rate like 50 or 60 fps, be aware that your longest possible exposure will then be 1/50 or 1/60. You might need to set the ISO quite high to get a decent exposure.

White balance

The white balance depends on whether you are working with a colour film or a black & white film. For black & white, the white balance doesn’t really matter as you can always make your video monochrome later on. For colour films, the white balance matters more. The light source in the projector is usually a halogen lamp so you would choose incandescent or tungsten on your camera. However, many colour films have faded and the colours have shifted over time so you will still probably need to work on the colours later.

Post-processing

I’m no expert on video editing, and as a Linux user I am not familiar with recent versions of Windows or Mac video editing software. Adobe Premiere would be an excellent choice but is expensive. Windows Movie Maker or iMovie would probably be fine, and there are various other options too. On Linux I use kdenlive but I also hear that OpenShot is very good these days.

Crop

Depending on your video camera, it is likely to have shot the video in 16:9 widescreen format. This does not match the Super 8 format, which isn’t so wide. Whether or not you crop out the surroundings is up to you. If the area around your screen is sufficiently dark and non-distracting, you could keep it in. Otherwise, crop it out.

Colour correction

If you are converting a black & white film, you may prefer to switch the video to monochrome rather than a colour image of a black & white film. It will get rid of any tint you may have picked up from the yellowish projector lamp. If you do a monochrome conversion, you can skip the colour correction step. If you are converting a colour film, you will probably need to fix the white balance. The procedure varies between editors but often “auto” is good enough. Or drag the slider until it looks OK. If the film is very faded, you might need to take more drastic action and manually fiddle with the colour balance. One of my films looked very red to the naked eye with only a hint of blue and green. I manually multiplied the amount of blue and green in the picture by a huge amount to restore a sort-of normal looking picture.

Contrast

The projected image is likely to be quite low contrast. Blacks won’t be pure black and whites won’t be pure white. Depending on what you did in the colour correction step, you might want to boost the contrast a bit to give your picture a bit more “punch”.

Audio

It’s up to you if you want to keep the sound of the projector in. I like the sound of the projector in both silent & sound films, but I had to make it quieter so it wouldn’t dominate. In films with sound, I ended up with a separate sound file that had been recorded directly onto my laptop from the projector. To incorporate this, I had to manually sync the soundtrack with the video. Usually when you switch the projector on, the switch makes a click that appears on the DSLR’s soundtrack while the direct audio output also makes a satisfying pop that you can use to align the two soundtracks.

Frame rate

The final frame rate you choose depends on what you want to do with your video. If it’s just for YouTube then the frame rate is pretty much irrelevant as YouTube can play back almost any format. If it’s for burning to DVD for viewing at home then you should use 25 fps in the UK or 30 fps in the USA. For the rest of the world, check your native television format. If you shot at 60 fps to counteract the flicker, you might prefer to convert the video to 30 fps (even if in the UK) just to make the file size a bit more manageable.

Export

Video codecs are a dark art and again, your choice depends on what you want to do with the video. For most purposes, H.264 is a good choice. The settings for most codecs compromise between quality and file size.

Samples

No article about Super 8 conversion would be complete without a converted Super 8 film. The first film is a 1945 news review. It’s a 24 fps film with sound, but when I had my first attempt at conversion I only had a silent 18 fps projector. Look at the flickering!

This is my second attempt, with sound and projected and captured at 24 fps.

And this is a badly-faded colour film, which I sort-of fixed by mangling the colour correction by hand. It still looks a bit odd, but it’s a lot better than it was!

Bristol docks at lunchtime

Last week there was a rare sunny February day, so Paul and I wandered down to Bristol docks to try for a few photos. I was carrying my grandfather’s Voigtlander Vito II, loaded with cheap colour film from Poundland.

I developed the C-41 colour film at home using Digibase chemistry. It seems there was a problem with the stabiliser and it left small droplets of something on the film which looked like water, but turned sticky and slightly cloudy as they dried. I didn’t notice until the film was dry, by which time it was too late to wipe it off. It would have spoiled the scans of images, so I gave the film a long wash in warm water to dissolve and wash away the gloopy residue. Unfortunately this made it worse, and it went from being cloudy and sticky to being dry, opaque white and permanent. When scanned, this residue is opaque so appears black, and when inverted back to a positive image, this shows up as white spots. Ho hum.

Of these pictures, I like the picture of the cranes best. The juxtaposition of the steam crane in the foreground with the tall cranes further away, the tall sailing ship on the left hand side and the railway tracks is quite a nice celebration of the former glory of the harbour. And I also like the snap of Paul, demonstrating what not to do on train tracks!

Somerset Towers project continues

The weather has been bad lately and quite a lot of the Somerset Levels is still suffering from flooding. Last weekend though, the sun peeped out for a little bit so I decided to check the flood maps and head to some of the drier villages within easy reach of Bristol.

I captured a few more of the churches on my list, including this one: the church of St John in Axbridge.

St John's Church, Axbridge
St John’s Church, Axbridge

Shot with a Horseman 980 camera and Horseman Press 65mm wide angle lens on Ilford FP4+ film, developed in Kodak T-Max developer.

Water drops

This week the Photo Challenge was to take photos of water droplets in one form or another. Here’s my entry.

Water droplet
Water droplet

For those who are interested…

  • This picture was taken with a Canon EOS 600D with Tamron 90mm f/2.8 macro lens. ISO 200, aperture f/5.6 to provide at least some depth of field, shutter speed was set to 1/160 although this is more-or-less irrelevant because the length of the exposure is actually determined by the flash.
  • I used a Yongnuo YN-560 flash on 1/64 power to ensure that the flash duration was short.
  • Drops were created by suspending a plastic bag from a microphone stand and making a small hole with a pin to make it drip at a steady rate in the same place each time.
  • The green colour was entirely provided by the ring binder I used to bounce the flash off.
Setup shot
Setup shot

Staple of photography

It seems to me that everyone who owns classic cameras – whether to collect them or to use them – takes an awful lot of pictures of their cameras. I’m no exception. A few years back I photographed all of my cameras against a white backdrop and illuminated with a shoot-through umbrella. Like this.

Canon AE-1 Program
Canon AE-1 Program

I’ve got more cameras since then and I don’t have photographs of all of them. I also got bored of the high-key style and annoyed by the visible tripod mount, so I decided to re-take all the pictures in a low-key style without using a tripod to support them. I won’t bore you with all of the photos here, but please allow me to introduce the family photo of my Canon FD kit. Notably absent is my Canon T90, which was being used to photograph the other cameras. Its smooth body isn’t as pretty as the angular casing on the older SLRs anyway.

Canon FD equipment
Canon FD equipment

If you want to see the rest of the pictures, they’re on my Cameras page. For those who are interested in how I took these pictures, I placed the cameras on a sheet of reflective black perspex, used a black backdrop quite far behind and lit the cameras with two snooted flashguns. The photos were taken with my digital Canon EOS 600D with Tamron 90mm f/2.8 macro lens, and Canon T90 with Canon FD 135mm f/3.5 short telephoto lens.

Setup shot
Setup shot

Lots of firsts – and a fail

This weekend I achieved quite a few firsts in the field of film photography. Here are the headlines:

FP4+First attempt at pulling film to control contrast

I shot some Ilford FP4+ (nominally rated at ISO 125) at ISO 50 in bright sunlight. Under-rating film in this way is called pulling, and in this case I was trying it out as a way of reducing the contrast, i.e. capturing a wider range of tones in the negative. I’m no stranger to advanced metering using the zone system and a spot meter, but this is the first time I’ve tried contrast control while making the negative rather than when making the print.

First outing of my Mamiya Sekor C 90mm f/3.8 lens

I bought this lens ages ago for my Mamiya RB67 for a bargain price – I now own the 50mm, 90mm, 127mm and 180mm lenses. This was its first proper outing, excluding some basic testing in the past. On the 6×7 format, 90mm is a normal lens and it is also the joint fastest lens (with the 127mm) for the RB67 system. It’s also a beast, weighing in at 805g (just the lens!) which is about the same as an entry DSLR with kit lens.

Mamiya Sekor 90mm
Mamiya Sekor 90mm

First use of medium format sheet film, cut down from 120 roll film

When pushing and pull film to deal with the range of tones in a scene, each negative should ideally be developed specifically for the conditions it was shot in. This isn’t possible using roll film, where all the negatives on the roll have to be developed the same way and a compromise must be made. Now I am at the stage where I want to regularly push and pull my landscape photos individually, I decided to start shooting sheet film rather than roll film for some shots. I don’t have a large format camera (yet) but you can also get sheet film holders for some medium format cameras, including my Mamiya RB67 and Horseman 980. Which brings me onto my next item…

First use of a Graflex Grafmatic six-shot sheet film holder

Traditional sheet film holders have two dark slides and hold two sheets of film, back to back. You expose one sheet, flip the holder over, and expose the other. The Grafmatic back takes six sheets of film and exposes them sequentially using a clever mechanical system. Once loaded, It’s almost as easy to use as roll film.

The Grafmatic takes US-sized 2¼ × 3¼ sheet film so not only did I have to cut my roll film into sheets, I also had to make the sheets about 4mm narrower to fit. It’s a bit of a pain to load compared to roll film.

First use of Kodak T-Max developer

For the past few years I’ve been working my way through a giant stack of Ilford Microphen developer that I was given. Before that, I was using Ilford ID-11. Recently, I was given two litres of Kodak T-Max developer concentrate so I thought I’d give that a whirl, as Microphen isn’t really the thing to use for pull processing. Early indication is that T-Max works nicely with FP4+ but as with any film-developer combination, some experimentation is required to get the best results.

First attempt at “taco” processing of sheet film

As I had to trim the sheet film down, it no longer fits in a 120 spool. I didn’t fancy doing open-tray processing so I decided to have a go at the taco method. Basically you curl each sheet of film up with the emulsion facing inwards, pop a hair band around it and hold several tacos in a film tank.

Taco processing

Unfortunately, taco processing seems best with larger film. My tacos were a bit skinny and apparently while I was agitating the tank by inversion, the films slipped out of the hair bands and came loose. When I finished processing and looked inside the tank, all the negatives had stuck together in a clump. Three of the negatives were ruined as they hadn’t been properly exposed to the developer. Murphy’s law dictates that the three pictures I was most looking forward to seeing were the ones that came out blank. Three other photos survived, although they have large areas of uneven development.

Troopers Hill
Troopers Hill

I had problems scanning these negatives, too. As I had trimmed the film down by 4mm it no longer fitted in a 120 film holder in my scanner. I had to lay the negatives directly on the glass, and to keep them flat I put a piece of picture frame glass on top. It wasn’t ideal.

Given that I was investigating sheet film to improve my image quality, I’m not sure if that aim is achievable with the equipment I have. The difficulties in cutting, loading and developing the film mean that damage to the emulsion is more likely. I think for now I will stick to roll film and put the idea of sheet film to bed until I get my hands on some 5×4″ large format equipment. The camera is the easy bit – I’d also need a corresponding enlarger and film scanner – and they’re expensive!

Feline light metering

Cats have excellent night vision, because the pupils of their eyes can open up so wide, to let more light in. They can also see well in bright daylight because the pupils shrink and let less light in. This is exactly the same as the aperture on a camera, and it got me thinking: can I look at my cats’ eyes and use the size of the pupils to judge the correct aperture setting to photograph the cat? It might (I said might) one day prove useful if I want to photograph the cat with a camera that lacks a light meter.

First I need to do an experiment to collect some data. I need to photograph a cat in various lighting situations. I’ll end up with a collection of pictures of cat eyes in various states, and from the EXIF data saved in each picture I’ll be able to calculate the exposure value (EV) which is a single number that represents the combination of camera settings, and compare it with the diameter of the cat’s pupil.
{EV} = log_2 {frac {N^2} {t} } - log_2 frac {S} {100}
where

  • N is the relative aperture
  • t is the exposure time (shutter speed) in seconds
  • S is the ISO speed

We have two cats. Lou Lou has larger eyes but is quite camera shy. Mittens has smaller eyes but is more playful and more willing to do as instructed (as far as cats ever are). I decided to go with Mittens to make it a bit easier.

I need one picture of the target cat with a ruler held against her eye so I can measure the width of the whole iris. From that (roughly fixed) measurement, it should be quite easy to judge the diameter of the pupil from every other photograph without having a ruler in the picture by comparing with the iris.

Cat with ruler
Cat with ruler

Trouble is, cats don’t really like having things shoved in their face and Mittens kept on trying to kill the ruler. Nonetheless, I think the width of her whole iris is about 15mm. This shouldn’t vary in different lighting conditions, although sometimes the eyelid covers the edge. I’ve shown this measurement on the diagram below with the red line. The green arrow shows the width of the pupil, measured at 90 degrees from the longest measurement of the pupil and taken at its widest point. In this case the pupil is about 7mm wide.

Cat eye
Cat eye

The camera decided to expose this picture at ISO1600, 1/100, f/3.5 which gives it an exposure value of 6.3. That’s my first data point 🙂

Now I’ll collect pictures of Mittens in different lighting conditions, measure the pupil diameter and calculate the EV. In the end I took nearly 80 pictures from the midday sun through to dusk, and chose 39 of them to be included in the calculations. I excluded ones were I couldn’t easily measure both eyes, and I excluded pictures that would have caused to many identical results (I was a bit snap-happy with the camera). I heard that there is a shortage of cat pictures on the internet, so I thought I’d post some representative shots of Mittens being subjected to experimentation.

I decided to measure the diameter of both eyes in each picture and use the mean diameter to plot against the EV. I can measure the diameter of the pupil to the near half-millimetre and taking the mean might help with accuracy a bit. You might have gathered by now that this is pretty unscientific.

Feline light meter

The results are reasonably well clustered around the line. There are some outliers. There are several explanations for this:

  • The cat is looking in a different direction from the camera. The cat’s eyes and the camera’s sensor are measuring the brightness of different things.
  • The cat was photographed in front of different backgrounds which could have caused the camera to over- or under-expose differently in each setting. I should really have used spot metering and metered off the fur between the cat’s eyes, but she wouldn’t sit still enough!
  • Cats’ pupils dilate more when they are frightened or threatened. It’s entirely conceivable that the sound or proximity of my camera alarmed the cat and caused her pupils to dilate.

Other observations

  • I was surprised that the cat’s pupils didn’t get larger in low light. I was expecting to see very little of the iris at all when the EV was below 4. Maybe Mittens is faulty.
  • Mittens’s right pupil (as you face her) usually measured 0.5mm larger than her left pupil. Again, maybe she is faulty.

According to the spreadsheet, the equation of the line is

{D} = -0.82 {EV} + 10

where D is the diameter of the pupil. Rearranging,

{EV} = 12 - 1.22 D

So next time you want to photograph a cat but you don’t have a light meter on you, just remember that equation. Couldn’t be simpler – just don’t forget to calibrate your cat beforehand.

I have no idea what I'm doing

Camera chooser flowchart

I’ve been off work ill for the past couple of days, and boredom is setting in. I slept for most of today, but during the time I was awake I decided to make a Really Useful™ flowchart to recommend film cameras for various situations.

The writing is tiny, so click for the full-size version. For more info about any of these cameras, see my Cameras page.

Camera chooser flowchart

Apple tree

I recently wrote about my new camera, an Ensign Cameo, and the fact I was going to have to cut down roll film for it. Last weekend I exposed four sheets of this film, including this one. It’s the apple tree in my parents-in-law’s garden

Apple tree
Apple tree

The picture is a bit wonky because I was using a flimsy travel tripod. The screw thread is a bit knackered and doesn’t fit tightly. At the bottom you can also see the shadows cast by the metal tabs that hold the film in place. I decided not to crop them out because I like the texture of the grass, and I didn’t want to lose it.

All the same, I love the tree and I love the location. The shed and fence give it a nostalgic feel. I think I’ll photograph this tree again in future.

Ensign Cameo

Released c1928

I was given this camera by my father-in-law as a birthday present. It’s a strange cross between a view camera and a more common folding camera. It has a ground glass focusing screen and front rise, but also has a pop-up sports finder and waist-level finder. Unusually, its default orientation is portrait rather than landscape. It takes sheet film in the now-uncommon 2¼ × 3¼ format. It’s possible to buy this, or cut your own from 120 roll film. It’s my second sheet film camera (after the Instantograph) but it’s the first I can use with modern film, rather than paper negatives.

Ensign Cameo
Ensign Cameo

At a glance

Lens Fixed 100mm Ensar Anastigmat f/4.5
Film 2¼ × 3¼ sheet film
Focus Ground glass
Meter None