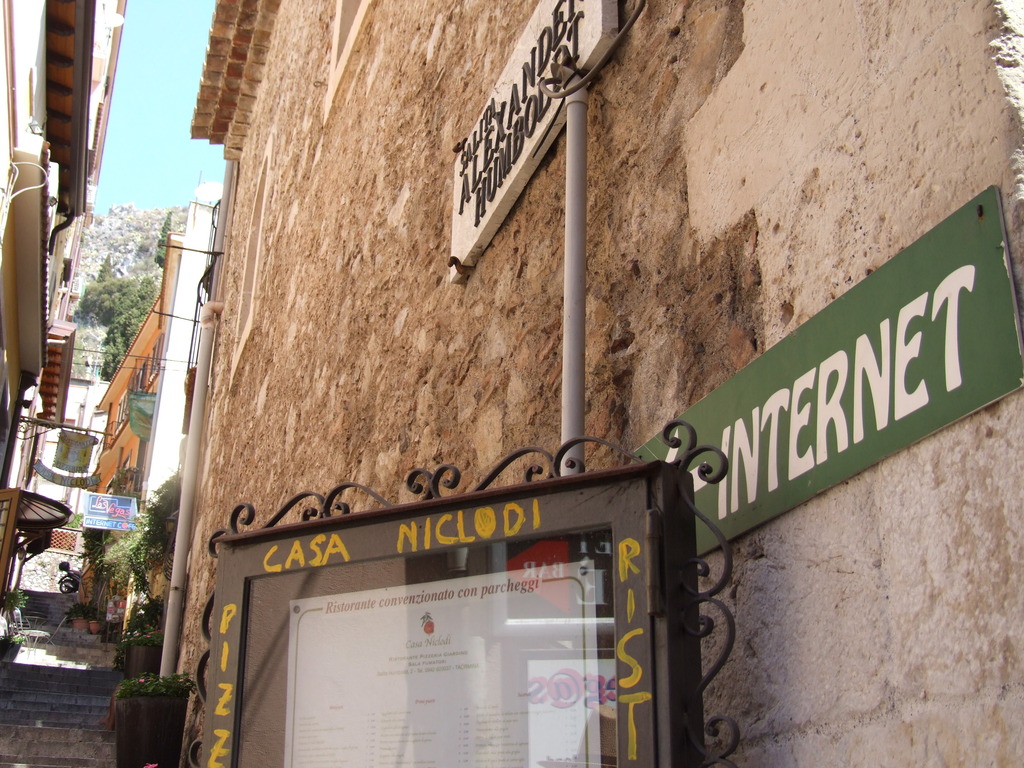
My first shot at developing – results

I must say, I’m delighted with the results from my first attempt at developing my own film.

This is the uninspiring view from my balcony that I’ve shot time and time again, mainly as a tester…
A view from my balcony

A slow-shutter view across Clifton Triangle, Bristol.

Clifton Triangle

Some mushrooms in Royal Fort Garden.

Mushrooms

A couple of shots of Hereford cathedral.

Hereford cathedral

Hereford cathedral

And a couple of shots of the new centenary sculpture in Royal Fort garden.

Centenary sculpture

Centenary sculpture

Calibrating a TFT monitor

I hadn’t realised how important it is to calibrate a monitor correctly.

My former method of “calibration” was simply to set the monitor’s contrast to maximum, and set the monitor’s brightness to a value that looked comfortable to me. I didn’t bother changing any settings in software.

But I got caught out.

Last night I took some photos and tweaked them on my PC so they looked OK. I published them and thought nothing of it. But several of my friends commented that they looked a bit dark, and when I checked the pictures out on two of the computers at work, they were indeed too dark.

My badly-calibrated monitors at home caused me to wrongly edit an image. So I read up on how to calibrate a monitor. There are many ways, but the method I’m writing about here is nice and simple.

    • If you have TFTs, they are sensitive to the angle you look at them. Tilt them so they face directly at you.
    • Turn the lights off in the room you are working in.
    • On the monitor, set the colour temperature to 6500K
    • On the monitor, set the contrast to 100%
    • Look at the gamma black chart below. Adjust the brightness on the monitor until:
      • Bar A is just visible at the bottom
      • Bar B is visible from the bottom to about halfway up the chart
Gamma black chart
Gamma black chart
    • Absolute black on your monitor is now calibrated.
    • Find how to adjust the gamma on your computer. For example, I am running the proprietary nVidia X driver on Fedora and it comes with a convenient control panel. You can use Adobe Photo Shop to adjust the gamma, or xgamma under X Windows on Unix/Linux systems.
    • Now look at the gamma chart below. Sit as far as possible from the monitor and squint so the lines blur together.

  • Adjust the gamma on your computer so the shade of grey completely across the gamma column is the same at 2.2.
  • The monitor is now calibrated.

References

A quad-light portrait

This week’s challenge from Stu was Limitations.

Your challenge, should you choose to accept it, is to come up with the most fantastic idea. What would you shoot if time, money and skills were no issue? Then work within your limitations to realise your dream. See what unique surprises occur.

I’ve always fancied taking some proper portraits, so I decided to have a go.

If time, money and skills were no issue, I’d be using a spacious studio with fantastic equipment, a willing model and, err, the experience to pull it all together. As it happens, I’m taking pictures in a tiny flat in Bristol with some tat I got off eBay, and my model would rather be watching Emmerdale. Oh, and only I looked up how to light portraits on the web this morning. But here’s what I came up with.

Hannah

After a few shots, Hana decided she didn’t like the flashes very much…

Hana

… so we decided to change places.

Me

Me

And just to prove that it was rather cramped, here’s how I did it.

My setup

  • Backdrop: black bedsheet from ASDA
  • Left: main flash with shoot-through umbrella
  • Right: snooted flash to light the face
  • On top of camera: fill light
  • Behind the chair: backdrop flash. Probably useless on a black sheet, but I did previously try this with a grey sheet (visible behind the black one).

Upgrading to Windows 7

I don’t use Windows much, except on my home media centre. For a while I’ve been running Vista and I’ve generally been impressed with the Media Center application.

I read about Windows 7 and was pleased to hear about the Ultimate Steal protomotion for students (and those with .ac.uk email addresses). The high prices of Vista and of Windows 7 off-the-shelf were a real off-putter for me, but the Ultimate Steal price of £30 for an upgrade seems a reasonable price to me. I’m prepared to pay £30 for a product I will use most days.

So I downloaded the 64-bit upgrade for Windows 7 Home Premium. Unfortunately, I hadn’t bothered to read that it’s not possible to upgrade a 32-bit Vista to a 64-bit Windows 7.

So I converted my DigitalRiver upgrade package to a bootable ISO by following this guide. Booting the Windows 7 installer worked fine – however it rejected my product key. It didn’t give a reason, but I assumed it was because my key covered upgrades only, and not clean installs.

Well, my only choice for using my product key legitimately was to “obtain” a copy of 64-bit Vista from somewhere. I installed Vista Home Premium x64, choosing not to enter a product key and not to activate. I immediately ran the Windows 7 upgrade tool and my product key was accepted. The upgrade took a while but was successful.

What a nuisance!

How to develop black & white film

As my interest in photography progressed, it was only natural I’d one day end up wanting to develop film. I developed my first roll last night by following this guide. It was extremely helpful – but there were a few points it didn’t cover. I made notes while I was developing, and so here’s a modified version of the guide, including my advice.

If you’re interested in seeing what I was able to achieve, some samples are here.

What you’ll need

These are the items in my inventory. I’ve bought “proper” gear where necessary but most of the kitchen-type items came from a supermarket for pennies. I bought the developing tank from eBay, and the same seller was also offering a kit with all the chemicals, listed as Ilford Black & White Film Developer’s pack

  • Developer
  • Stop bath
  • Fixer
  • Wetting agent (cheap washing up liquid will do)
  • A developing tank
  • 3 water bottles – preferably one litre
  • 3 plastic jugs – at least one litre
  • Funnel
  • Kitchen timer (get one with a mechanical knob rather than a digital one)
  • Clothes pegs
  • A place to hang the negatives sufficiently high that they won’t touch the ground
  • A dim light. Colour doesn’t matter- perhaps a torch with half-flat batteries.
  • Scissors
  • Bottle opener
  • Something to stir the chemicals with. I used old picnic cutlery!
  • A storage box for all of the above, with a lid.
  • Room thermometer

    Preparation

    If this is your first time developing a film, there are some things you should do first. You should probably do them before every time you develop a film, even if you’ve been doing it for years 🙂
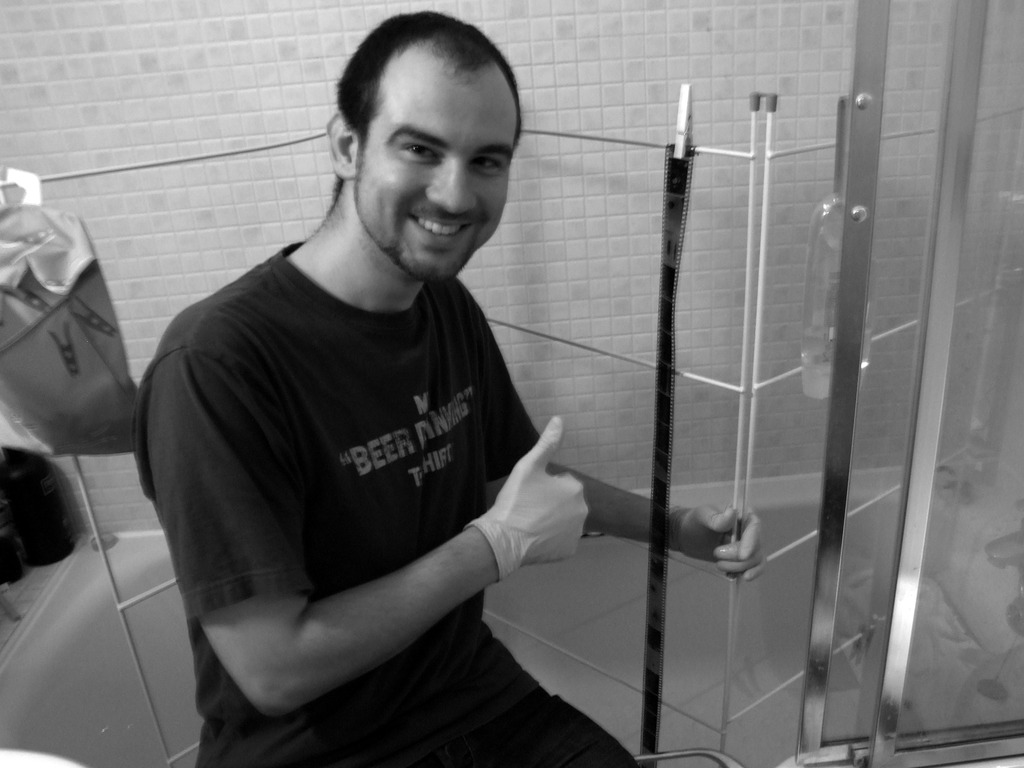
  1. Familiarise yourself with how to mix each of the chemicals – how much concentrate to how much water, how much you want to end up with, etc.
  2. Make a note of how much of each chemical your tank requires you to use.
  3. Calculate and make a note of how long each of the three phases should take.
  4. Label each of your empty bottles and jugs with a permanent pen so you know which chemical belongs in which jug.
  5. Loading the film

  6. Take film, bottle opener, scissors, developing tank and reels into a lightproof room.
  7. Organize the materials on a table. You’ll need to know where each item is in the darkness.
  8. Turn off the light.
  9. Open the film canister at either end with the bottle opener.
  10. Take the film out of the canister and cut off the leading tab at the end to create a straight edge.
  11. Load the film onto your tank’s spool. The method varies depending upon your tank, but I found my Paterson System 4 tank easy to use.
  12. Pull or cut the end of the film off the spool and remove the tape.
  13. Drop the loaded reel into the developing tank and secure the lid.
  14. Turn the light back on.
  15. Developing the Film

  16. Mix chemicals according to directions.
  17. Put the right amount of each chemical into the three jugs.
  18. Put any leftover chemicals into the plastic bottles for storage.
  19. Technically with a good tank you should be safe to have the light on, but it never hurts to be cautious, so at this point I switched the main light off and worked by the light of a dim torch, pointing at the ceiling to softly illuminate the whole room. If you wait a minute or two, your eyes will get accustomed to the low light.
  20. Take the top off the developing tank.
  21. Pour the pre-measured developer into the top of the tank.
  22. Tap the tank against the counter to dislodge bubbles.
  23. Agitate the tank by slowly inverting it and turning it back over for the first 15 seconds.
  24. Repeat every 30 seconds for the recommended time (usually 5 to 10 minutes).
  25. Pour the developer back into the jug.
  26. Pour stop bath into the now-empty developing tank.
  27. Agitate the stop bath and let stand for 1 minute.
  28. Pour out the stop bath and replace with fixer.
  29. Agitate the fixer for 15 seconds and then for 15 seconds once every minute for the allotted time.
  30. Pour the fixer back into its jug.
  31. Remove the lid of the tank and run water into the tank for 15 minutes.
  32. Add wetting agent to the water to expedite drying. If you are using washing up liquid, add a tiny drop to the water in the tank and let it sit for a minute.
  33. Remove the film from the tank.
  34. Gently pull the film off the reel.
  35. Attach a clip to the top of the film and hang it up. I hung mine from a clothes horse in the bath.
  36. Attach another 2 or 3 clips at the bottom, to prevent the film from curling as it dries.
  37. Hang the film in a dry, dust-free area.
  38. I don’t know how long it really takes them to dry, because I went to bed at this point. When I woke up, the film was dry and straight.
  39. Cut the film into appropriate length chunks for your scanner / envelopes / etc.
  40. Store dry negatives in plastic negative sleeves.
  41. Afterwards

  42. You can usually re-use the developer several times (although it takes longer each time). Store it in a clearly labelled bottle.
  43. You can re-use the fixer. Store it in a clearly labelled bottle.
  44. Rinse all of the “dirty” components in warm water and dry them thoroughly before putting them away in a clean place.

Tips & warnings

  • The optimal temperature for most developers is 20°C. Processing at a significantly higher or lower temperature will result in soft, easily damaged film or flat negatives. Some developers have a chart on the packaging to give the time correction if your room temperature is different from this.
  • Do not remove the top of the developing tank to look at the film until after the fixing stage.
  • Use storage bottles that are just the right size for the amount of developer you are mixing. Label a chemical with its name, date and dilution.
  • Begin timing each step as you pour chemicals into the developing tank, and start draining chemicals 10 seconds before the time is up.

Mobile phone users cannot walk in straight lines

Anyone who has cycled around a city before will not be surprised by the findings of this research.

Pedestrians are probably the most dangerous element of my daily commute through central Bristol. They may be lighter than cars, but they stop more suddenly and change direction more unpredictably.

On a regular basis, pedestrians who have looked directly at me still fail to see me, and walk into the road anyway. As often as not, these people are using mobile phones or iPods.

I could go on forever about unobservant or careless people, but I won’t. Today. 😉