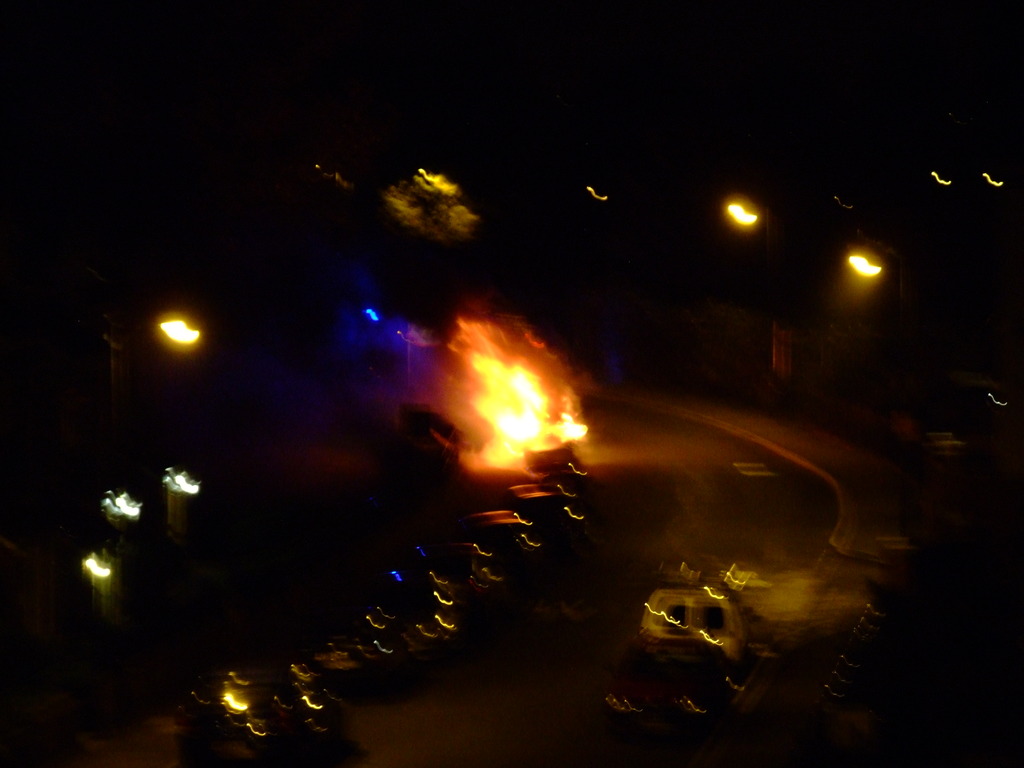
Last night I was woken by noise and flashing blue lights, so I immediately went to the window. I saw a car on fire in the street below my flat, so I whipped my camera out. It was a bit dark for decent photos, but this is what I saw. I’ve no idea how long the fire had been burning when the fire service arrived, but I guess not long, given that the fire station is about 200m from here.
At one point the flames reached about twice this size but unfortunately I was fiddling with my camera’s settings to try and get a sharper image.
The fire service quickly brought the flames under control and eventually put them out.
You can see the ghostly outline of a fireman in this picture, backlit by the blue lights of the fire engine.
The car is still there this morning, just a shell of its former self. I hope they remove it soon – it’s an eyesore on an otherwise pleasant street.
Today my new 35mm scanner arrived – a Plustek OpticFilm 7200.
The 7200 is the bottom of the OpticFilm range, but perfect for my needs. All of the scanners in the range have the same optical resolution, but some offer features such as iSRD infrared dust and scratch removal, or MultiExposure where the scanner makes 4 images and combines them to reduce noise.
As I’m scanning brand new negatives, I don’t plan to scratch them or let them get dusty. The MultiExposure might have been nice, but it nearly doubled the price of the basic 7200 model, which set me back just £115 from Amazon.
First impressions
Opening, the box I was impressed straight away. Obviously the basic were there: the scanner, power and USB cables but there was also a padded carry case.
The build quality of the scanner definitely puts it in the realm of home users but it’s perfectly fine.
There are two plastic trays: one that can take four slides and one that can take a strip of up to six negatives. I was a little disappointed by the negative tray, as it didn’t have the “dots” to help the film keep aligned and it can be tricky to get the film into it, especially if it’s new film that still has a tendency to curl.
When sliding the trays into the scanner, you can feel it “bump” into notches so it sits in the right place. These notches aren’t as precise as I would like and you can’t always tell if you are exactly in the right place until you’ve done a preview scan.
The software
According to this page, the OpticFilm 7200 is not supported by any SANE backend, and therefore cannot be used with Linux. Shame.
Installation on Windows was easy enough, although the supplied SilverFast software has a distinct “Windows 3.1” look and feel about it. It works well enough though and after a few minutes of playing I worked out most of the important features.
Image quality
So far I’ve scanned two rolls of film and I’ve been impressed with the results. I’ve been scanning at 3600dpi which gives a resolution of round about 17-18 megapixels. Saved as a TIFF, this takes up about 55MB.
The built-in sharpening feature does a good job – I can’t tell that my scans have been sharpened which is a relief. Some sharpening software overdoes it and you end up with unsightly artefacts.
The colours are good so long as you’ve done all of these:
Chosen the right film manufacturer
Chosen the right film type
Chosen the right ISO film speed
Done a prescan to allow SilverFast to calibrate itself
In extremely over- or under-exposed photos, the software can do some funny things with the exposure. But I guess the moral of that story is to expose your photos properly…
The photos I’ve scanned so far have either been on old, grainy film or not focussed properly so it’s hard to tell how sharp the scans are. Except that some of my old negatives from a disposable camera had scratches, and these showed up lovely and sharp in the scans!
Conclusion
This scanner is fantastic value for the money.
Sharpness, colours and dynamic range are all very good.
Serious users should consider getting one of the higher scanners with iSRD and MultiExposure which will help with image quality even more. And they still don’t cost ridiculous amounts.
Sample
I took this picture recently with a Canon AE-1 Program 35mm SLR, using a 50mm prime lens and ISO400 Fuji Superia film.
Unfortunately the lab who processed the film also scratched it, which is pretty annoying. But it demonstrates how sharp the scanner is, and highlights the reason for buying a scanner with iSRD.
Today I wrote an email in Thunderbird and clicked send. It gave me this message:
It has never asked me this before, so I wonder what prompted it to do so today. Turns out new builds of Thunderbird scan your email for keywords such as attachment or attached and reminds you to check for attachments if you used these words.
In my email I had said “It’s in my name because it’s attached to my account” so this must be what triggered it.
Pretty nifty – the number of times I’ve accidentally sent an email without its attachment…
On the 4th October I am taking part in a cycle ride from Bristol to Bath (and back!) with my family and Hana, to raise money for Marie Curie Cancer Care.
We would really appreciate it if you could sponsor us via my JustGiving page so we can reach our fundraising target.
Filters are pieces of glass that screw onto the front of your camera, and they can cause all sorts of unusual effects to your photos.
The good news is that you can buy filters cheaply from eBay (and of course, less cheaply from the high street, if that’s how you like to buy). Before buying, you’ll need to know the diameter of your camera’s lens. This should be written somewhere on the lens barrel or often around the glass on the front of the lens. Look for something like Φ58mm, and then check that your lens has a fine screw thread inside the rim. You’ll need this for the filters to screw into.
Of course each camera (and potentially each lens, if you have an SLR) may have a different lens diameter. If you’ve built up a large collection of filters and you plan on changing camera, never fear! You can buy adapter rings that allows you to use the “wrong” size filters on your new camera.
So let’s have a look at the various kinds of filter you can buy. This list is by no means exhaustive!
These filters are designed to filter out UV light, which is invisible to the eye but can cause haze in outdoor photos.As they are so cheap, it’s worth keeping on one the front of your camera permanently to prevent the lens from scratches.
Infrared (IR)
IR filters remove all light except infrared light. It can give an eerie night-vision type effect, or give interesting photos of hot objects – such as the sun or a light bulb. Example.
ND filters simply cut down the amount of light entering the camera. Think of them as sunglasses for your camera. With an ND, you can set a longer exposure in daylight, or it allows you to keep the same shutter and open the aperture a bit wider for increased depth of field.ND filters come in a variety of darknesses. The most common types are ND2, ND4 and ND8, which allow through 1/2, 1/4 and 1/8 of the light respectively. If you’re not sure which to buy, try an ND4 first.
These filters are almost clear at one edge, and dark at the other edge, fading slowly across. You can use a graduated ND to darken and enrich the sky while leaving the foreground unaffected.
Skylight filters reduce the bluish tinge that can occur when shooting in daylight.
Graduated colours
These are graduated filters with a colour. The most common ones are blue and orange – for emphasising the colours if the sky during the day, or at sunset.
These are the rules of thumb that I’ve come up with through experimentation. Hopefully they’ll be useful:
Always keep a UV filter (or at least some other type of filter) on the lens to prevent scratches
Consider replacing the UV filter with a Skylight filter when shooting outdoors to avoid a blueish cast
Use an ND filter when shooting in very bright light to avoid overexposed areas
Use a CPL or a GND when shooting landscapes with large areas of sky, to make the sky dark and rich
Consider using a diffuser when taking close portraits to soften skin tones
Any of the other filters are generally for novelty effects and are not subtle
Try to use only one or two filters at any one time. Every filter you add can decrease the quality of the lens system, and if you stack up three or more filters, you can usually see the rim of the filters in the photo.
So if you fancy trying something different, I recommend getting some cheap filters from eBay and seeing what interesting effects you can come up with.
Next time, I will write about basic photo editing on a computer.
Most cameras, even compacts, have at least some manual settings that you can adjust if you want to explore what your camera can do. As I mentioned in my introduction, the three most common settings to play with are the aperture, shutter speed and ISO.
What the settings do
Let me go into a little more detail about these.
Setting
Low value (approx)
High value (approx)
Aperture
f/3 – large aperture
Lets lots of light in – good for dark situations where you don’t want to increase exposure time or ISO
Large aperture increases the depth of field (makes things go out of focus more quickly as they move towards or away from the camera
f/12 – small aperture
Can be used to reduce the amount of light entering the camera
You can also use an ND filter1 to reduce the amount of light
Very small aperture of f/10 or smaller can make points of light become star-shaped
Smaller apertures increase the depth of field so more of the photo is in focus
Shutter speed
1/4000s – short exposure or fast shutter
Use a fast shutter in bright sunlight
Use a fast shutter to freeze a point in action, e.g. sports
30s – long exposure or slow shutter
Exposures of longer than 1/250s will probably need a tripod or at least a place to rest the camera on a firm surface
If you are increasing the exposure simply to capture more light, consider making the aperture larger instead
If you want to take a long exposure of a moving object in bright light, make the aperture small and use an ND filter
ISO
100 – low ISO
Camera less sensitive to light
Use low ISO in bright conditions or for long exposures
1600 – high ISO
Camera more sensitive to light
Use in darker situations where you don’t want a long exposure
Be aware that ISO 800 or more can cause speckly “noise”. This can happen with digital or film!
[1] Don’t worry – we will discuss filters in a later post.
How you can use the settings
So know you know a little bit of the basics, I can say something about the different modes on your camera.
Taking full manual control of the camera can be a little daunting and can produce unpredictable results until you are familiar with the camera. But most cameras semi-automatic modes known as shutter priority (or S for short) and aperture priority (or A for short). This allows you to set one value, either the shutter or the aperture, and the camera picks the other settings for you. Full manual is usually known as M.
This table shows what combinations of settings are available on my camera.
ISO
Shutter
Aperture
Auto
Either auto, or you choose
Auto
Auto
S
You choose
You choose
Auto
A
You choose
Auto
You choose
M
You choose
You choose
You choose
Examples
The best way to explain when you should choose a particular mode and what settings you should choose is by example – and experimentation, of course.
Blurred photo of moving cars on a sunny day
To achieve blur we need a relatively long shutter speed, and the challenge is compensating for this long exposure so the picture isn’t overexposed.
Mode
M
ISO
Choose the lowest available ISO
Shutter
Choose the shortest shutter speed that you can get away with while still achieving the desired blurred effect. Maybe 2-5 seconds.
Aperture
Choose the smallest available aperture (largest F number)
Notes
You will need a tripod, and probably an ND filter to limit the amount of light.
A car on the M32
Blurred photo of moving cars at night
This is actually much easier than blurred photos by day as compensating for the long exposure in low light conditions is easy.
I recommend…
I used…
Mode
S
S
ISO
Choose the lowest available ISO
80
Shutter
Choose a really long shutter speed – 10 or 30 seconds perhaps
10s
Aperture
Auto
Auto: f/10.9
Notes
You will need a tripod, and possibly an ND filter to limit the amount of light for very long exposures
M32 by night
A closeup of a flower
The primary objective here is to open the aperture wide to decrease the depth of field and cause the background to be out of focus.
I recommend…
I used…
Mode
A
A
ISO
Choose a medium ISO like 200. Adjust according for the daylight conditions.
80
Shutter
Auto
Auto: 1/340s
Aperture
Choose a fairly large aperture
f/2.8
Notes
Daffodils outside St Paul’s Church, Nuneaton
Sports and action
The object here is to keep the shutter as fast as possible, to freeze the action without blur.
I recommend…
I used…
Mode
S
S
ISO
Choose a medium ISO like 200. Adjust according for the daylight conditions.
80
Shutter
Choose a fast shutter such as 1/400s or less, according to the speed of the object you want to freeze, and the light conditions.
1/450s
Aperture
Auto
Auto: f/7.2
Notes
M32 near Bristol
The best thing you can do is practice, and try new things. Chances are you’ll go to your local motorway bridge and take tens of photos. Some will be good, and some will be awful. But you’ll quickly learn what works for your camera.
If you can’t remember what settings you used to take each picture, you can find out on your computer later. If you’re on Windows, right-click on the image file, click Properties and click on the Details tab. Scroll down to Camera you’ll see the details, like in the screenshot below.
This isn’t my computer – Hana likes pink on hers
Next time, we will go over how to choose and use filters in your pictures.
I started getting into photography a couple of years ago, and I have been helped along the way by a colleague and various books and websites. I’ve been learning about cameras continuously, and a few months after I got interested, my brother took an interest too.
I made some notes about basic camera settings for him, which he says he found very useful. So I’ve decided to try and write them up a bit more formally for my blog, in the hope that they will be useful for someone.
I wrote this guide mainly using my Fuji Finepix S9600, with the intention that my brother would use it with his Fuji Finepix S5800. Some of the numbers may vary, but pretty much all of the advice is transferable between digital cameras and even 35mm film cameras.
For someone who has never used manual settings on a camera before, there are a few terms you need to be familiar with.
Aperture
Also known as F-stop. This is the size of the hole behind the main lens of the camera. It can be adjusted in size to let in more or less light.
Shutter speed
Also known as the exposure. This is simply the amount of time that the camera exposes for. Long exposures mean blurry photos while short exposures can freeze action shots in time.
ISO
This is the sensitivity of your camera to light.
In the next post, I’ll talk about the modes on your camera, and how they come into play with the three concepts I’ve just explained.
Last week I was given a Canon 35mm SLR. I’ve already shot a roll of film to test out the camera and today I received the prints and a photo CD. Here are my favourite shots from the roll.
The colours are nice, and the lens is nice.
Flowers
This indoor portrait of Hana is somewhat underexposed. I could have done with some more light really.
Hana
This shot of the physics department was disappointingly grainy given that it was taken in sunlight.
Department of physics
In my opinion, these shots are all rather grainier than they should be. I don’t know if it’s because I used an old film, or because they are underexposed, or for some other reason. But I will keep trying!