Tilt-shift miniature fakes in GIMP

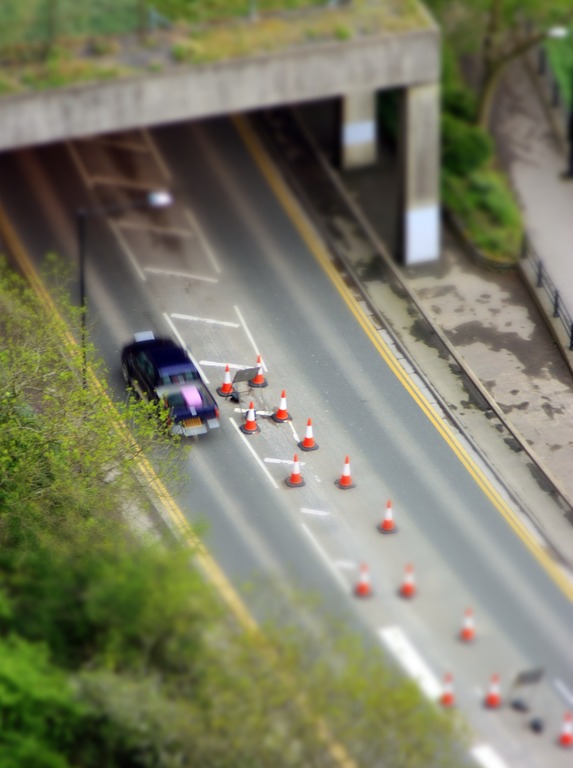
As posted on my photo blog yesterday, I faked a tilt-shift miniature model of the A4 in the Avon Gorge.

I’d never tried it before, so I followed this guide on how to do it. It was pretty straight forward, but I’ve recreated the steps here, with my own modifications.

Step 0: Take a photo

Start off by taking a photo to make into a fake miniature. The best photos are taken looking down on your subject, as a human observer would see a model on a table, for example. Include subjects such as people or cars to give a sense of “scale”.

Strong shadows also lend themselves to the effect, as you may well look at a model railway using a single desk lamp, for example.

Step 1: Adjust colours

Most models have more vivid colours than real life, due to their glossy paint. There are several ways you could achieve this.

  • Go to Layer > Colors > Curves. Click at about x: 130 y: 210. Move the curve around until you get what you are looking for.
  • Or, go to Colors > Auto > Color Enhance. This is the lazy man’s way of boosting the saturation.

You might also like to enhance the contrast to make the shadows stronger.

Step 2: Set gradient mask

Open the image and toggle the switch mask on. There are three ways to do this:

  • Click the dotted box in the bottom left had corner of the open image, or
  • Got to Select > Toggle Quick Mask, or
  • Press Shift+Q.

The image will now be pink. Click on the Gradient tool. It looks like a square with a grey gradient applied to it. Set the gradient shape to Bi-linear.

Step 3: Apply mask

Pick your focal point. Decide what areas of the image you would like to be in or out of focus. Click in the center of the area you would like to be in focus and drag a line perpendicular to the direction you want to be masked, i.e. dragging the line from the “in focus” region to the “out of focus” region.

Play around with the centre, size, and angle of the mask until you get what you are looking for. Toggle the switch mask off.

Step 4: Apply blur

GIMP doesn’t have Lens Blur like Photoshop (although it can be installed). We have to make do with Gaussian Blur. Go to Filters > Blur > Gaussian Blur. In the Gaussian Blur window click on Preview and maximize the window so that you can see what you are doing.

Play with the blur radius until it looks right. A Blur radius between 5.0 and 10.0 seems to work most of the time, although I found a radius of 50.0 was needed to achieve a decent effect in my image. It depends on the resolution of your camera.

When you have the blur right, delete the quick mask by going to Select > All.

Toytown

Recently I’ve heard quite a lot about “tilt-shift” photography, or “fake miniature” photography. Done with a proper tilt-shift lens, you can mess with the lens to make a real scene look like a model. It’s also possible to fake the effect in post-processing, which is what I’ve been concentrating on since I don’t have a tilt-shift lens.

My friends Paul Seward and Dave Musson have also recently published fake tilt-shift photos, of Royal Fort House and Acocks Green railway station respectively, and last night I also looked through this page of 50 beautiful examples of tilt-shift photography.

Today I set out to take a photo that could be turned into a fake model. It’s not just about editing on a computer – you have to start with a photo taken from a high perspective, as if you were looking down upon a model. So I headed for the Clifton Observatory, which overlooks the Clifton Suspension Bridge and Avon Gorge.

I took this photo looking down the cliff onto the A4 that passes beneath, beside the river.

Despite it being a mediocre photo, I’m quite pleased with the result. I will definitely revisit this concept, and working on a university campus I have access to lots of tall buildings. Watch this space!

Randomness

The theme of this week’s Photo Challenge is Randomness. As usual I’ve tried to take as many photos on the theme as possible, with the intention of picking my favourite shortly before the deadline.

I think randomness can have two main interpretations – something that is random in nature, or the more modern meaning of some kind of generalised stupidity.

The latest buzzword used amongst mindless teenagers as a way of showing just so utterly irreverent their predictable sense of humour is. Particularly dominant among English teens and University students, the word “random” or the act of being “random” is a desperate plea for others to recognise how totally against the grain of the norm you are and that you’re really crazy and out there. Trouble is, being “random” is predictable, boring, moronic and extremely sad indeed.

Urban Dictionary

Working on a university campus, I think I encounter enough irritating randomness on a daily basis, so I decided to concentrate on the former. I tried to find random things in nature that I could point my camera at.

The first “random” thing that sprung to mind was rolling a die or flipping a coin. Unfortunately I don’t have any dice but I did find a 10p coin. I put the camera and two flashguns on tripods and used a handheld trigger to fire the camera. Unfortunately it was much harder than I had imagined to fire the camera at the right time to capture the flipping coin (no pun intended!). Out of about a hundred shots, only a handful even had the coin in the shot, and most of those were unusable for one reason or another. This was the best one, although I’m still not pleased with it. It’s too dark, and not gripping enough.

In the past I have tried taking photos of smoke and had decided to revisit it one day. Smoke seems to move in a fairly unpredictable way, so it seemed to fit the randomness theme. I ran into many of the same problems as last time. I tried to use a second flashgun to provide twice the light, but I only have one snoot and the second flash illuminated the backdrop, so I had to turn it off.

I’ve seen fractured ice before, and I like the random effect of the crack lines. I attempted to crack ice cubes with a hammer but it was hard to smash them in a “pretty” way. They also start to melt seconds after being taken out of the freezer, and using an SLR with macro extension tubes and manual focus is a fairly time-consuming exercise, so most of the sharp fractures had melted before I was able to capture them.

This is the best ice photo. You can see my ring flash reflected in a couple of places, because the ice had melted enough to become smooth, reflective water.

Last but not least, I attempted some photos of small bubbles. These are just washing-up suds in a wine glass.

BluRay playback on Windows 7

Recently I upgraded to a 1080p screen and a 5.1 speaker set to compelent my Windows Media Center home theatre PC. Suddenly those low-quality 700MB DVD rips with stereo sound and about as many pixels as a Nokia phone from the last millennium don’t seem so great. It was time to go high-definition.

I downloaded a slightly compressed BluRay rip, but it was 15GB and took a week to download. My ISP seems to be rate-limiting filesharers these days, which doesn’t help. I searched for legal HD movie downloads but I couldn’t find any in the UK. Even if there were such a site, there’s still no getting round the fact that a good quality video is going to be at least 10GB.

So I decided to buy a BluRay drive and some discs. I popped the SATA drive into my media PC and it was immediately detected. So I put a BluRay disc in the drive, but Media Center said that software had to be installed to play BluRay discs. That’s OK – not entirely unexpected and hopefully just as simple as installing any other video codec.

The BluRay drive came with a CD of software, including Cyberlink PowerDVD, which said it could play BluRays. So I installed it, and it can indeed play BluRays. Unfortunately it offers no integration with Media Center, and to play a BluRay you have to scrabble around on your hands and knees with the keyboard and mouse.

After some searching online, I discovered an app called TotalMedia Theatre. Several people in home theatre forums had recommended it as an app that sort of integrates into Media Center. It’s a bit ugly because it minimises Media Center and launches its own splash screen before starting to play the BluRay, but at least it doesn’t require manual intervention.

Getting 5.1 audio out of TotalMedia Theatre took a bit of prodding at the settings, and at the buttons on the front of my Sony receiver, but it seems to be fine now. So, my first high-defition, surround-sound BluRay experience tonight will be to watch… erm….  Frost/Nixon. A dialogue-driven political drama. Never mind!

Efficiency

I bought a BluRay-ROM drive for my media PC this week, and so I decided to bump-start my collection of BluRays.

I dredged through the bargain movies at Play.com and ordered ten of them.

Much was my surprise when they started arriving today and I discovered that they were individually wrapped!

I can’t understand how they can possibly save money by using ten cardboard packets and ten orders with the courier. It seems to me to be more efficient to pick the ten discs in the warehouse, put them in one box and post the box off.

Not to mention the cost to the environment (or perhaps more importantly, perceived cost).

Infrared photography

When I first started getting into photography a couple of years ago, I wanted to have a go at everything. I bought the cheapest infrared (IR) filter I could find on eBay and was delighted to find that my then camera, a Fuji S9600, was slightly sensitive to very deep red, and IR. I don’t think it was supposed to be, but it enabled me to take IR photos of outdoor scenes, and very hot objects, such as this light bulb.

When I traded in the S9600 for a Canon 450D, I was slightly disappointed to find that it wasn’t at all sensitive to the same range of IR and/or deep red. There are companies that will do an IR conversion, which involves taking the camera apart and removing its internal IR filter. It’s expensive, and it’s pretty much a one-way conversion.

Then I realised there was a cheap and practical alternative that had been staring me in the face the whole time. My 35mm SLR.

IR film is several times more expensive than regular film, but still vastly cheaper than digital IR photography. I bought a roll of Ilford SFX200 and it was about £8.

I read about how to correctly expose IR film and frankly it sounds confusing. Lots of people recommend using a light meter, but then you have to take into account the filter which is present on the camera but not on the light meter. It’s anybody’s guess how many stops you need to compensate for the IR filter.

It’s also a shot in the dark (no pun intended!) as to the ratio of visible light to invisible IR light. This varies with the time of day, what the light is falling upon, and about a million other things.

I wanted to shoot one or two frames, see the results, and then make sure I was doing it properly before shooting a whole film. Unfortunately that’s not easily possible, so I’m just going ahead and shooting a whole 36-exposure roll. As I write, I’m about halfway through the film.

The good news is that my Canon AE-1’s light meter appears to be sensitive to IR light. That is, with the IR filter on, the internal meter appears to work properly so I can simply use the camera as normal. I verified this with a quick back-of-the-envelope calculation to compare the meter’s behaviour with and without the IR filter. It seems about right.

So here’s hoping that this fantastic little camera will produce me 36 interesting IR photos. We will see – watch this space!

Architecture through a fisheye

This week’s Photo Challenge is architecture. I want my photo to be a little bit different from everyone else’s so I decided to use my fisheye lens. Building almost always have straight edges, so a curved and distorted lens can really make things interesting.

One of the criteria of this Challenge is to take only one photo of each building – so this is what I’ve done. (Although I’ve taken photos of lots of buildings).

It’s a long way to… Utrecht

I was just considering the possibility of visiting a friend in Utrecht. With the flights currently grounded, I thought it might be a nice idea to get the Eurostar or ferry to Calais and cycle from Calais to Utrecht. I wasn’t exactly sure how far it would be, so I checked on Google Maps.

The shortest driving route from Calais to Utrecht is 337 km. That’s doable on a bike in a few days. However, being a car route, it was sticking to the major roads so I selected the walking option which I thought might choose quieter roads that would also suit a cyclist.

Apparently the quickest (not shortest) route on foot is 1,049 km. Unbelievably, the map shows that you are to go via the UK twice.

Calais to Utrecht

I suppose the implication is that it’s quicker to take the ferry for the long stretches than walk. The only segments of that journey to be undertaken on foot are a short stretch in Kent, a short stretch near Brugge and the home straight into Utrecht.

The shortest walking route still goes via Kent but makes you walk from Oostende to Utrecht.

I will probably end up getting the ferry to somewhere in Holland and cycling just the last stretch.

Steam trains

Today I cycled to the Avon Valley Railway, somewhere between Bristol and Bath, and accessible via the Bristol-Bath cycle path.

Being a sunny Spring day, the steam trains were running and there were plenty of passengers and spectators. I took a few photos that I’m pleased with – all the better that I was using black & white film for that vintage feel.

It was also the first time that I’ve properly used my new 135mm prime lens, and it’s fantastic.

Sort of train related, here’s the Staple Hill tunnel – free of trains and now part of the cycle path.

And finally, not at all train-related, but from the same roll of film, a deliberately out-of-focus shot of some street lights…

… and a sizzling barbecue.

How to waste £400

I dropped my iPhone 3GS this week. It fell perfectly face down on the pavement, and the glass front shattered.

The screen still works perfectly, and so does the touch-screen. Unfortunately some of the shards of glass are loose and they have an unpleasant tendency to stick in your thumb when you swipe to unlock the phone.

I will almost certainly have to pay for the repair out of my own pocket – and maybe even buy a whole new handset. Currently all of the iPhone handsets retail for over £400.

Broken iPhone
Broken iPhone