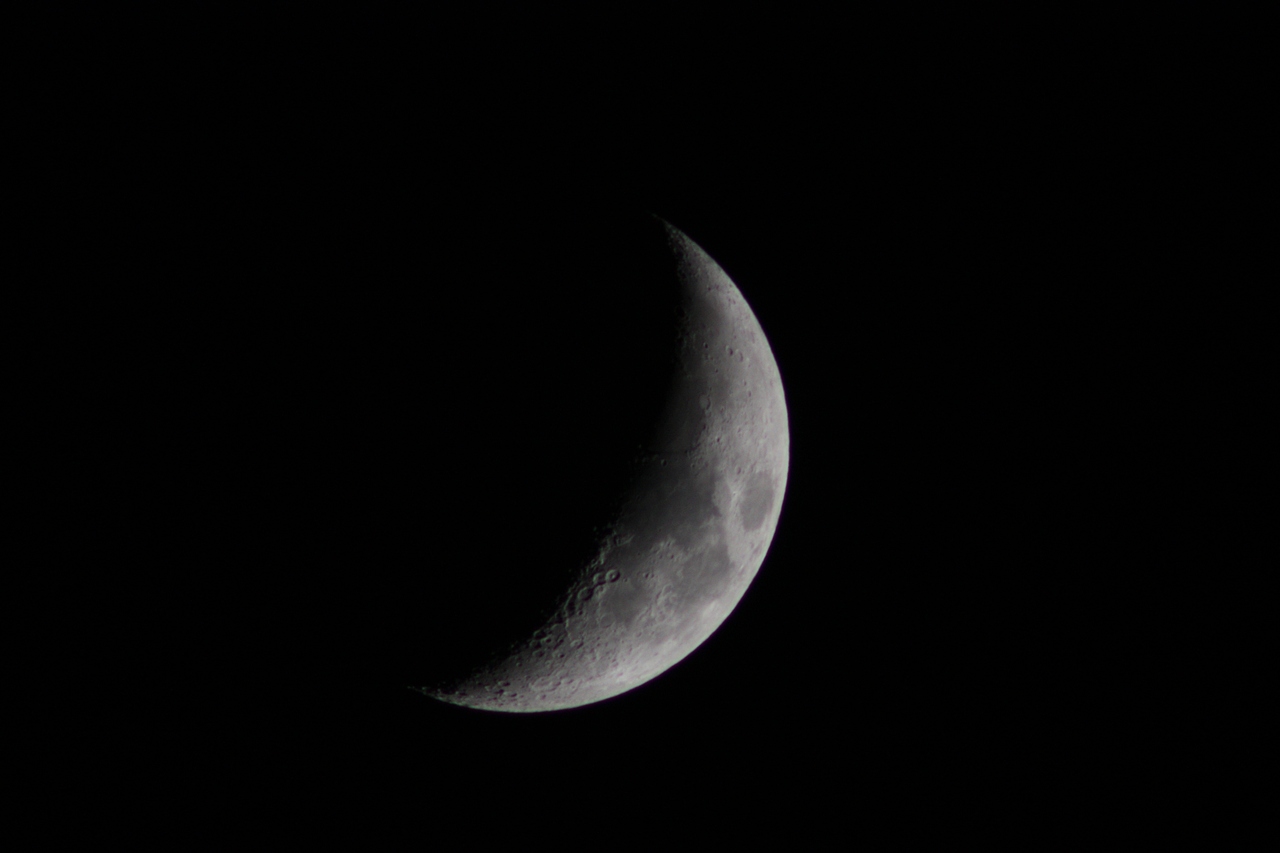
Yep, it’s the moon again – but this time through my new lens. It’s a Tokina 400mm f/5.6 prime for Canon FD mount, with 2× teleconverter, mounted on my Canon DSLR with a corrective adapter.
For those who don’t know or care about lenses – this is my zoomiest lens so far.
I also stacked a few separate exposures with ale to reduce the noise and increase sharpness. Other than this, there was very little post-processing.
In 1987, Canon introduced their new autofocus-capable EF lens mount for their EOS series of cameras – including today’s digital SLRs. It was incompatible with the older manual focus FD lens mount. The flange focal distance of the newer EF lenses is slightly longer meaning that an adapter for mounting FD lenses on an EF body must contain an optic to allow infinity focusing. This immediately means the image quality will be affected by the adapter. But to what extent?
I bought a Kood adapter (although there are many, many brands available) to use my FD lenses on my EF-mount EOS 450D camera. For £15, I thought it would be a fun way of getting some extra use out of my FD lenses, even if the quality wasn’t great.
Kood FD-EF adapter
The competitors
I decided to do a side-by-side comparison of my Canon 50mm f/1.8 lenses – FD and EF mount respectively. I shot at ISO400, 1/60s, f/4 with flash. (Perhaps some other time I will think of this experiment when it’s not dark, and try it in daylight.) The camera was on a tripod. I used autofocus and centre-weighted program exposure with the EF lens. I used the same shutter and aperture settings for the FD lens, and focused manually using live view, magnified to 10× in on the LCD.
Canon FD 50mm
Canon EF 50mm
Results
For a start, you might notice that the FD lens is slightly more zoomed-in than the EF lens. This is a side-effect of the correction optic to allow infinity focus. I’ll show both photos here, including 100% crops at 1024×768. Click the images to view them at this size. Other than cropping, no sharpening or any other editing has been done on these images.
EF lens
FD lens
EF lens
FD lens
EF lens (100% crop)
FD lens (100% crop)
I am honestly staggered by these results – the sharpness of the FD lens is much better than that of the EF lens. It’s possible that the autofocus didn’t do its job properly but it does prove that this third-party FD-EF mount adapter isn’t so terrible. I can only speak for mine – I’m sure there are terrible ones out there.
Pitfalls
There are some other things to be aware of though. Obviously the FD lenses don’t support autofocus, so you have to focus manually. This is no problem on a genuine manual focus SLR body, but autofocus SLRs lack the split-circle and microprisms on the focus screen, so it’s a lot harder to focus using the viewfinder. Using live view is a workaround, and it is also possible to swap out the focus screen for one with a split-circle, microprisms, or both.
While FD lenses do support an aperture controlled by an FD body, it won’t work using an adapter like this. You will need to take your meter reading using any appropriate method, and then set the aperture – this is stopped-down metering. The viewfinder will darken when the aperture is stopped down. This particular Kood adapter has a switch to flick between fully open and stopped down, which helps.
Summary
But if you are in the same position as me, with an EOS SLR and a load of FD lenses, I don’t think you’ll regret spending a few quid to be able to use them on your digital body. The quality, at least of this Kood adapter, is perfectly good – perhaps flawless.
Update
As promised, I have now added some outdoor photos taken from my window. I slightly cropped the zoomed-out version this time, to give a comparable field of view. I’ve taken a 100% crop of the unaltered original to test edge sharpness.
Both photos were taken at ISO100 and f/5.6, but the EF version was taken at 1/50 and the FD version at 1/40 as the darkness was coming in. Both are a little underexposed, I think, due to the pale sky. and the FD version is a little darker.
EF lens
FD lens
EF lens
FD lens
EF lens (100% crop)
FD lens (100% crop)
On this occasion, the autofocus seems to have got it spot-on and my manual focusing isn’t quite perfect. Image sharpness otherwise seems good, especially towards the edge of the photo where you might expect softness, and I can’t see any chromatic aberration around the chimney.
The real test will probably be using this lens in strong sunlight – which I shall try to find the time to do at the weekend. 🙂
Today I went to Bristol zoo with Hannah and her parents. The sun was out and it was a lovely day for shooting with my Canon 450D and slightly slow Tamron 70-300mm f/4-5.6 telephoto lens. These photos are all in chronological order.
We started off in the reptile house. I don’t really know what any of these are since I was more interested in admiring the animals than reading the plaques. The second one is a chameleon which appears to be belching and obviously the fourth one is a snake.
I thought that both of these were lemurs but now I study the photos, the second one probably isn’t.
Obviously, these are parrots. Unfortunately, they didn’t say anything funny and eventually the clicking of my camera annoyed them, and they moved away.
Staying on the bird theme, we caught these Magellanic penguins at feeding time. You can just about see the fish flying towards them in the top-right corner of the photo.
After the penguins, we watched the seals beg for their dinner, too. They were very obedient and well trained – they would lift their flippers, jump, spin on the spot and do all sorts of things that the keeper gestured. But I still think the best photos were of the seals sitting on the rocks, being themselves.
Just a short walk away were the gorillas. They didn’t particularly like showing their faces.
In fact, the best thing in the gorilla compound was actually this moorhen chick. Just a ball of fluff!
Since the British public have fallen in love with Aleksandr Orlav, everyone loves meerkats. They are also excellent photographic subjects, since they sit still.
And finally, we returned to the lion enclosure. It was the first thing we saw when we entered, but the lions were nowhere to be seen. On the way out, they were ready and waiting. The male was sleeping lazily on the floor, with his big, sad eyes.
Meanwhile, round the corner, the lioness was sharing a rack of ribs with two of the cubs. She seemed very wary of the tourists standing behind the glass.
Today I went to see the stone circles at Stanton Drew. It’s kind of a poor man’s Stonehenge, but it was very quiet even on a bank holiday, due to its obscurity. There was just one man sitting in a deckchair, painting a watercolour, but I was able to hide him behind one of the stones in each photo I took 🙂
I shot some traditional landscape-type photos with my RB67, but the film isn’t finished yet, so you’ll have to wait. After my success last week, I also took a roundograph of the stone circle with my 450D. Compositionally, it is more interesting but technically I don’t think the stitching is so good.
Stanton Drew stone circle
Still, it’s another pleasant picture to look at until I develop the film from the RB67, and until I get round to making a roundograph in an urban location.
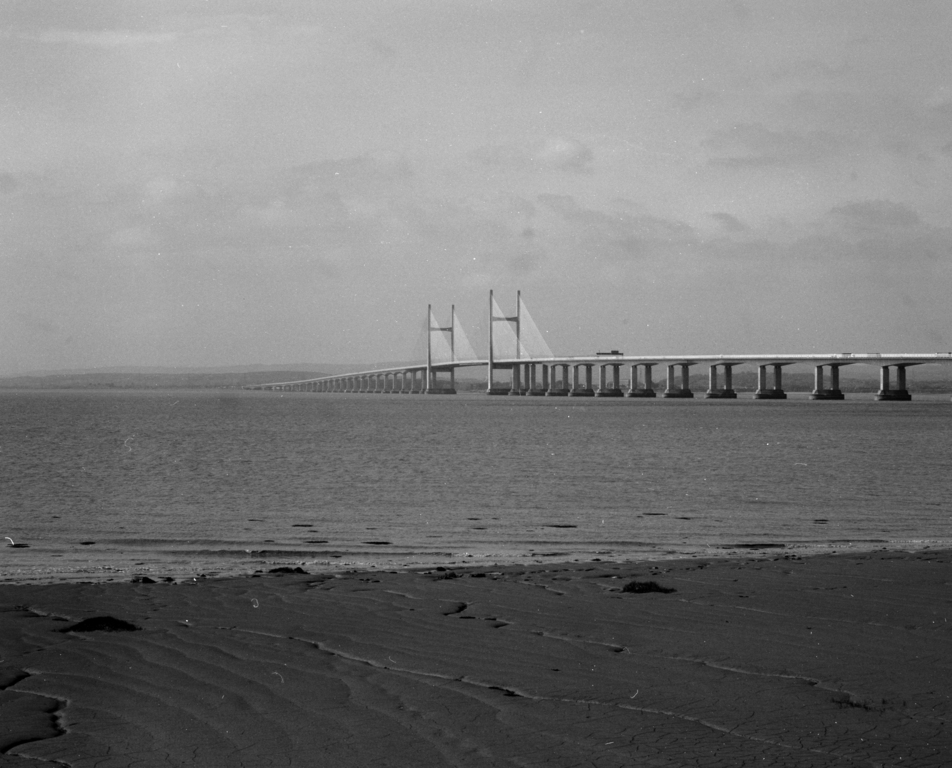
Today I took my RB67 for a walk along the Severn Beach, underneath the second Severn Crossing and towards the older one. It was on my list of potential places for landscapes, and it’s one of the nearer ones to my home in Bristol. It wasn’t as interesting as I had hoped, but I had a nice walk anyway.
For ages, I’ve wanted to make a decent roundograph. I’ve tried on a couple of occasions in the past, but the result has always been pretty bad. On this occasion, I appear to have succeeded in making a decent planet.
I will definitely revisit this, and endeavour to find a more interesting landscape than a field and a row of trees.
I’ve been practising traditional silver-based black & white photography for a couple of years but today it occurred to me that I don’t really know what is going on with the various chemicals. It’s just a process of remembering which bottle is which. I had a vague idea of what was going on, but I decided to look it up – and summarise it here.
Exposing
The light-sensitive film (or paper) contains crystals of silver halide, which is light sensitive. At this point, the film is opaque grey. When light hits the film, the silver halide crystal splits into a silver ion and a bromine atom.
Ag+Br– (crystal) + hν (radiation) → Ag+ + Br+ e–
Then, the silver ion recombines with the free electron to give an atom of metallic silver.
Ag+ + e– → Ag0
After exposure, there is an image on the film made from a tiny quantity of metallic silver. This is known as the latent image. It would be invisible to the eye and the film is still dull and opaque. For an individual grain of the silver halide emulsion to count as “exposed”, at least two photons must have interacted with it, to form small silver crystals consisting of two or more silver atoms.
Development
The purpose of developer is to amplify the latent image. The chemical composition of developer varies and is complicated so I won’t go into it here – other than to say that it promotes silver crystal growth where the small silver crystals already exist.
After development, the latent image has been converted to an actual image, made of metallic silver crystals. It appears black, although the film itself is still opaque.
Stopping
Even after taking the film out of the developing solution, it continues to develop (your hands are still wet after taking them out of the sink, right?) so a stop bath is used to halt development. Developing requires an alkaline environment to work, so stop bath is simply a weak acid – usually acetic acid.
The stop bath causes no other changes to the film.
Fixing
Although we have now developed the film and ended up with a black image in metallic silver, the areas of the film that were not exposed to light are still opaque, and still sensitive to light. Bathing the film in fixer dissolves the unexposed silver halide, leaving a near-transparent film backing that is not sensitive to light. At this stage, you can take the film out of the developing tank and look at it in daylight.
Toning
So far, we have ended up with either a film or a print which has an image made from metallic silver. If there’s one thing we know about silver, it’s that it tarnishes. Depending on the storage conditions, silver prints may degrade with time. Toning the image serves two purposes: it improves the longevity of the image, and it can produce the colourful sepia effects.
Various toners exist, but they all work in the same way. They react with the silver to produce silver salts, such as silver sulphide which is more stable then pure silver. It is also slightly brown in colour, hence the sepia tone.
Avid readers of my blog will know that I recently purchased a Mamiya RB67 with the intention of using it for high-resolution landscapes, à la Ansel Adams. I’ve posted a few photos from the RB67 on my photo blog already, but up until now these have been mainly for the sake of testing the camera and familiarising myself with it. It sure is a beast!
I also compiled a list of places–mostly in the South-West–that I want to visit to take landscapes. This weekend just gone, the sun was out and the weather was beautiful and clear, so I set off with my friend Ben to Cheddar Gorge to see what we could see.
Unfortunately, out of twenty-something photos taken, only two came out.
It seems that I had neglected to check the mirror lock-up knob, meaning that the shutter didn’t fire in many of the picture, leading to totally blank film. And of some of the ones that did get exposed, one of the film backs seems to have a light leak and the film was ruined. I can easily fix the light leak and in future I’ll certainly pay attention to the mirror settings.
In the meantime, here are the two photos that came out OK. The first one has some evidence of a small light leak in the bottom-left corner. The other frames had light leaks so severe that the entire frame was made white.


")
")


")
")