This evening I decided to take a stroll along the canal near Atherstone with my parents, brother Edmund and girlfriend Hana. It was a really nice evening for a walk and we covered about three miles.


This evening I decided to take a stroll along the canal near Atherstone with my parents, brother Edmund and girlfriend Hana. It was a really nice evening for a walk and we covered about three miles.
I think I may have stumbled across a security problem in OS X on my Macbook. To recreate it, you need to satisfy the following conditions:


I spotted this bug accidentally on my Mac when I was a bit hasty typing in my unlock password, and was shocked to see it appear in the 802.1x username box after I unlocked successfully.
I’m using Leopard, 10.5.7. I’d be very interested to hear from anyone who can recreate this bug on other versions of the OS.
I’d be ever more interested to hear from anyone who figures out how to enter keystrokes through a lock screen to an arbitrary application. I’ve tried this, and Control+Tab doesn’t work, so you can’t immediately switch to other windows. I’ve also tried successfully entering my 802.1x credentials through the lock screen to dismiss the 802.1x box, but after that my keystrokes are not accepted.
In this article I will talk you through how to set up automatic backups from your Linux computer, to another Linux/Unix computer of some description. This works for OS X, too. I have tested these instructions on Fedora and Ubuntu.
These backups will use rsync, a handy program for copying only the files that have changed. The first backup will obviously copy all of your stuff, but after then if you only create/change one text file, it only copies one text file.
Your receiving computer (let’s call it the server) needs to be running an SSH server. This is standard on almost every Linux/Unix/OS X computer. If not, consult your OS documentation for guidance on how make it go. Don’t forget you need to poke a hole in your firewall (port 22/tcp) as well as setting up the SSH server.
Your sending computer (the client) needs to be set up with a private/public key pair. This is so it can communicate with the server without having to ask for a password. First check if you have keys by doing the following:
jonathan@hyperion:~$ ls ~/.ssh
If this command results in displaying the files id_rsa and id_rsa.pub then you are all set. Skip ahead to the step about copying the key to the server.. If those files or that directory don’t exist then you’ll need to create them, like so:
jonathan@hyperion:~$ ssh-keygen
Accept the default options and it will create a private/public key pair for you. Now we set permissions on your keys to keep them secure, and to ensure that the key authentication works properly:
jonathan@hyperion:~$ chmod 600 ~/.ssh

jonathan@hyperion:~$ chmod 600 ~/.ssh/id_rsa*
Copy the public key (identified by its .pub extension) to the server. Don’t whatever you do copy the private key to any other computer. You should treat the private key as securely as your password Copying is easiest using scp, but you can use a USB memory stick, email attachment or any other method of copying data.
jonathan@hyperion:~$ scp ~/.ssh/id_rsa.pub jonathan@server.com:~
Now you need to log onto the server and tell it to trust your key. Be doubly sure to use a double >>, otherwise you will overwrite the authorized_keys file rather than appending to it.
jonathan@server:~$ cat id_rsa.pub >> .ssh/authorized_keys

jonathan@server:~$ chmod 600 ~/.ssh/authorized_keys
Your key authentication should now be fully set up. You can test it by connection to the server from the client using ssh – if the key authentication is set up properly you will get automatically logged in without being asked for a password.
Consider what you actually want to back up. Most likely just your home directory, i.e. /home/jonathan. Also think about where the backups will be stored on the server. If this is your home directory again, then no problem. If you wanted to store it in a different directory, you would probably need to grant write access to that directory to your user account.
In this article, we will assume that I want to back up /home/jonathan on my client to /media/private/Backup/hyperion on the server. So let’s make a script to do this. Call it backup.sh and save it in your home directory. Change the paths, usernames and server name in this example to suit your setup. You can also use an IP address instead of a server name if you don’t have DNS running on your LAN.
#!/bin/sh

rsync -rutvz --delete --exclude=".*" /home/jonathan jonathan@server.example.com:/media/private/Backup/
Note: the line starting with rsync is one long line – don’t put a linebreak in
Note: this excludes hidden files (ones starting with a dot, such as .test). If this is not what you want, remove --exclude=".*" from the rsync line.
Set it as executable, and run it for the first time
jonathan@hyperion:~$ chmod +x backup.sh

jonathan@hyperion:~$ ./backup.sh
Depending on the size of your home folder, the first run could take ages. I strongly recommend having a gigabit LAN in your home for copying large amounts of data. After it has completed, check on the server that your files have indeed made it across to the place you intended.
Now run it again. It should take only a few seconds to run, as no files have changed since you last ran the script.
Create a text file in your home directory with a few words on it. Run your script again. Check the new file got copied to the server.
Delete the text file from your home directory. Run your script again. Check the the file got deleted from the server.
If your server and client are on the same LAN, the server is always on, and it’s a fast LAN, the best option will probably be to set this to run regularly.
For example, my desktop PC is set to sync with my server every hour. They are both on gigabit so even if I’ve got loads of new data to copy it rarely takes longer than a few minutes.
My server then syncs with an offsite server every night at 3am, when I don’t notice if my broadband is running slowly due to the traffic. (Yes, maybe you consider this to be OTT, but I have lots of irreplacable photos and recordings, and had you considered what might happen to my data if I was burgled and both PC and server were taken, or if a fire destroyed my home and its contents?)
For scheduling regular jobs, cron is your friend. The syntax can be a bit odd but if you open up /etc/crontab in an editor, you can add some comments to the start as a reminder of what each field means. When you’re done, add a new entry to the bottom, like I have here.
# +---------------- minute (0 - 59)

# |  +------------- hour (0 - 23)

# |  |  +---------- day of month (1 - 31)

# |  |  |  +------- month (1 - 12)

# |  |  |  |  +---- day of week (0-6) (Sun=0 or 7)

# |  |  |  |  |

# *  *  *  *  *  command to be executed
# run-parts

01 * * * * root run-parts /etc/cron.hourly

02 3 * * * root run-parts /etc/cron.daily

22 4 * * 0 root run-parts /etc/cron.weekly

42 4 1 * * root run-parts /etc/cron.monthly

30 * * * * jonathan /home/jonathan/backup.sh
This command tells my script to run at 30 minutes past the hour, every hour of every day of every month. It is vitally important that you run the script as the same user you configured the key authentication for, otherwise it won’t be able to authenticate. Finally fill in the full path to the backup.sh script we prepared earlier.
If you are running Ubuntu Netbook Remix (UNR), I assume you are also using a netbook. The hourly (or daily, etc) backups described above might not be what you want – you probably don’t have a permanent network. And what if you’re connected via a 3G USB modem, or the slow wireless at friend’s house? Unlikely you’d want to copy several gigabytes of data over such a connection. So the obvious choice here is to put you in charge of when the script runs.
You already know how to run the script manually from the command line, but here we will set up a pretty icon for your desktop. While these instructions are particularly aimed at UNR (because I have it on my EeePC), a similar method will also work in any GNOME environment.
That’s it! Now you can just click the icon to start a backup when you know you’re in a position to make a backup.

This week, the Tuesday Challenge brief is not to take a photograph; but rather to submit the best photograph we’ve ever taken.
Tough one. I’ve managed to whittle it down to two (the first of these Water pictures, and a portrait of my mate Fraser), but I can’t decide between them. So I’ve set up a poll.
On Monday 22nd June 2009 the poll will close, and the winning photograph will be submitted to Stu. Get voting!
Edit: The poll has closed and I’m pleased to announce that Fraser won by a margin of 11 votes to 9.
Today at work I had to install a switch in a rack in a riser. The riser goes from top to bottom of the building in question (5 storeys + basement). Access is through an iron door on each floor.
There is a grille to stand on, but it was slightly wobbly and nowhere near as big as the size of the riser, so I had to be careful where I was putting my feet. The building was constructed in the 1920s and the iron grille and brickwork is original.
It’s a long way to the bottom of the basement. While I was working I dropped a bolt. I heard it hit every grille as it went down, and it took about four seconds to reach the bottom.


This is what I was sent to work on – installing a small new switch in that tiny rack. It’s a Power-over-Ethernet switch to power some new Cisco APs that are going in soon. However, the new switch needed an uplink to the network, provided by…

… the Cisco switch that was bolted flat to the wall above my head, out of reach. You can see the bundle of cables that join the switch to the patch panel.
In order to reach the switch, I needed to stand on a chair. In order to get a chair to not fall through the grille, I had to go and find some pieces of wood. Yikes.

“The theme this week is Fairy Tales. Interpret this in any way you wish.”
I decided to set up a shot of me reading a fairy tale to a “child” in bed.

I recently inherited a box of around 4,000 film slides and was asked to scan them in. I decided that my existing film/slide scanner, a Veho VFS-001, was not up to the task so I investigated alternatives, and eventually settled on a Reflecta DigitDia 5000 – which is simply a rebadged (and cheaper!) Braun Multimag 4000.
First let me show you the specs, pinched directly from the manufacturer’s page:
The consistent advancement of DigitDia 4000 resulted in a substantially reduced scanning speed. More efficient working is now ensured by the faster scanning speed of only 90 seconds at full resolution of 3600 dpi. In addition, the scanner now has an improved and more stable USB 2.0 connection. Scanning is done directly from the slide magazine with a capacity of 100 slides and Digital ICE Technology.
No large-scale and manual inserting of single slides. The easy and fast way for high quality scanning of slides format 24x36mm for archival on CD, projection with digital-projectors, viewing on PC or TV, sending the images by e-mail, printing at home or exposure the images on professional lab on high quality photo-paper. Compatible for CS/Universal/Braun and LKM Magazines.
- Digital ICE™ – Hardware-based Dust-and Scratch removal with infrared sensors and automatically Software correction.
- DigitalROC™ – Color Restoration; Image Quality will be restored.
- DigitalGEM™ – Grain Management; minimize grain to restore the image’s sharpness.
- Image Sensor: Linear Array Color CCD
- Scanning mode: 48 Bit
- Optical Resolution: 3600×3600 dpi
- Lamp: Cold Cathode Fluorescent lamp
- Scanning preview: 15 seconds
- Scanning Speed (ICE off):
- ColorScan 1800 dpi 60 seconds
- ColorScan 3600 dpi 120 seconds
- Max. Scanning Area: 37.5 x 37.5 mm
- Dynamic Range: 3.8 Dmax.
- Batch Scanning: directly from magazine
- PC Interface: USB 2.0
- Output connector: 1x USB 2.0
- Viewer: Slide Viewer with backlight to examine slide
All sounds promising so far, and the Digital ICE sounds like a definite bonus, as frankly I can’t be bothered to clean 4,000 slides.
I’ve now scanned in over 2,000 of my slides so I feel I can write about the scanner with at least some experience.
In general, no problems at all with the image quality. For a 35mm slide, you get an image that’s around 14 megapixels in resolution. Some of the slides I encountered were some other format (sorry, don’t know much about film!) and were square. With these, you get around 10 megapixels.
The colour reproduction isn’t great. The colours are not well saturated and the scans have a distinctly washed-out feel to them. This is no problem if you plan to edit the photos manually later, e.g. using Photoshop or GIMP. The scanner package also includes a feature for colour restoration, DigitalROC, which brings me on to my next point…
DigitalROC is useless. Avoid avoid avoid. In photos that are well exposed and colourful in the first instance, it does an OK job and livens the colours up a little. In photos that are anything more than slightly underexposed, DigitalROC comes crashing in and ruins the photo. It makes parts of the picture look like they are in 16 colours. Unfortunately I didn’t realise this until after I’d done a few hundred slides, and I’ve had to go back and redo them without DigitalROC. In the end I resorted to using GIMP to adjust the colours – I found that the “Auto white balance” tool usually fixed the colours.
The original sample photo below was underexposed but by no means beyond repair with a little bit of gentle tweaking. But here’s what the DigitalROC made of it…

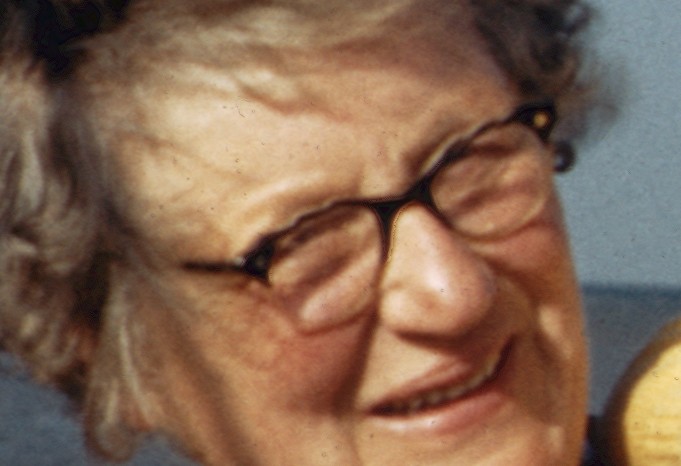
The other software-based enhancement, DigitalGEM is not a lot better. This is supposed to automatically sharpen the image, but I guess the risk with any automatic tool is that there’s no “one size fits all” solution. On some of my photos, DigitalGEM did such a “good” job of sharpening that it cut people’s faces out with hard edges that made them look like cartoon characters.
This next sample shows how DigitalGEM has oversharpened the glasses on the bridge of my great-grandmother’s nose. Perhaps you can’t see in this scaled-down version, and maybe that’s OK; maybe that means DigitalGEM has got away it. But click for the full-resolution version and see how odd it looks. I’m not really happy about this being done to my photos!

The only enhancement I found to be any good was Digital ICE – the hardware-based technology for removing (well, working around) scratches and dust using infrared light. I haven’t directly compared the same slide with and without Digital ICE, but in the scans that I have done, there isn’t a lot of obvious dust. Sure, it misses larger items like deep scratches and eyelashes, but it seems good at minimising the effect of dust.
The scanner automatically crops the image. This usually works well, although almost all of my scans were rotated by approximately half a degree. Sometimes the auto cropper crops close enough that you can’t tell, other times you get annoying wonky black borders.
The supplied software is rather crude. It is unlike any scanning software I’ve seen before, in that you don’t actually get to see your photos anywhere in the software. In my case, that didn’t bother me. I simply turned off DigitalROC and DigitalGEM, increased the resolution to 3600dpi from its default of 1800dpi (this took some searching) and from then on I simply commanded it to scan trays in batch.
It does not work on Windows Vista, and for you Linux users out there, I couldn’t get it to work on wine either. Maybe with some fighting you could make it go, but it was quicker for me to dig out my old laptop with Windows XP. An Apple OS X version of the software is included, so I can’t vouch for it and I don’t know if it’s any different.
For me, this was the main reason for buying such an expensive scanner, and the main advantage over the Veho. In reality, it has been a bit of a disappointment.
First off, Reflecta provide a 100-slide tray with the scanner. Great, I thought, and immediately loaded 100 slides into it. But it quickly became clear that this tray was not well designed and does not hold the slides straight (only up on edge, not along the bottom). If the slides are not straight, they can’t slide neatly into the scanner – and worse yet, as the slides are only held upright along one edge, as soon as they start to slide into the scanner, away from the support, they immediately fall over. Useless!
Luckily, I had a 50-slide tray that came bundled with the slides I inherited. This holds the slides and supports them all the way as they slide in and out. But I still had difficulty with the reliability of the loading mechanism. The first video shows how it should work, and the second shows what it does when it fails.
The most reliable slides in my experience are the fairly thick plastic-framed ones with rounded corners. The mechanism seems fairly able to capture them properly and slide them into the scanner. The round corners means they don’t snag on the “track” they slide along.

I also had some rather thicker slides, with the film sandwiched between two pieces of glass. These had square corners. They usually load into the scanner fine, but upon trying to unload them they often jam and have to be manually removed. This is an unrecoverable jam and so your batch job stops. Pretty annoying if this is in the first few of the tray!

The vast majority of my slides are “standard” thickness and either plastic with round corners, or card with square corners. These almost never get loaded properly, as the arm that pokes the slides into the scanner misses the slide completely, and you get a blank scan. So if you’re scanning thinner slides, you do really need to sit with the scanner and help it along when it changes over. Pretty annoying, as each scan takes almost two minutes, so a tray of 50 keeps you tied to your desk for an hour and a half!

I’ve managed with this scanner by saving my few thick, plastic slides for unattended overnight jobs, and scanning the thin ones whenever I have time to supervise the scanner.
I ran a speed test from Namesco on my PC at work. It has a gigabit Ethernet connection but more importantly, it is served by JANET – the high speed academic network.
As you see in the screenshot, it achieved 215 Mb/s download!
The best Internet connection in the world? I think so.

When I first started using the Bristol – Bath cycle path I was frustrated by the lack of decent maps. Most of the ones I’ve come across that show the exits of the bike path are schematics, like maps of the London tube. It can be pretty hard to figure out how that ties into a real map, for planning real-life journeys that use roads and off-road paths.
So I spent an hour using the schematic at the link above, Google aerial photos (which show the path), an Ordnance Survey map of Bristol and Bath, and a black pen. I marked in the route of the cycle path and all the exits from the path onto public roads. This map is now on my wall at home and it’s a great reference.
Unfortunately it’s a little too big for my scanner so I’ve had to settle with taking a photo. Unfortunately the problem with photos is that my head casts a shadow, but never mind. Hopefully this will prove useful to someone. Click for a bigger version of the map.

From Stu’s Tuesday Challenge:
Take a bunch of photos without using any kind of viewfinder or checking the images on the rear screen afterwards. Post your best one of the week!
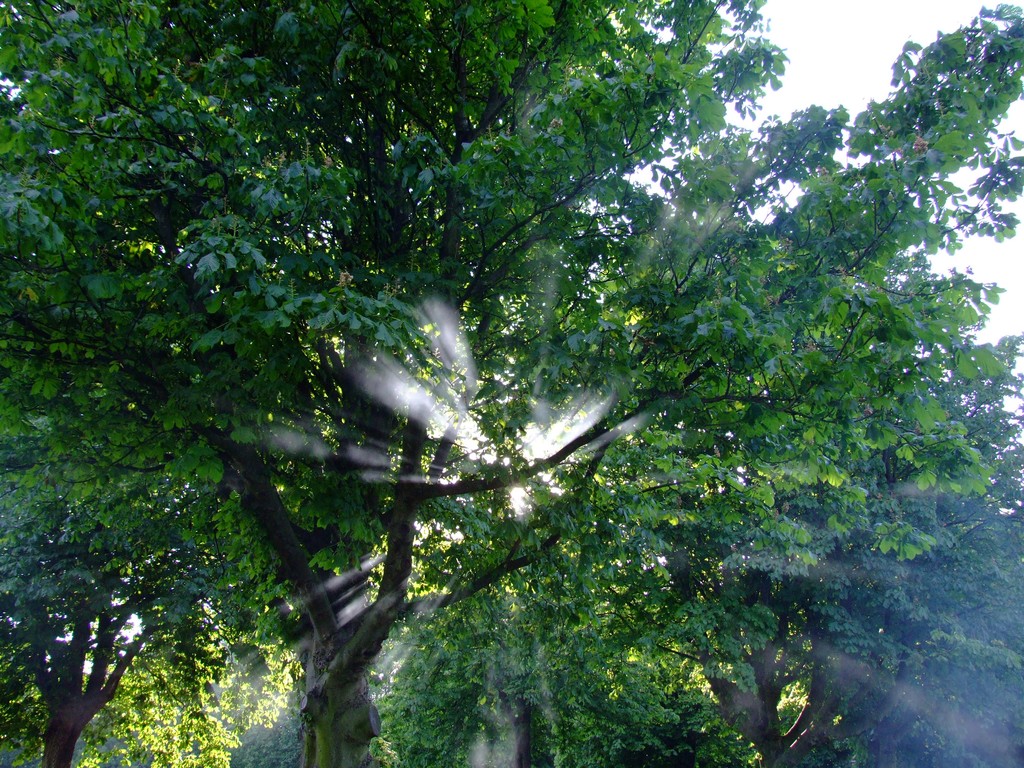
I had a barbecue with Hana and a couple of friends on Bristol Downs today. Seemed an ideal time to take photos, and when I saw the sun shining through the trees and the smoke, I got my camera out. Without using my viewfinder, I managed to get Hana in the first one.


This last one is probably my favourite.