Ice, Water & Steam

For ages I’ve had the idea of producing a themed set of three black & white prints to display on the wall on my stairs at home. This evening I finally had the inspiration (the three classical states of water) and motivation to take the pictures and develop the film immediately after.

I wanted to shoot these pictures on film so I’d have the pleasure of making the prints in the darkroom. I broke out my trusty Mamiya RB67, which takes 10 shots on a roll of film, giving me just 3 or 4 attempts to get each photo right. Last time I tried something similar with my digital camera, I took over 200 photos to get the one I wanted. On this occasion, it took three attempts to get the ice right, and just one for both the water and the steam 😀

Ice
Water
Steam

These pictures are not perfect. In the ice and water pictures, the background is not sufficiently overexposed and it’s distracting. In the steam picture, some of the light got onto the backdrop despite my best efforts. It might seem like nit-picking but I’m not going to put these on my wall, else I will grimace at my mistakes every time I go up or down the stairs 😛

However, I’ve now got a better idea of what to do next time. My cotton backdrops are in the loft so I used some A3 pieces of black and white perspex that I bought for macro photography. They’re a bit reflective, and not large enough (I couldn’t get all the steam in). Rather than using a flashgun to illuminate the backdrop, I think I will use a softbox as the backdrop instead. Using the flashes bare, without modifiers, the lighting was a bit harsh. Unfortunately my white umbrellas are also in the loft with the backdrops 😉

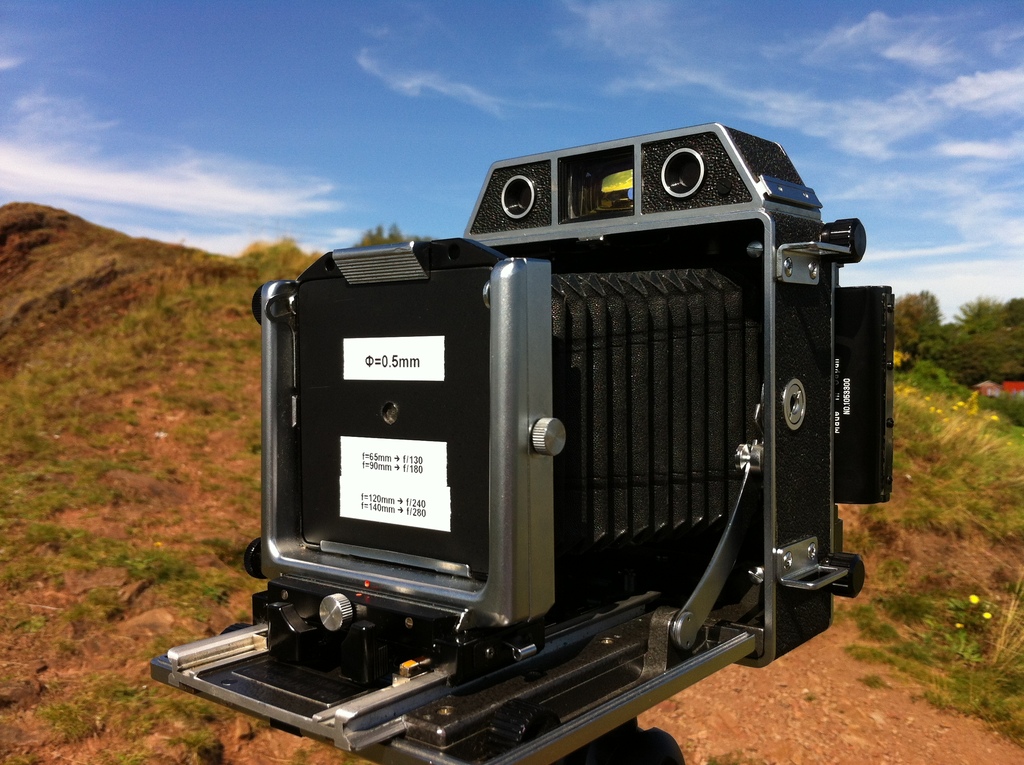
For those who are interested, here’s my setup. That’s a Mamiya RB67 medium format camera with Sekor C 127mm f/3.8 lens, bellows fully cranked out and an extension tube. Also with prism finder (that black lumpy bit on the top is full of glass, and weighs a kilo on its own) and a roll film back loaded with 120-format Ilford FP4+. I’m using a cable release to get mirror lockup to reduce camera shake (the mirror is 6×7cm and makes a mighty thwack when it flips up), and a wireless flash trigger to sync with two flashguns.

Setup shot

Gold hallmarks

Hannah has a gold ring which was her grandmother’s wedding ring. The hallmarks were too small to read so I decided to photograph the ring with my macro setup. I’ve messed with the contrast and sharpness of this picture – it’s not an artistic photograph, it’s just to aid the readability of the hallmarks.

Ring

According to a gold hallmark identification wizard, this ring…

SH

…was made by a jeweller with initials SH
…was hallmarked prior to 1975 and is 22 carat gold
…was assayed in Birmingham
…was hallmarked in 1863

Hannah was surprised to see that it was as old as 1863, and might mean it was a family heirloom that was passed down the generations. Who knows!

Pinhole test

Recently I wrote about making a pinhole lens for my view camera. The results weren’t brilliant and I wondered if I had chosen the right diameter of pinhole. So I asked laser dude to cut some more pinholes in other sizes, and now I have 0.2mm, 0.3mm, 0.4mm and 0.5mm pinholes, all mounted in 80mm steel plates for easy use on the view camera.

Pinhole mounted on camera

Trouble is with testing things in a view camera, it chews up a lot of film – almost £1 per frame I shoot! But I realised I can also use these pinholes with my DSLR by simply holding the steel plate over the lens mount of the DSLR.

So I took these photos out of my window with the pinhole held over the DSLR’s open mount. The pinhole is approximately 45mm from the sensor, giving it the same field of view as a regular 45mm lens – that’s quite zoomy for a crop-sensor DSLR.

These pictures were all taken at ISO 400. I wasn’t too careful with the exposure. The trouble is, when the camera is “too dark” inside (because the pinhole doesn’t let in enough light) the light meter readings are affected by light entering the viewfinder and are worthless. If you block off the viewfinder with your thumb, the meter doesn’t get enough light to work at all. The only way of exposing sensible is to use manual mode and guess a shutter speed until the picture looks OK. I think overexposed these increasingly as I used the larger pinholes, but never mind 😛

Pinhole Focal length Aperture Exposure
0.2mm 45mm f/225 2″
0.3mm f/150 1″
0.4mm f/113 1″
0.5mm f/90 ½”
0.2mm pinhole
0.3mm pinhole
0.4mm pinhole
0.5mm pinhole

It seems pretty clear to me that the 0.3mm pinhole is sharpest. In theory, the smaller the pinhole, the sharper the image. However, the smaller the pinhole, the more diffraction comes into play and spoils the sharpness. There is a “sweet spot” where you can find the best compromise between sharpness and diffraction, and an optimum size for the pinhole. This depends on the size of your film/sensor and the distance between the pinhole and the sensor. For my DSLR, the optimum should be around 0.3mm and for my view camera, more like 0.4mm. More on this soon 😉

If you’re a geek, you might like to read more about what Jearl Walker has to say about pinhole photography.

Tewkesbury Abbey interior

Yesterday Hannah and I spent the day in Tewkesbury. She was singing at choral Evensong at Tewkesbury Abbey and was in rehearsal for most of the day, so I spent a few hours walking around armed with a pair of cameras and a bag of lenses.

I’ve only finished one of the two films, which is exclusively interior shots of the abbey. I knew the inside would be dark so I loaded up my Canon AE-1 Program with a roll of Fuji Neopan 1600 which I pushed to ISO 3200. The result is a set of pictures that are filthy with delicious grain.

These pictures were taken using a Canon 50mm f/1.4, a Canon 28mm f/2.8 and a Cosina 19-35mm f/3.5-4.5. The latter is not a great lens, but it is a lot of fun for this kind of thing.

Zoom pinhole

I’ve made pinhole lenses for my 35mm and digital SLRs out of body caps before, but it recently occurred to me I could make a zoom pinhole lens. I have a view camera with bellows for focusing. The effective focal length of a pinhole is always the distance between it and the film, so a pinhole mounted on bellows makes a zoom pinhole! The bellows on my Horseman 980 view camera can be used between approximately 40mm and 160mm from the film, giving a decent range of focal lengths.

Making a custom lens for a view camera is easy. Unlike SLRs, the lenses don’t attach using a complicated bayonet system. A lens is mounted into a lens board, which is simply a square plate of metal with a hole bored in it. The plate then clips into the front of the camera. I bought a small piece of 2mm mild steel, cut it into an 80mm square, rounded the corners and drilled a small hole in the middle. This hole isn’t the pinhole itself – this is where the pinhole will later be mounted. I painted the steel black to minimise internal reflections.

In the past I’ve made the pinhole itself by making a small hole in a piece of aluminium foil with a pin. I found this often makes a jagged and irregular hole of unpredictable size. This time, I asked a favour from a mate who has access to a laser cutting machine.

Laser cutting machine

It’s computer-controlled and can make very precise incisions. He cut me a pinhole of diameter 0.5mm in a very thin piece of tungsten foil. I assumed the laser would zap a round hole straight through, using a round beam. But it’s cleverer than that – the beam is incredibly tiny. This next picture shows the laser beam going round the outside of the hole it was cutting. Yes, that’s a tiny laser point skirting around a half-millimetre hole. It gives a very smooth edge.

Laser cutting machine

When the small piece of tungsten foil was ready, I glued it onto the mild steel plate. For the finishing touches, I added some stickers to remind me of the parameters of the pinhole (Φ=0.5mm, and various relative aperture values for various focal lengths).

Pinhole mounted on camera

So now all I need to is duck under the dark-cloth and stare intently at the dim, upside-down image on the ground-glass screen while I adjust the distance between the pinhole and the back of the camera. When I’m happy, I remove the dark-cloth and the ground-glass, and replace it with a film back.

The norm with view cameras is to have the shutter in the lens. There’s no shutter in my pinhole lens but exposures are so long that I can use the darkslide as a shutter. I worked out the exposure using an app called PinholeMeter on my iPhone. In bright sunlight, one of my pictures needed 17 seconds of exposure.

The three pictures below were taken this morning on Ilford FP4+ film. The negatives are 6×9cm in size. The first two pictures are of the same scene, but at different zooms. The images are quite soft but surprisingly good quality – no vignetting. And the exposures are pretty much spot-on 🙂

Troopers Hill
Troopers Hill
Troopers Hill

Bristol et environs

I just developed another film from my trusty Mamiya RB67. These pictures are from “here and there”, not too far from Bristol.

The garden wall is in my own garden. As the sun shone down the side of my house, the gate cast an unusual, shimmering shadow on the wall. The picture didn’t quite capture the magic, but I still like it.

Two of the pictures were taken in Portishead. I spent several hours walking around the marina and pier and these were my two favourites. I also shot quite a few colour slides but these haven’t been processed yet. Hopefully they’ll appear here before too long.

Finally, the last picture is of a freight train called 6A29 waiting near Pilning station. I don’t know much about trains but I went with my friend Ed who is a signalman and knows his stuff. He’s writing a book about railways and needed a picture of this particular train to complete the collection. I tagged along and asked plenty of stupid questions – all in all, we had a good time, although it did get rather cold after the sun went down!

Bristol zoo (again)

We decided to go to Bristol zoo again today. We’ve been before, but I never get tired of watching the animals.