For ages, I’ve wanted to paint a pair of Chinese lucky waving cats the same colours as my cats. This weekend I finally got around to doing so – and these are the results 🙂
Lou LouMittens
Lou Lou isn’t keen on her lucky waving cat. Mittens keeps trying to kill hers.
I recently picked up a De Vere 54 enlarger for a bargain price. It’s a 1950s machine, designed to take 5×4″ negatives. In order to use the light most efficiently when making large prints, the enlarger is fitted with a condenser to give parallel illumination to the negative. However, the flip side of a condenser enlarger is that you have to match the condenser to the lens you are using and you have to match the lens to the size of negative you are using. It is usual to use a normal lens for enlarging your chosen negative format, so that’s (approximately) 50mm for 35mm negatives, 80mm for medium format and 150mm for large format (5×4″). Every time you change negatives, you have to change lens and condenser. The condenser in my enlarger is not labelled but is probably designed to work with 150mm lenses, and also seems to work well with my 135mm lens. However, when using any other focal length, there is extremely bad light fall-off on the print.
I made a 10×8″ print from a 6×9cm negative using a 75mm lens and the print only had sufficient density in the central area of the print, tailing off almost to white in the corners. Lighter areas mean not enough exposure was given to the print. For comparison, the left hand image was scanned directly from the negative while the right hand image was scanned from the print.
Scanned from negative
Scanned from print
Given that it is expensive and difficult to get hold of different condenser lenses for this enlarger as it went out of production in the 1950s (not to mention the size and weight of the condensers, and the pain of having to change the condenser each time you change the lens) I decided to convert this condenser enlarger to be a diffuser enlarger instead. This will basically involve:
Removing the condenser lenses
Inserting some kind of diffusing material to provide even illumination
Painting the inside of the lamp house and condenser chamber white to make a mixing box
Replacing the light bulb with a more powerful one, as diffusion enlargers are more wasteful of light
Before & After
Removing the condenser is easy enough. The enlarger head comes apart into chunks and the condenser lens set simply lifts out. It’s a big ol’ chunk of glass, about 8″ across.
Condenser in its chamberCondenser
I decided the best places for diffusion material to go would be in the filter drawer, and in the bottom of the condensing chamber – just above the negative. This is pretty much how the mixing box in my old LPL C7700 was constructed. So I ordered two sheets of Perspex online – one translucent white and one frosted transparent. The filter drawer takes 5″ square filters so it was easy to make these.
5″ diffusion filters5″ diffusion filter in drawer
Slightly harder to make were the filters for the condenser chamber. They need to be circular to fit in the hole and have small overhanging tabs to support them. Again, I made one white and one frosted so I can choose between them later.
Circular diffuserCircular diffuser in condenser chamber
Upgrading the light bulb was an easy job. The enlarger came with a 75W pearl light bulb, and I replaced it with a 75W halogen reflector. Not only does the halogen bulb give more light output, it also directs it all towards the diffusers and the 95mm reflector on my chosen halogen lamp is almost as wide as the top of the lamp house.
New 75W halogen reflectorOld 75W pearl bulb
Finally, I came to the less-easily-reversible step: painting the inside of the enlarger. From the factory, the insides of the various components were either painted matt black, or the same hammerite teal as the outside. Interior reflection just isn’t necessary for condenser enlargers. Diffusion enlargers have a white mixing box where the light bounces around before hitting a diffuser and then illuminating the negative, so I decided to paint the interior of the lamphouse and condenser chamber in matt white to aid this.
Enlarger interior paint
While I was making these modifications, I made a number of test prints at different times. Here are some scans of the test prints for comparison.
Test print 1
Test print 2
Test print 3
Test print 4
The exposure of these prints is well-off; they were only made quickly for comparison. The prints are from a 5×4″ negative which uses the largest possible area (i.e. if these are fine, smaller negatives will be fine too). All were made at grade 2 with 14 seconds of exposure. I varied the aperture in whole-stop increments, just to compensate for the differing amounts of light that each method of diffusion let through.
Print
Test conditions
Aperture
Observations
1
Both diffusion layers were the clear frosted type. Interior of enlarger was in original black. Halogen reflector lamp.
f/16
Fairly bad light fall-off in the corners
2
Both diffusion layers were the clear frosted type. Interior of enlarger was repainted white. Halogen reflector lamp.
f/16
Didn’t really have any effect. Possibly even made it worse.
3
Same as print 22, but I switched the halogen reflector bulb back to the tungsten pearl bulb.
f/11
The pearl bulb is over two stops slower than the halogen!
4
Top diffuser was clear frosted, bottom diffuser was translucent white. Interior of enlarger was repainted white. Halogen reflector lamp.
f/8
Changing the lower diffuser to the white one helped enormously, but costs about three stops of light, compared to print 2. It also has lower contrast.
Test print 4 has a pretty even illumination. It’s not perfect, but the effect is minimal and easily cured with minor edge burning. As I mentioned, these test prints were made from a 5×4″ negative so when printing from a smaller size, the problem will be much reduced anyway.
I’m a little disappointed in the amount of light available through the translucent white diffuser. The larger the negative, the more light that is available (imagine the negative as the light source) and the smaller the print, the brighter the concentration of light upon it. In this case, with a large 5×4″ negative and a small 10×8″ print it still took 14 seconds at f/8. The enlargement time will only get longer if I want to have smaller negatives or larger prints, or if I want to stop the lens down more.
In the future I may try to find some perspex that is a little thinner than the 3mm sheets I used for this, and perhaps less optically dense than the translucent white (but more diffuse than the frosted clear). For now, this setup gives me sufficiently even light and allows me to work with all my negatives.
Another possible idea I’ve had is to put a semi-opaque dot on the front of the halogen reflector lamp, like you see on car headlights bulbs. This means that light cannot leave the bulb in a forward direction from the filament directly, which causes a brighter area in the centre.
Capped bulb
Having the opaque cap on the front of the bulb (or in my case, painted on the front of the reflector window) means all light that leaves the lamp must have been reflected from the curved reflector, and should be more even. It shouldn’t have a central bright area. Obviously I will have to think very carefully before painting the front glass of the reflector bulb, since it becomes very hot.
Reflector bulbs
If the modification works, it may mean I’m able to get away with using two of the clear frosted diffusers which let more light through. If I decide to make this modification, I will write about it here. For now, back to the darkroom!
It’s been a while since I last posted some pictures instead of writing a technical article. Fortunately, here are some pictures I took in Cambridge this weekend while visiting my brother, Edmund.
Being a Cambridge undergrad, he’s quite busy and wasn’t able to meet us right away. When we arrived in the town, we sat on the riverbank for a while and watched the various rowing teams come and go as they trained.
RowersRowers
In between the boats, young swams swam back and forth. A couple came and ate grass near us on the riverbank. Eventually a dog came passed and tried to sniff one of the swans. The swan took exception, stood up tall and hissed like a tomcat. The dog took the hint and retreated, so I never got to take a picture of a swan attack 😦
Swans
Edmund was out on his bicycle, following the rowers on the riverbank while training to be a cox. We camped outside Girton’s boat house, knowing he would return at some point. When he did, I papped him from across the river with my telephoto lens.
Edmund arrives
After a bite to eat, Edmund gave us a tour of the colleges. The light was fading and I tried not to take the same pictures I’ve taken before, but I managed one or two nice photos. OK, one nice photo. I found this nice side street which was just lacking a cyclist. Fortunately you don’t have to wait long for a cyclist in Cambridge!
Cyclist
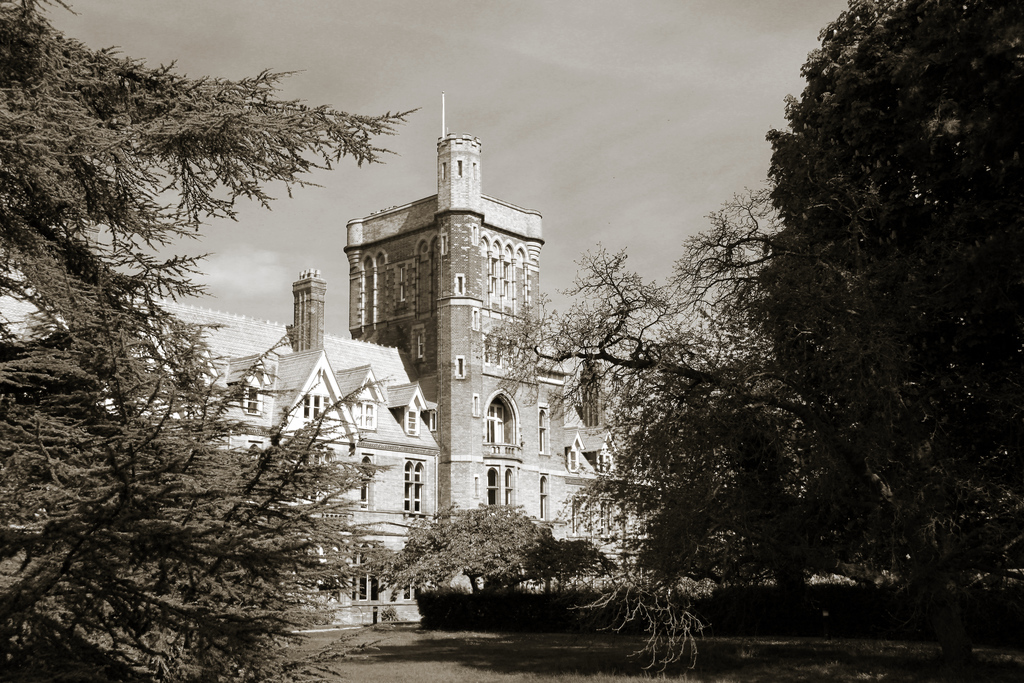
Edmund’s tour concluded with a visit to his alma mater, Girton College, which is a little bit out of town (nearer to Oxford than Cambridge, or so they say…). The college is a collection of Victorian red brick building which take some of their design cues from some of the much older buildings around Cambridge. It’s a wonderful place to be, with three grassed courts (which you are actually allowed to walk on!) and lots of quirky features. I’m sure I could spend a whole week photographing the inside and outside of these buildings.
Girton college hallGirton college towerSpiral staircase
The corridors of Girton College are filled with portraits, old and new, painted and photographed. I particularly enjoyed the informal black & white photographs of famous alumni of the college. Makes me want to try more portraits myself!
This is going to be a long article about photography and databases. Mostly databases, and in particular how to model certain photographic entities in a relational database. If you’re not interested in databases, stop reading now!
I have quite a collection of cameras and lenses and I wanted to track as much information as possible in a database, and keep it as normalised as possible. To further complicate the situation, I also use various films to produce negatives, and then I scan these in and make prints on various types of paper – but we’ll ignore the films, negatives and prints for now.
The underlying premise of the cameras and lenses is quite straightforward. Cameras and lenses are joined by a mount. For example, any Canon FD lens will work on any Canon FD camera.
However, when we start to list extra attributes surrounding cameras and lenses, suddenly it gets more complicated. Each of these sections describes a different problem and a few notes on the compromises I made. I’m trying to balance good normalisation with ease of use, especially as I don’t have a frontend application for this database – all querying and editing is either done via the MySQL command line or using MySQL Workbench. Throughout this article, table names are capitalised and field names are lower case.
Fixed lenses
As I hinted at in the ER diagram above, there is a table called MOUNT which lists all the interchangeable camera mounts available and allocates a mount_id. It’s then easy to add a mount_id to each row in CAMERA and LENS.
However, some cameras (e.g. compacts) have fixed lenses. Do we model this by using a virtual fixed mount, or by describing the lens directly in the camera?
Initially, I started out by defining fixed mounts as rows in MOUNT which had a boolean fixed which was set to 1 for fixed-lens cameras with fixed mounts. It’s not possible to have just one fixed mount called “fixed” – you need a different fixed mount row for each fixed-lens camera, so you can distinguish which lens belongs to which camera. As I have quite a large number of fixed-lens cameras I ended up with a large number of rows in MOUNT and I decided that approach was unsuitable.
I now set a boolean in CAMERA called fixed_mount. If fixed_mount is true, I set lens_id in CAMERA. If it’s false, I set mount_id in CAMERA instead. It’s not ideal, but at least I can determine programmatically whether or not a camera has a fixed lens, and which lens(es) it is compatible with.
Canon FD equipment
Shutter speeds
On some cameras, the available shutter speeds are a property of the camera – e.g. most 35mm SLRs. On some cameras, the shutter speeds are a property of the lens (e.g. most large format cameras and some medium format cameras). How do we model this?
As most of my cameras have the shutter speed set on the camera rather than on the lens, I’ve opted to record available shutter speeds in CAMERA and to ignore (for now) the cases where the shutter speed is set on the lens.
This isn’t ideal, though. Imagine a situation where I want to run a query to check which of my cameras has the fastest shutter speed. I’d need to query both the CAMERA and LENS tables – and at the time of writing the LENS table doesn’t even have this information. I’m not sure how to handle this.
Film format
In most cases, it’s possible to say definitively which film format a camera uses – e.g. 35mm film, 120 film or 5×4″ film. However, some cameras can make more than one kind of film – e.g. the Horseman 45HD which can take 5×4″ and 120. Some cameras can only take one kind of film, but can shoot more than one size of image on that film – e.g. the Mamiya RB67 which takes 120 film but can shoot 6×7 or 6×4.5.
Just to complicate things more, in some cases different types of film come up with the same size negative, e.g. medium format 120 and 620 film which can both take pictures in 6×4.5, 6×6, 6×7, 6×8, 6×9, 6×12 or 6×17.
120 film and 35mm film
This led me to implement a table called FORMAT which only records the type of film used (35mm, 120, 126, 620, 5×4, etc) and another table called NEGATIVE_SIZE which records the size of negative taken. In most cases, records in FORMAT and NEGATIVE_SIZE correspond directly, but not for medium format, as mentioned above.
For each record in CAMERA, I log the format_id for the most common format the camera is capable of using (so I’d use 120 rather than 620 if a camera can take both) and I log the negative_size_id for the largest negative the camera can take – so I’d log 6×9 rather than 6×6 for the Ensign Ranger which can take both. Potentially I could use a link table to comprehensively define which film formats and negative sizes a camera can use, but this sounds even more complicated.
While I think I’m modelling the data quite well in this way, it is too fiddly for my liking so I’m thinking of combining FORMAT and NEGATIVE_SIZE into a single table which would describe both attributes, although there would be some loss of normalisation, e.g.
35mm
120 (6×6)
120 (6×7)
120 (6×9)
620 (6×6)
620 (6×7)
620 (6×9)
Manufacturer
There is a table called MANUFACTURER which simply lists manufacturers of camera equipment. Each row in CAMERA and LENS has manufacturer_id set to correspond to the manufacturer of that equipment. This in itself is very simple, but the difficulty comes when you want to print out a camera and lens combination at the same time – which row do you grab from MANUFACTURER?
Joins are required to retrieve the manufacturer of the camera and the manufacturer of the lens separately. This example probably isn’t great as the manufacturer of both is Canon – but this isn’t necessarily the case (I also have Sigma, Tokina and Tamron lenses for my Canon SLRs). MySQL [photography]> SELECT
-> concat(cm.manufacturer, ' ', c.model) AS CameraType,
-> concat(lm.manufacturer, ' ', l.model) AS LensType,
-> n.shutter_speed,
-> n.aperture,
-> concat(n.focal_length, ' mm') as FocalLength,
-> FROM
-> FILMSTOCK as fs,
-> NEGATIVE AS n
-> INNER JOIN FILM AS f ON n.film_id = f.film_id
-> INNER JOIN CAMERA AS c ON f.camera_id = c.camera_id
-> INNER JOIN MANUFACTURER AS cm ON c.manufacturer_id = cm.manufacturer_id
-> LEFT JOIN LENS AS l ON n.lens_id = l.lens_id
-> LEFT JOIN MANUFACTURER AS lm ON l.manufacturer_id = lm.manufacturer_id
-> WHERE
-> f.filmstock_id=fs.filmstock_id
-> LIMIT 10;
+------------+-------------------------+---------------+----------+-------------+
| CameraType | LensType | shutter_speed | aperture | FocalLength |
+------------+-------------------------+---------------+----------+-------------+
| Canon T90 | Canon FD 50mm f/1.4 | 1/125 | 8.0 | 50 mm |
| Canon T90 | Canon FD 50mm f/1.4 | 1/125 | 8.0 | 50 mm |
| Canon T90 | Canon New FD 24mm f/2.8 | 1/60 | 5.6 | 24 mm |
| Canon T90 | Canon New FD 24mm f/2.8 | 1/30 | 5.6 | 24 mm |
| Canon T90 | Canon New FD 24mm f/2.8 | 1/15 | 5.6 | 24 mm |
| Canon T90 | Canon New FD 24mm f/2.8 | 1/60 | 4.0 | 24 mm |
| Canon T90 | Canon New FD 24mm f/2.8 | 1/125 | 4.0 | 24 mm |
| Canon T90 | Canon New FD 24mm f/2.8 | 1/750 | 4.0 | 24 mm |
| Canon T90 | Canon New FD 24mm f/2.8 | 1/125 | 5.6 | 24 mm |
| Canon T90 | Canon New FD 24mm f/2.8 | 1/60 | 5.6 | 24 mm |
+------------+-------------------------+---------------+----------+-------------+
10 rows in set (0.01 sec)
Sheet film negatives
Well, I initially said this post was going to be about the cameras and lenses in my database, but this point is about negatives. Let me explain.
A camera is used to shoot a film, which contains several negatives. This works quite nicely when shooting 35mm film (36 exposures) or 120 film (10 exposures) as both of these fit into an A4 film sleeve and can be filed in my ringbinder. The record in the FILM table has information about how the film was developed: developer, time, temperature, whether the film was pushed/pulled, etc.
This model breaks down a bit when using 5×4″ large format sheet film. Each negative is one sheet of film and as such can be processed differently from any other – you can’t model several sheets of film as different negatives in the same film. So now I’m shooting large format, each film as defined in the FILM table contains only one negative as defined in the NEGATIVE table. However, one A4 sheet of large format sleeves holds four sheets of film and therefore, according to the new model, four films.
This displeases me, because each A4 page in the binder should hold only one film. But it’s wasteful to fill a four-pouch negative sleeve with just one negative. Worse yet, I might shoot two large format negatives, then some 35mm, and then another two large format negatives – so the numbering won’t even be continuous! It’s the right way of modelling the data, though.
I’ve been amassing the components of my astrophotography rig over time. Before Christmas I got hold of a guide scope and I attempted to rig up a modified webcam as a guide camera. This wasn’t too successful so recently I bought a dedicated but inexpensive guide camera. After a brief experiment in my back garden to make sure it worked OK, I headed out to my favourite spot in Somerset.
This was the first attempt at using the guide camera and also at using a laptop to control guiding and exposure using PHD Guiding and BackyardEOS. Previously, without guiding, I was able to expose for about 45 seconds before tracking errors became apparent. With the guider, I managed a 5-minute exposure without any visible tracking errors.
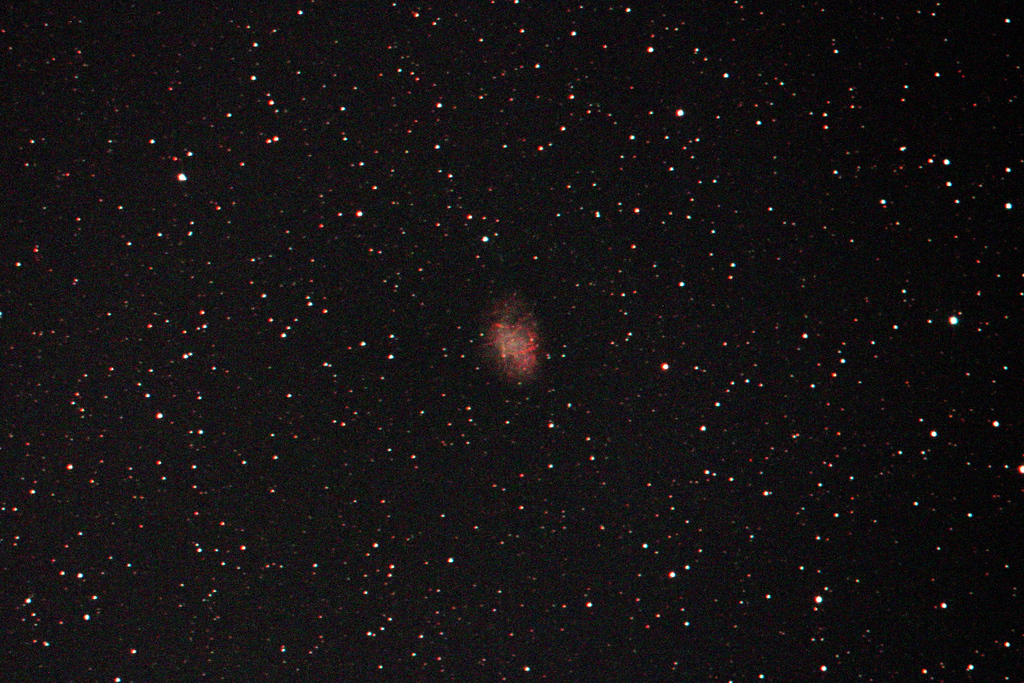
This is a single frame depicting M1, the Crab nebula. Exposure of 5 minutes at ISO 6400 using a 6″ f/5 Newtonian telescope. As it’s a single frame, the noise is quite bad. M1 was in an area of sky over Bristol, quite badly light-polluted so the background was quite pale. I stretched the contrast to make it appear black again. The focus isn’t quite spot-on, either.
M1 Crab nebula
The laptop I’m using for this is old and not very powerful, but I chose it because it’s small, light and frugal with its power consumption – which is useful when all the equipment is running from the car battery. However, it didn’t quite have the grunt and the processor was running at 100% the entire time. It worked, but was frustrating to use. Next time I’ll just take a normal laptop and keep an eye on the car battery voltage, in case I get stranded.
Anyway, having proved that the equipment was functioning and that my technique was at least acceptable, I set about taking some “proper” exposures to form part of a stack later on. At this point, the silence of the night was pierced by a squealing sound. I investigated, and found the source to be the laptop’s 12V power supply. As I looked at it, it made a loud pop and the magic smoke escaped. Clearly it wasn’t capable of supplying enough power. The laptop’s battery was at only 7% and obviously hadn’t been charging for a while. It lasted another couple of minutes, and then ran out – leaving me with no guiding or automatic exposure.
So that’s another astronomical outing where I came home almost empty-handed (without a proper picture to show for it, anyway) but at least I learnt some important lessons. Hopefully next time there will be some picture of some of the dimmer Messier objects that I haven’t been able to photograph in the past.
This week has been a bonanza for new toys, with five new cameras and some darkroom goodies. Here’s the round-up.
The first camera I purchased – a large format Horseman 45HD. This is to improve my landscape and architectural photography by increasing the field of view from my current Horseman 980. Some time soon I’ll finish and publish another article comparing the two cameras in more detail.
The other four cameras I was given. It’s ironic that in the same week I bought my largest camera I also obtained the smallest. The four donated cameras all have different and relatively unusual film sizes. In decreasing film format size:
Agfa Click II – medium format dumb camera with no exposure control
Kodak Instamatic 355X – it’s an Instamatic, what can you say?
Kodak Ektra 22 – a fairly typical 110-format mini camera
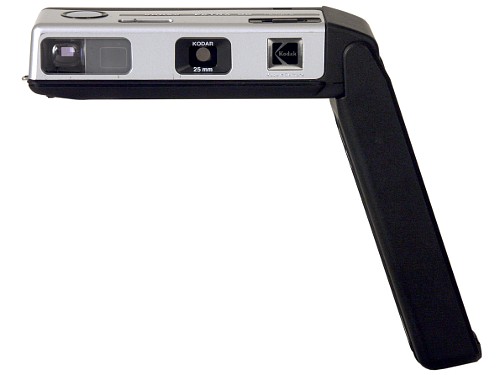
Mec 16 – a rather unusual subminiature camera taking 16mm cine film
Kodak Instamatic 355X
Kodak Ektra 22
Mec 16
Since obtaining a large format camera, I also needed to acquire a large format enlarger to make darkroom prints. I replaced my LPL C7700 with a De Vere 54. The De Vere is much older and much more basic, but can take huge negatives and make huge prints.
I had to re-jig a few things in my darkroom to fit it in. It has interchangeable baseboards. The one that came with it is enormous and takes up a lot of my worktop and is only really needed when making prints 16×12″ or larger. Most of the time I make 10×8″ prints so I made a smaller baseboard for everyday use. It only takes a few seconds to swap baseboards when I want to make large prints. Here the De Vere 54 is pictured with my smaller homemade baseboard.
LPL C7700
De Vere 54 w/ condenser head
As I drove to London to collect the new enlarger, the seller kindly gave me a few extras that weren’t worth selling. I happily walked away with two enlarger lenses, some multigrade filters, some 5×4″ film tanks and a slot processor. This stuff is all expensive if purchased new, but I think the seller was glad to see it go to someone who would make use of it.
This unusual camera was donated to my collection. It takes negatives on double-perforated 16mm film – the same type as used for cine cameras.
It has full manual controls – aperture, shutter speed and focus, all set by small dials on the top plate. The viewfinder pulls out from the left hand side. It’s a fun camera to use and seems to be built to a very high standard.
This is a simple camera, basically a box camera in all but shape. It has a slow, fixed-focus lens, a single-speed shutter and three selectable apertures. These are three holes of different sizes punched in a sheet of metal, rather than a continuously variable diaphragm.
This is a cheap and cheerful 110-format sub-miniature camera. Fixed aperture, three-speed shutter set by a switch with weather symbols. My copy was donated to my collection and came in excellent condition in original box, with some flash bulbs.
The Horseman 45HD is my first “modern” large format camera. It is remarkably similar to the medium format Horseman 980 that I already own. I use view cameras widely for landscape and architectural photography, but was struggling to find a lens wide enough on medium format.
Enter the 45HD – it takes all the same accessories as the 980 but gives a wider angle of view for the same lens. I think we’re going to get on very well.