This wonderful camera is one of the oldest in my collection, and yet I bought it specifically to use, not to look at. I wanted a medium format travel camera, because my medium format SLRs are too heavy to cycle with comfortably. This Super Ikonta folds up to a size barely larger than a modern digital compact, yet still produces 6×4.5cm negatives.
This camera was in quite bad condition when I bought it, but I had it restored. I wrote some notes about the Super Ikonta.
This article is specifically about capturing classical or other acoustic music with multiple microphones in a format that is suitable for playback on a 5.1 surround speaker system. 5.1 surround is desirable with classical music in particular to give the listener a sense of being in the midst of the music. If I can get 5.1 recording to work well, my use case is to record choral church music, which I have been recording in stereo for many years.
Note: I am specifically talking about recording in 5.1 in one take with multiple microphones. I’m not talking about upmixing stereo, or creating a 5.1 sound stage artificially by panning a multi-track recording. But those are probably fun things to try too! 😀
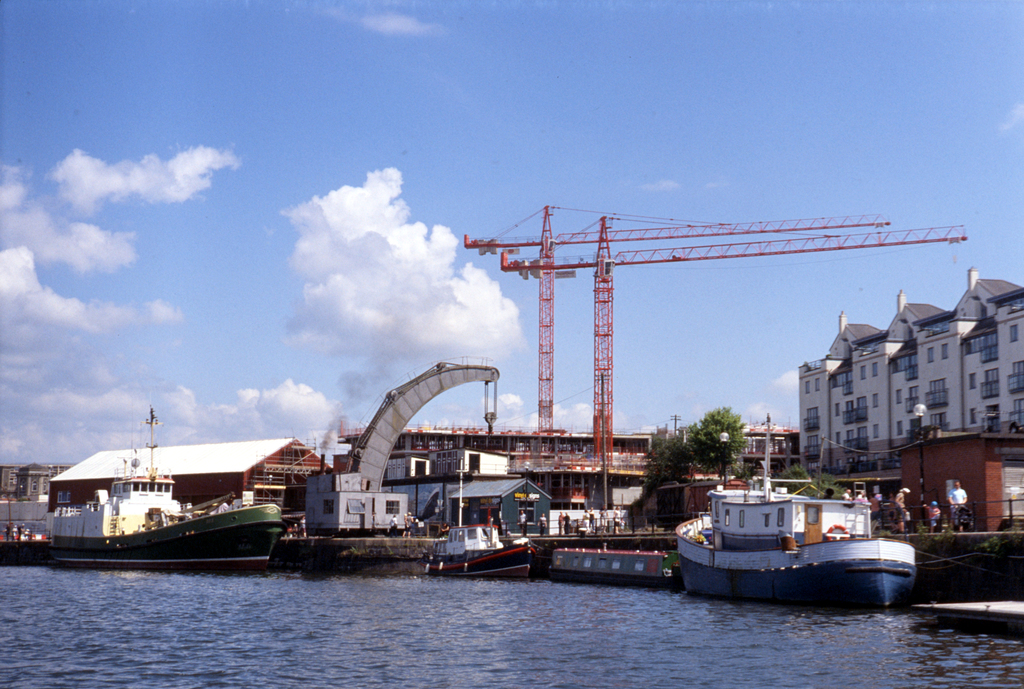
In a previous blog post about stereo recording techniques, I gave a description of the church building. It’s a bit odd because the choir sit at the front, while the organ is at the back. 5.1 will probably sound a bit wacky, but should be interesting. The church is a reverberant space and if I can capture some of the ambience and presence of the building, I will be very pleased.
St Mary’s Church
Microphones
The first question is how to lay out the microphones. 5.1 miking is far less well established than stereo miking. DPA Microphones have quite a helpful page about surround microphone techniques with some examples. I looked at the microphone arrays they suggest but with the equipment I currently have, I wasn’t able build any of them. Many of the designs demand the use of figure-of-8 microphones (which I don’t have) or lots of omnidirectional microphones (of which I have just two). The Fukada Tree looks most promising but needs a few more microphones than I have.
It looks quite simple as a diagram. In real life it’s not quite as pretty:
Williams microphone array
This Williams array is built from the following microphones:
L and R: Behringer B-5 small diaphragm condensers with cardioid capsule
Centre: Behringer B-1 large diaphragm condenser (cardioid)
Ls and Rs: Behringer C-2 small diaphragm condensers (cardioid)
The B-1 isn’t an ideal choice for this application – a small diaphragm would have been better. However I thought the large diaphragm would pick up more bass and could also provide the feed for the LFE subwoofer channel.
As you can see, this microphone array is quite large and intrusive, and not really suitable for use in a church service, so to prove the concept I decided to record choir practice instead. The music is interrupted here and there, but is definitely sufficient to prove whether or not the recording technique works! I placed the array on the D-shaped platform near the front of the church.
Mixing
The mix is straightforward, since each microphone is mapped directly to one channel. 5.1 actually means 5 surround channels and 1 LFE subwoofer channel – 6 channels in total. As you can see, my array contains only 5 microphones so the subwoofer (LFE) channel will be created by pinching the feed from the centre channel and filtering out the treble with a low-pass filter.
Audition 5.1 project
Mixing was quite laborious for me – my audio workstation only has stereo monitors and I had to render the project to a single 5.1-encoded file and copy it onto another PC which is attached to my 5.1 home theatre amp to listen to it. Rinse and repeat! If I’m going to make a habit of 5.1 mixing I’ll need to either get 5.1 speaker for my audio workstation, or start doing my 5.1 mixing using the home theatre PC downstairs.
After tinkering with the mix a bit, I decided that the subwoofer channel sounded best when I summed all of the other channels and sent them through the low-pass filter – not just the centre channel on its own.
Mastering
The only mastering step I did in the traditional sense was to add light compression to boost the volume in the quiet passages. Choirs have enormous dynamic range!
I’m using an old version of Adobe Audition (3.0, from 2007) which has fairly poor support for surround encoding. You work in stereo while doing the mixing and at the end It’s basically a case of “assign each project channel to a speaker channel and press the button, and it spits out a multi-channel WAV file”. I understand more recent versions of Audition support 5.1 projects better.
Audition surround encoder
Formats
Distributing 5.1 audio is a tricky issue. Most commercial 5.1 audio releases are sold either on a DVD-Audio disc or Blu-Ray audio disc (in both cases, these are not the same as video discs). I don’t have a Blu-Ray writer so I decided to try and make a DVD-A disc. It’s surprisingly hard to do – the specialist software is hard to find and expensive. I managed to find a free trial of one package and burn a disc which looked sane to me. However, my Sony Blu-Ray player refused to read the disc, so who knows. There is an open source project called DVD-Audio Tools, but I wasn’t able to compile it.
In the end I gave up. It seemed a bit of a waste of time as none of my friends have 5.1 audio systems, and I’m content just playing the files from my home theatre PC! I decided to convert the 6-channel WAV file to a 5.1 FLAC file, which is widely accepted (but not universal).
If you have a 5.1 system, you can download a sample FLAC file from this session (you might need the codec). This recording is Kyrie Eleison by Louis Vierne. It should play on stereo systems too, but obviously you won’t get the surround effect.
Kyrie Eleison
For anyone who wants to hear the recording but doesn’t have the ability to play FLAC in surround, here’s the stereo MP3 version – available for streaming or download.
Kyrie Eleison
Overall I’m happy with my first attempt at a 5.1 recording. There’s definitely room for improvement on the microphone side of things, but the biggest obstacles I face are with processing the recording and distributing it in a format that other people can play. The fact that a lot of people don’t have a 5.1 system at home or the interest in using it to listen to music means that this is a bit of a gimmick, too.
The Williams array I used is too obtrusive to use in a live service but could be used for “studio” recording sessions. For now, I will continue to record church music in stereo and distribute it as a good old audio CD, plus MP3s for streaming and download for those who want to listen on their iPod.
This is the closest to totality that we saw in Bristol during the solar eclipse this morning. Taken on a digital camera, but using a decidedly vintage Tokina RMC 400mm f/5.6 lens with Paragon 2x teleconverter and a custom-made solar filter.
I’ve used infrared film quite a lot in the past, but hardly used my infrared DSLR for anything except astronomy. I once tested digital infrared, but this is the first time I’ve properly used it for photography. These assorted shots were taken over the past few days, whenever the sun came out.
St Aidan’s Church
Troopers Hill
Bristol Bridge
These pictures were taken on a full-spectrum converted Canon EOS 600D using a much-despised Canon EF 28-80mm kit lens and a no-brand 760nm IR filter. While long exposures are the norm with IR film, all of these shots were taken handheld as my IR DSLR is almost as sensitive to IR as it is to visible light.
These photos are film a film I shot in June but only recently got processed. I normally process all my own films at home but this was one was a slide film and I send those away. I don’t have the chemicals required to process colour slides and I definitely don’t have the patience to cut the processed film into individual pictures and snap them into those little plastic frames without getting fingerprints on them.
Most of the photos were taken on a sunny cruise around Bristol floating harbour aboard Chris’s boat Amador. The sky was blue and the clouds were white and fluffy, and rather picturesque.
All of these pictures were taken with a Zorki 4 and Jupiter 8 50mm f/2 lens. Film was a roll of Fuji Sensia 200 which expired in 2008. Slide film has a reputation for being very fussy about correct exposure, especially expired slide film. The Zorki does not have a light meter so I exposed the whole roll using the sunny 16 rule in my head so I’m lucky these came out so well.
My scanner didn’t do a great job of the slide film, but it’s OK. It’s a lot more fun to project them and have a slide show!
This was the inaugural roll of film through my new (to me) Canon AT-1. It’s not a very exciting camera, having only shutter-priority or full manual exposure, and a fairly inaccurate match-needle meter. Nonetheless, its procurement was necessary for me to complete my collection of the Canon A series and there’s nothing I hate more than an unused camera – so I used it!
Canon AT-1
I loaded the AT-1 with a roll of Ilford FP4+ with a box speed of ISO 125, although I usually rate it at ISO 100. However, I accidentally left the meter dial set to ISO 800. It gets even worse – some of the pictures I decided to meter using the Sunny 16 rule, so those were exposed at ISO 100. I had flipped back and forth between the metering styles throughout the roll. I realised my mistake before processing the film, so I had the opportunity to minimise the badness during development.
I decided to process the film as ISO 200, hopefully getting a reasonable compromise between the ISO 100 and ISO 800 shots. On top of that, I developed with a dilute batch of Microphen, itself a low-contrast developer. This should make the extremities of the exposure slightly less extreme. After developing, the ISO 800 shots were quite thin, so I cut the film up to separate the the ISO 800 shots from the rest, and then intensified them in a selenium toner to increase the density a bit.
The result is a set of fairly thin, fairly low contrast negatives that would be tricky to print optically in the darkroom. However, with the magic of a decent scanner and careful tweaking of the curves in GIMP, I’ve ended up with a set of reasonable scans.
Dead flowers
Cat
Church of St Cyriac, Lacock
Tree carving
Crepuscular rays
With careful film handling, it is possible to get reasonable images. The flowers were exposed at ISO 100, the tree carving and sun rays were exposed at ISO 400 and the cat and church were exposed at ISO 800. The selenium toner did not affect the colour of the negatives, only the density. The sepia effect was added digitally after scanning.
Lenses used were a Canon FD 100mm f/4 macro for the flowers, Canon FD 135mm f/2.8 for the cat and sun rays, and Canon FD 50mm f/1.4 for the church and tree carving.
Long ago, before there was colour film, it was possible to create full colour pictures using black & white film with a set of coloured filters. This is exactly how three-strip Technicolour works. For movies, you have to use a beam-splitter to split the image into three. Each image is then passed through a different coloured filter (red, green or blue) and hits a different strip of film that is running through the camera.
Technicolor three-strip
For still photography of stationary subjects, we have the advantage of time and the three pictures can be taken one after another. I’ve been thinking about trying the technique for a while and finally got round to it this weekend. I set up a colourful scene on my table. I chose the boldest colours I could think of – a casino set with coloured chips. I couldn’t think of any good reason why I shouldn’t use an outlandish camera, so I set up my Horseman 45HD with Schneider-Kreuznach 150mm f/5.6 lens. I’m not completely insane though – rather than use 5×4″ sheet film I decided to go with my “crop back” which takes 6x9cm roll film.
Setup shot
I know doing macro with large format camera needs lots of light so as well as using the light from the window, I set up a 500W halogen lamp. Once I had taken into account the bellows extension factor, reciprocity failure of the film and the filter factor, I came up with an exposure of eight seconds at f/8 on Ilford FP4+. I shot the same scene three times, once through each filter.
RGB filters
When the film was developed, washed and dried, I scanned it in black & white. The three pictures look quite similar at first glance, but at closer inspection there are obvious differences between them. Coloured filters make their own colour appear paler in black & white, so in the red picture, the red markings on the cards appear almost white.
Red
Blue
I combined the three images in GIMP using the compose tool. The stacking itself is easy enough but you have to make sure your source images are exactly the same dimensions and positioned correctly. Mine weren’t, due to the slightly shonky film advance. Five minutes of alignment and cropping and I was ready to go. Here’s the final product.
Three-colour image
It works! The green and red colour fringes on the nine of diamonds shows I didn’t get quite get the alignment perfect, but it’s pretty good. The colours are a bit “off” presumably because my filters are cheap and aren’t perfect saturated red, green and blue.
The blue tokens have rendered nicely. The red and yellow ones are a bit faded, while the green felt is quite dark. It does look like a scene from an old movie. I’m very pleased with the effect! This is definitely one to try again.
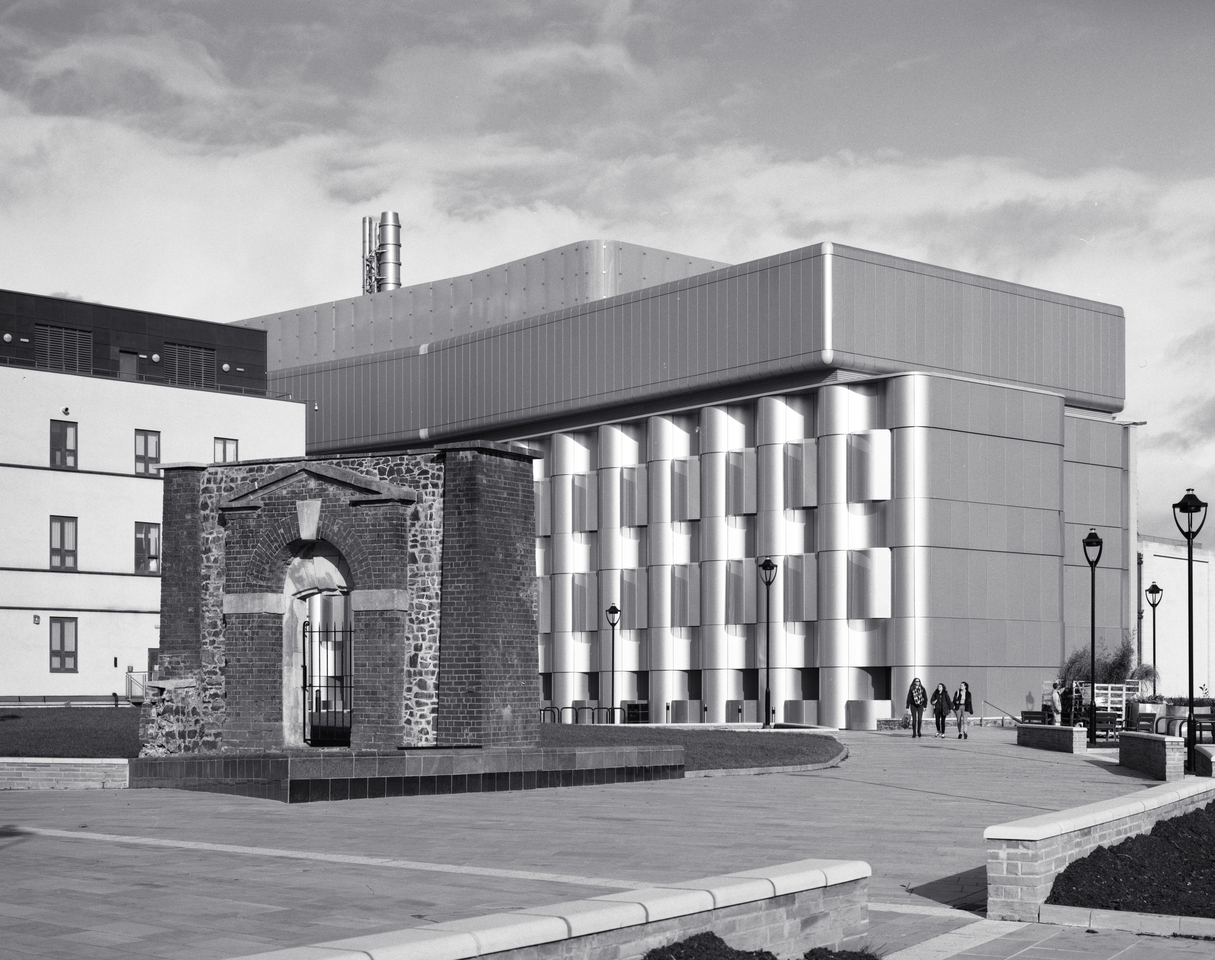
In October 2014, the University of Bristol completed its new Life Sciences building. I’ve been wanting to photograph it since then but until now there has been continuing groundwork outside with an array of temporary fencing. The last of the fencing was removed this week, so I popped out of my office with the camera and took this picture.
Life Sciences Building
The large silver building is the Life Sciences building. The side facing the camera is windowless, since it contains science labs. The white building to the left is the rear of the Centre for Nanoscience and Quantum Information. A paved precinct was made too: the arch in the foreground I haven’t been able to find much information about, but I think it is part of the civil war era Royal Fort – obviously the red brick gate arch is a later addition! The fort itself is long gone, but Royal Fort House now stands in a garden on the site of the fortification.
Horseman 45HD camera with Schneider-Kreuznach Symmar-S 150mm f/5.6 lens. Exposure was 1/125 at f/16 on Ilford FP4+, developed in ID-11. Front rise to correct verticals, no other movements or filters. Scanned directly from the negative.
I’m not taking or posting enough photos at the moment so I decided to jump into this week’s Photo Challenge after a few weeks off. The theme is movement. I remember some months ago finding a mini strobe light in a charity shop and for ages I’ve been meaning to take an action shot using this fast strobe and a long exposure to include a moving subject in the frame several times.
I tried a few household objects but none really came out how I had imagined them. The best of the bunch is this picture of me tearing a sheet of paper in two.
Tearing paper
It’s a one-second exposure during which time the strobe seems to have fired at least seven times. The focus is a bit off, but ho hum. Camera was a Canon 600D with an EF 50mm f/1.8 lens.
Since about 2008 I’ve been using a Phonic Helix Board 24 Firewire mixer as a digital audio interface for multi-track recording, but also for digitising various analogue sources such as vinyl records, cassettes and the sound from Super 8 movies.
Phonic Helix Board 24 Firewire
It’s a fully-featured mixing desk and it does an excellent job of pretty much everything – but when bolted into its wheeled flight case with amps for live use, it is large and heavy. It’s a great choice when I’m doing live sound or a multi-track recording, but overkill when I’m recording choral evensong with two microphones or capturing an LP from my turntable.
I’ve been pondering buying a small USB audio interface for a while but I finally bought one today when I saw an M-Audio M-Track on special offer.
M-Audio M-Track
It’s a simple but versatile device. It has two inputs (which can be coupled as one stereo input) and accepts either 1/4″ TRS jack or XLR input connectors. It provides 48V phantom power for mics that need it, switchable impedance for connecting guitars without a DI box and monitoring outputs that can be connected to an amp and speakers, or a pair of headphones. It is fully powered from the USB bus, including the phantom power so it can be used with a laptop without needing a mains connection.
On paper, the specs look competitive with the larger and much more expensive Helix device. It’s hard to draw a direct comparison since some of the Helix figures are given as ranges.
Helix Board 24
M-Track
>90 dB
Signal-to-noise ratio
97 dB
<0.005%
Total harmonic distortion
0.005%
10.5 kg
Weight
0.7 kg
445 x 212 x 432 mm
Dimensions
155 x 124 x 51 mm
16
Inputs
2
Of course specs on paper are only half the story, and it’s how these things perform in reality and how they sound that matters.
So far I’ve used the M-Track to record one church service and about 60 hours of vinyl. I am extremely pleased with the results. The dynamic range and noise are really very good and the sound is rich and full-bodied across the entire range of frequencies.
Anecdotally, I noticed that the frequency range of the M-Track seems to extend lower than that of the Helix. For the church recording test, I set up the recording microphones in the same way that I always do. In the raw recording, there was a strange buffeting sensation that was too low to hear, but loud enough to affect the dynamic range compression. I was stumped at first, until I realised that I was hearing the sound air convection currents moving around the church, disturbing the microphones at sub-sonic frequencies. This had always been happening, but the Helix had presumably been filtering out frequencies below 20Hz. When I set a high-pass filter at 20Hz, the problem disappeared. My condenser microphones have an optional wind-shield (below) which I hadn’t bothered using so far. I will start using those now to see if it avoids the problem!
Behringer B-5 with accessories
For those who are interested in the details, the church recording was made with a pair of Behringer B-5 microphones, using the omnidirectional capsules. The mics were spaced about 1m apart and connected to the M-Track using balanced cable via the XLR connectors and powered via the M-Track’s phantom power. For more info on recording in churches, you might want to read my comparison of microphone techniques.