Using Canon FD lenses on digital cameras

Digital camera lenses are expensive, so it’s no wonder people are turning to much cheaper second-hand manual focus lenses. However these older, mechanical lenses behave quite differently from the electronic ones that digital camera owners are used to. This article discusses the key differences and will hopefully help you get the best out of manual focus lenses on your digital camera. I will mostly be discussing Canon FD lenses since this is what I know best, but most of the advice applies to any manual focus lens.

Canon EOS M
Canon EOS M

Interchangeable lens fundamentals

If you know about SLR interchangeable lens systems, skip this section. Every interchangeable-lens camera, including 35mm SLRs, DSLRs and mirrorless cameras has a lens system, also known as a mount. This is basically a set of lenses designed to work with a set of cameras. For instance, Canon FD lenses work on Canon FD cameras, Canon EF lenses work on Canon EOS cameras and Canon EF-M lenses work on Canon EOS M cameras. Different mounts offer different levels of functionality – the Canon FD mount offers aperture control but no autofocus. EF and EF-M, being designed for autofocus cameras, do offer autofocus.

Canon FD 50mm f/1.4 lens

You can mix things up a bit by using an adapter to mount the “wrong” lens on the “wrong” camera. Depending which lens you put on what camera, you can expect different levels of functionality. Each of the following sections discusses one aspect.

Flange focal distance

Each mount has something called the flange focal distance. This is the intended distance between the back of the lens, and the sensor (or film). For SLRs, this is usually 40-50mm, so there is enough room for the moving mirror to do its thing. On mirrorless cameras, flange focal distance is usually less than 20mm as there isn’t a mirror.

Adding an adapter between a lens and camera increases the flange focal distance by 5-10mm. If the total distance is longer than the lens’s flange focal distance, that particular camera/lens combo will not be able to focus at infinity. You will not be able to focus more than a few feet away.

Flange focal distance

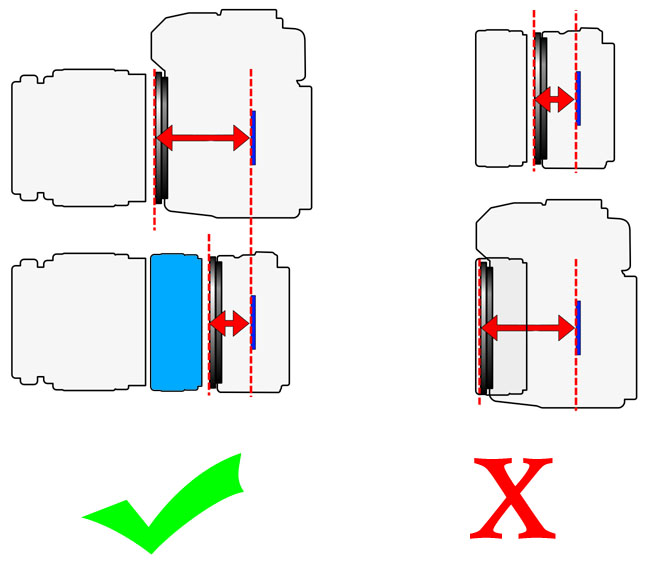
For example, the Canon FD mount has a flange focal length of 42mm. The Canon EF mount has a flange focal length of 44mm. Immediately you can see that Canon FD lenses will not focus to infinity on Canon EF/EOS camera – especially not when you add in a 5mm thick adapter. In this case, you’d space the lens out to at least 49mm – which far exceeds 42mm.

Some mount adapters include a lens element of their own which can work around this problem and allow you to focus at infinity even if your total length exceeds the flange focal length of the lens. These are almost never worthwhile, since the glass lens element degrades the image quality. If you are buying an adapter on eBay or similar, look for glassless and infinity focus. Avoid ones that say macro or with optic.

Kood FD-EF adapter
Kood FD-EF adapter

Luckily, mirrorless cameras have such a tiny flange focal length that they can accept pretty much any lens and still focus at infinity using a glassless adapter. This article concentrates on mirrorless cameras, in my case a Canon EOS M, but this also applies to Micro 4/3 cameras like the Sony NEX series, Olympus Pen-E series, some Panasonic Lumix models and other cameras too.

Crop factor

Almost all manual focus lenses were designed for 35mm film cameras which has an image size of 36×24mm. Traditionally this is called the 35mm image format, but these days it is often known as full frame. Most mirrorless cameras have either an APS-C sensor (23×15mm), or a Micro Four-Thirds sensor (18×13.5mm).

The smaller sensor size means the picture will be more “zoomy” for the same focal length. The normal lens is the focal length that gives a standard field of view with a specific camera. For 35mm full frame cameras, the normal lens is 50mm (and that’s what was bundled with every 35mm SLR as a kit lens). For mirrorless cameras, the normal lens has a shorter focal length. If you want a lens with a normal field of view, you’ll need a shorter focal length than 50mm. However you’ll also find that 50mm is a nice focal length for portraits on mirrorless cameras.

550px-Sensor_sizes_overlaid_inside_-_updated.svg

The crop factor tells you how more “zoomy” the lens is on your mirrorless camera than on its original 35mm SLR. Don’t worry too much about the crop factor; it doesn’t mean a huge amount and yet some people put a lot of emphasis on it.

Sensor type Size Normal lens Crop factor
35mm full frame 36×24mm 50mm 1.0×
APS-C 23×15mm 35mm 1.5×
Micro 4/3 18×13.5mm 24mm 2.0×

Manual focus

As this article is about manual focus lenses, hopefully by now you’ve realised you don’t get autofocus! Manual focus isn’t hard, but cameras originally designed for manual focus (like Canon FD SLRs) have focusing aids like microprisms or a split image circle. Autofocus cameras don’t have these things, so you should use live view and focus as carefully as possible. You can also use the magnified live view for precise focusing.

Split circle & microprisms

Metering

In most cases, automatic metering relies on the camera knowing what the lens aperture is set to, and what the lens’s maximum aperture is. In digital lenses this is done with digital electrical contacts around the edge of the lens mount and in manual focus lenses this is usually done with a set of mechanical linkages.

Lens adapters do not convert one kind to the other, so your camera will be flying blind. The only way to get accurate auto-exposure on a mirrorless camera with a manual focus lens is to use aperture priority metering, also known as A or Av mode. The idea behind A mode is the photographer sets the aperture and the camera chooses the correct shutter speed for the right exposure. Even if the camera can’t tell what your aperture dial is set to, it will choose the best shutter speed for whatever amount of light is entering the camera.

Canon FD lenses are what was known as “automatic” in the 1970s. This means whatever you set the aperture ring to, the aperture diaphragm doesn’t actually change until it receives a signal from the camera (by prodding a lever) and it temporarily stops down the aperture at the moment the photo is taken. This means the aperture stays wide open while you are focusing, so the viewfinder is nice and bright.

A digital mirrorless camera can’t send the stop-down signal, so Canon FD lens adapters have a switch which can be set to A or M (on some adapters they are marked OPEN/CLOSED, OPEN/LOCK or even OFF/ON). Set the adapter to A or OPEN while focusing and switch it to M or CLOSED to stop down the aperture to the chosen value when you take the picture. Many mirrorless cameras have a live view that is sensitive enough that you can keep the aperture stopped down all the time.

Summary

  • Use a digital mirrorless camera rather than an SLR – you’ll have many more options
  • Avoid lens adapters with glass optics
  • Remember manual focus lenses have a narrower field of view on mirrorless cameras
  • Use magnified live view for precise focusing
  • Focus with the aperture open, and then stop it down for taking the picture

I hope I’ve covered everything. If not, please ask in the comments!

Bright lights, big city

Last night I went up Troopers Hill to watch and take pictures of the Perseid meteors. Unfortunately after 30 minutes I’d only seen one meteor and needless to say, that’s when the camera wasn’t running…

It wasn’t an entirely wasted trip though, as I grabbed this shot of the lights of central Bristol before returning home.

Technically, it’s not great. I should have stopped down for extra sharpness and there is quite a lot of noise and a few hot pixels. I still like it, though.

Sherborne Abbey

We visited Sherborne Abbey almost a year ago, and enjoyed it so much that we went back again this year. The real point of the visit was to hear Hannah sing at choral evensong in In Ecclesia Exon. If you came here for the photos, then please enjoy. For more photographic rambling, scroll down 🙂

The final picture in this gallery is the only one in colour. The black & white images were scanned directly from the negatives, while the colour one was scanned from a split-toned print. Compared to the original negative, I cropped it a bit during printing and then toned it in copper red followed by iron blue, to give red highlights and blue shadows. Getting the split between red and blue to fall in the right place is trial and error – I did quite a few test strips before making the print. I’m extremely happy with it though – it’s one of my best prints and is currently sitting in pride of place on my grandmother’s coffee table. Apparently that’s one up on being stuck on my parents’ fridge.

On the previous visit, I took a 35mm Canon T90 and a 17mm f/4 ultra wide angle lens, and shot some Ilford Delta 3200. In general I was pleased with the results but the grain was quite prominent, limiting the maximum enlargement size. This time I took my Mamiya M645 with 35mm f/3.5 lens which gives a much larger negative but keeps the angle of view approximately the same. This is the first time I’ve used the M645 wide angle combo in a large church.

Due to low lighting in the abbey, I decided to push the Delta 3200 one stop to 6400. The grain is quite bad, but because the negatives are larger it is not so prominent. Next time I may not push to 6400 – I don’t think it’s necessary as the M645 is nice and easy to hold securely, meaning you can use some of the slower shutter speeds handheld.

I struggled with the metering at 6400. The CdS metered prism on my M645 had an option for ISO 6400 but it can only meter across a very limited range of shutter speeds at that high ISO. There is a mechanical interlock that prevents you from setting slow shutter speeds at higher ISOs. I hadn’t appreciated this until I was already in the abbey (an hour’s drive from home). The retro 1970s user manual for the prism explains it nicely – the slowest shutter speed you can set using the CdS meter is 1/125 which is far too fast. I was wanting to shoot at 1/30 handheld and even slower than that if the camera was balanced on a pew. Next time I use the M645 in low light I will definitely take a separate light meter. This hadn’t been a problem with the Canon T90 I took last time, but that is ten years younger than the M645. Technology moves on a lot in a decade!

M645 shutter speeds
M645 shutter speeds

Metering aside, the M645 is a very capable camera at this type of photography. Tripods are not often allowed in cathedrals but the M645 is fairly lightweight and easy to carry (compared to its big brother, the RB67). Either with a prism or the waist-level finder it is quite easy to hold and shoot at slow speeds. There is also a wide range of lenses available for the M645, and the M645’s 35mm f/3.5 is wider on 6×4.5 (90°) than the RB67’s 50mm f/4.5 on 6×7 (81°), although unfortunately neither is quite as wide as my Canon FD 17mm f/4 on 35mm (104°).

Magnificent beasts

Hannah and I went to Longleat again recently. We’ve been a few times before because we enjoy it so much, which means I’ve taken most of the photos I can take there. This time, I was more content just to sit, look, listen and admire the animals. Of course I got my camera out a few times and we were unusually lucky to get quite close to the lions and tigers this time. Often they like to hide away in the shade, but this lion sat peacefully only a few strides from the car!

I was armed with a Canon EOS 600D with Sigma 100-300mm f/4 and a Canon EOS 5 (not 5D) with the less-than-stellar Canon EF 28-80mm f/3.5-5.6. I enjoyed shooting with the EOS 5 a lot, although I’m not sure if I’d take it to a safari park as my only camera. Maybe next time!

Summer evening in Bristol

These pictures were taken on a lazy walk after work on a warm summer’s evening. There was a lovely glow in the air and people were relaxed. I did my best to capture the easy vibe with my Zorki-4, Jupiter-8 and a roll of Agfa Vista 200, aka Poundland film.

Panoramas

These panoramas were taken with a medium format film camera (a Mamiya RB67) loaded with 35mm film. I’ve taken panoramas in this way before, but this time I used a 3D-printed spool adapter.

35mm film with 120 adapters

I managed to squeeze 11 panoramas onto a film designed for 24 exposures. These are my favourite two – scanned without the sprocket holes.

Tintern

At the weekend I went for a walk around the Tintern area with a friend. We walked about eight miles, starting from Tintern Abbey and heading up to the Devil’s Pulpit which overlooks it. It’s quite a steep climb to the top! Much of the walk was in shady woodland and there weren’t many opportunities for photos. However the Devil’s Pulpit afforded an excellent view over the ruined abbey, the village and the Wye valley.

Elsewhere on the walk we were caught in rain so we sheltered in a barn for about half an hour. There was a rusty old tractor in there so I grabbed a couple of shots while waiting for the rain to pass.

These pictures were taken with a Canon AL-1 QF camera using Ilford FP4+ film. I carried a few lenses and I used the 135mm f/2.8 for the abbey, the 17mm f/4 for the tractor and the 50mm f/1.4 for the tractor detail.

Colour pictures from black & white film (again)

After success using this technique on a casino set, I decided to try again with a different subject. This time I chose some peppers. Everything else was the same – I shot the scene sequentially through red, green and blue filters – and recombined the three channels digitally.

Once again, the green filter wasn’t the right shade of green and so the green pepper looks closer to black.

Ultraviolet photography

The common mention of “ultraviolet” in photography is the use of ultraviolet (UV) filters, which specifically block UV light and allow visible light into the camera. This is less important in the digital days since UV is also blocked at the camera sensor. It was more important in the film days when too much UV light could fog the film.

Today I am talking about the opposite of this – a filter that blocks visible light and permits UV. I’ve owned a full-spectrum DSLR for astronomy for a while now but I’ve only really experimented with infrared (IR). Recently I came into a set of “instrument filters” in a charity shop which turned out to be two UV-pass filters and one IR-pass filters. They were not labelled so I’m not sure what the bandpass is although in bright daylight, with the naked eye I can see dim purple objects through the UV filters and dim red objects through the IR filter.

Filters
Filters

I’ve got a bunch of lenses, old and new that fit my DSLR. However the instrument filters are 2″ square glass and most of my lenses are too big – they would not be covered by a 2″ filter. Eventually I found two lenses that accept 49mm screw-fit filters, so they can be completely covered by a 2″ square glass filter. The lenses are a Pentacon 30mm f/3.5 wide angle and a Paragon 35mm f/3.5 wide angle (also branded as Photax). Both are M42 fit – easily adapted to Canon EF without extra glass. On the DSLR’s crop sensor, they are not quite as wide – in fact the 35mm lens is about a normal lens on APS-C. After a (very) brief experiment I discovered that the Paragon was a bit better at transmitting UV than the Pentacon, so I decided to use that.

Paragon 35mm f/3.5
Paragon 35mm f/3.5

Here are my test shots with these filters, taken with both UV filters, the IR filter and finally with no filter. (To me, #nofilter doesn’t mean a selfie without Instagram). In each case I set a custom white balance for that filter.

The results weren’t quite what I was expecting. I expected the UV pictures to be startlingly different from the IR pictures. However, except the sky, the two pictures are very similar. I think what is happening is that the UV filter must be transmitting UV and IR. The IR is both brighter than the UV, and the camera’s sensor is more sensitive to it. In the bright areas, the IR drowns out the UV. In the sky, which is dark in the IR picture, the UV shows through – hence the purple sky. I’ll have to get onto my tame scientist friend and see if I can use his spectrophotometer again.

Regardless of the science, shooting through this UV filter gives an unusual effect. I went for a short walk on Troopers Hill again and came up with these pictures in the evening sun. These have had no editing except for the custom white balance set on the camera and a slight boost to contrast on the computer.