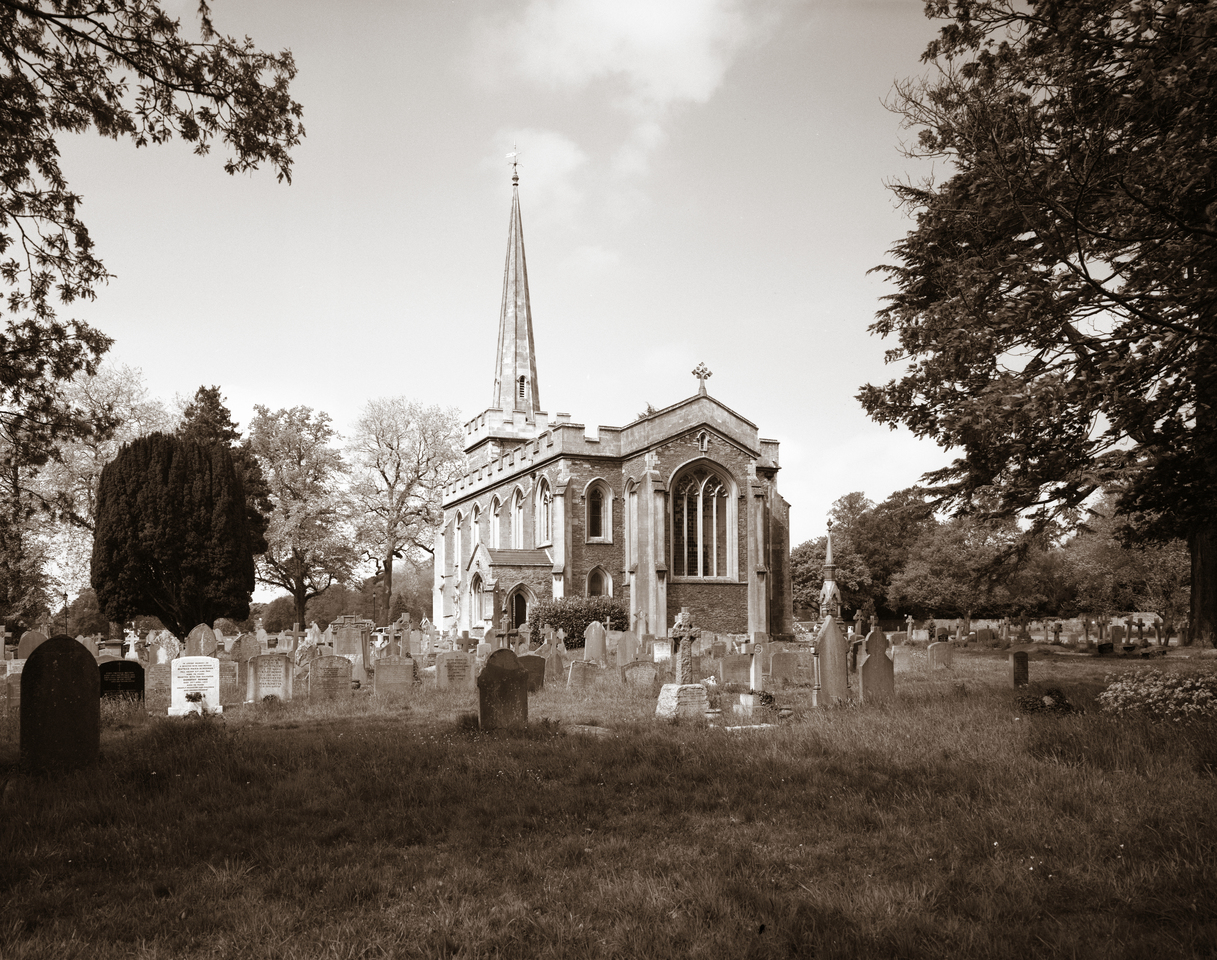
Although St John the Baptist church is not far from my house, I’d never been past it and didn’t know it existed. Over the last few weeks we were invited to both a wedding and a christening at this lovely church, and I vowed to return with my largest camera to do it justice. The church stands in the middle of Frenchay Common, which means it is surrounded by open space (and a few trees) so you can step back and take a photo that encompasses the church and its surroundings.
St John the Baptist, Frenchay
This picture was taken with a Horseman 45HD field camera, equipped with a Schneider Super Angulon 90mm f/8 wide angle lens. Exposure was taken through a yellow filter on Ilford FP4+ film.
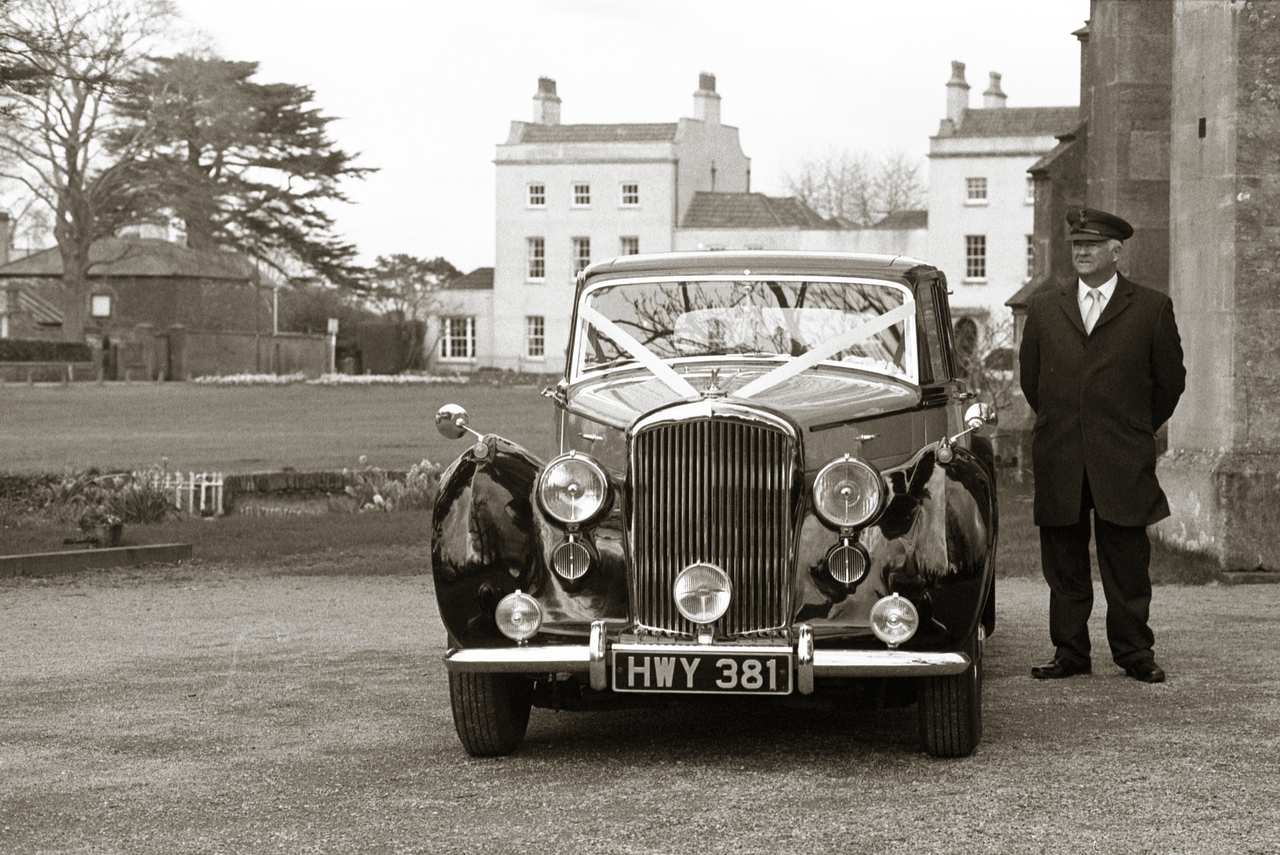
Some of our friends got married recently, and their wedding car was a Bentley Mark VI. I’m no classic car buff but this vehicle was beautifully built, maintained, and polished, and well-worthy of a picture or two. Photographs taken on Frenchay Common, Bristol.
Recently I’ve had an inkling to dabble in large format portraiture rather than medium format. In particular I’ve wanted to try using older lenses with their various flaws. So far my only large format lenses have been high-quality Schneider lenses of (relatively) modern design and wide-to-normal focal lengths, so I decided to pick up some old lenses.
Large format lenses
Trouble is, old large format lenses seem to attract high prices these days so I’ve been watching eBay for weeks to find some bargains. This week, I finally struck gold and these three beauties were added to my collection for tiny prices. Thanks again to Arthur for turning his metalworking skills to making some aluminium lens boards for me.
Zeiss Ikon Tessar 120mm f/4.5
Zeiss Ikon Tessar 12cm 1:4.5
This Tessar wasn’t purchased on its own but rather mounted on a Zeiss Ikon Icarette 500/15. It is easily (and reversibly!) removed and can be mounted in a lens board for use on a large format camera. After a not-very-successful attempt to convert the Icarette to a 6x11cm camera with 120 film I decided this lens would be better put to use on my Horseman 45HD.
The Tessar design was patented in 1902 and this particular lens was made in about 1930. This Tessar was designed for use with a camera that takes 116 film, with a negative size of 4¼×2½”. It will probably vignette on 5×4″ but should be great with my 6×9 roll film back as it is quite fast.
Kodak Ektar 203mm f/7.7
Kodak Ektar 203mm f/7.7
The Ektar 203mm (originally marketed as 8″ Anastigmat) was designed to cover a 7×5″ negative so no problems with 5×4″. The original Kodak 8″ Anastigmat was introduced in 1915 and the lens was marketed with only minor modifications until the 1950s. Not many other photographic products can boast such a long lifetime! The Ektar series were traditionally Kodak’s professional line and this lens in particular has a reputation for sharpness, and still holds its own today. This is the longest large format lens I have.
Bausch & Lomb Rapid Rectilinear
Bausch & Lomb Rapid Rectilinear
The Rapid Rectilinear design was first patented in 1866 but this particular Rapid Rectilinear lens was apparently introduced in 1897 and is most well-known for its use on the Kodak postcard cameras including the No. 3A Folding Pocket Kodak (1903-1915). These cameras took negatives of size 5½×3¼” so this lens should just about cover 5×4″ – however it turns out the lens can actually cover 7×5″.
This lens is probably the most interesting out of the three because it is not anastigmatic and should show some interesting distortions which lend an antique feel to the pictures.
It’s important to note that although the largest aperture marked on the scale is 4, this is not an f/4 lens. The lens is marked with the Uniform System and US4 is actually equivalent to f/8.
Facts & figures
Lens
Year
Focal length
Aperture
Coverage
Elements/Groups
Mounting
Key points
Tessar
1930
120mm
f/4.5
4¼×2½”
4/3
30mm hole in aluminium lens board
Sharp & fast
Ektar
1915
203mm (8″)
f/7.7
7×5″
4/4
Copal #0 hole in aluminium lens board
Sharp & long
Rapid Rectilinear
1903
190mm (7½”)
f/8
7×5″
4/2
Copal #0 hole in wooden lens board
Unsharp & fun
Tests
I shot four test shots of Hannah with my Horseman 45HD using the three lenses listed above, and a “modern” Schneider-Kreuznach Symmar-S 150mm f/5.6 for comparison. All lenses were shot wide open to maximise any aberrations, vignetting, etc. I used a couple of speedlites and metered approximately using my DSLR. Only the Symmar-S comes in a shutter with flash sync so for the other lenses I shot in Bulb mode and manually fired the strobes as quickly as possible.
Kodak Ektar 203mm
Rapid Rectilinear 190mm
Schneider Symmar-S 150mm
Tessar 120mm
I knew the Ektar and Rapid Rectilinear would easily cover 5×4″, having been designed for 7×5″. However it was a very pleasant surprise that the Tessar all-but covered a 5×4″ negative, leaving only a small vignette in the corners. That’s wide open too – the vignette would lessen if I stopped down.
Ektar
This lens has a longer focal length and my Horseman 45HD has quite a short bed. Even with the front standard all the way forward and the focusing bed fully extended, I was not able to focus on Hannah where she was standing so I had to ask her to step back, closer to the blind.
The lens is good though – hardly any visible vignetting and plenty of sharpness. I will use this again for further-away subjects where I can focus properly.
Rapid Rectilinear
Being an older lens design, this lens shows a little more vignetting in the corners. It would probably clear up if I stopped down a bit. The lens has a little bit of pleasant softness but is still surprisingly good for something designed 120 years ago. It’s also possible I didn’t focus perfectly.
This lens needs more testing with a more interesting background but I think it could become a useful portrait lens in my arsenal.
Symmar-S
As expected, this lens is capable of making very sharp images and serves as a good control. At only 150mm it’s not quite long enough for large format portraits.
Tessar
I don’t know what happened to this negative. It looks like the shutter stuck open and experienced some motion blur. The negative is also a bit over-exposed because I forgot to turn the flash power down to account for the faster f/4.5 lens.
There is noticeable vignetting in the corners, as expected, but this lens is doing remarkably well for one that was never designed to cover 5×4″.
This lens is too short to be a useful portrait lens on large format but it could be ideal on medium format with my 6×9 roll film back.
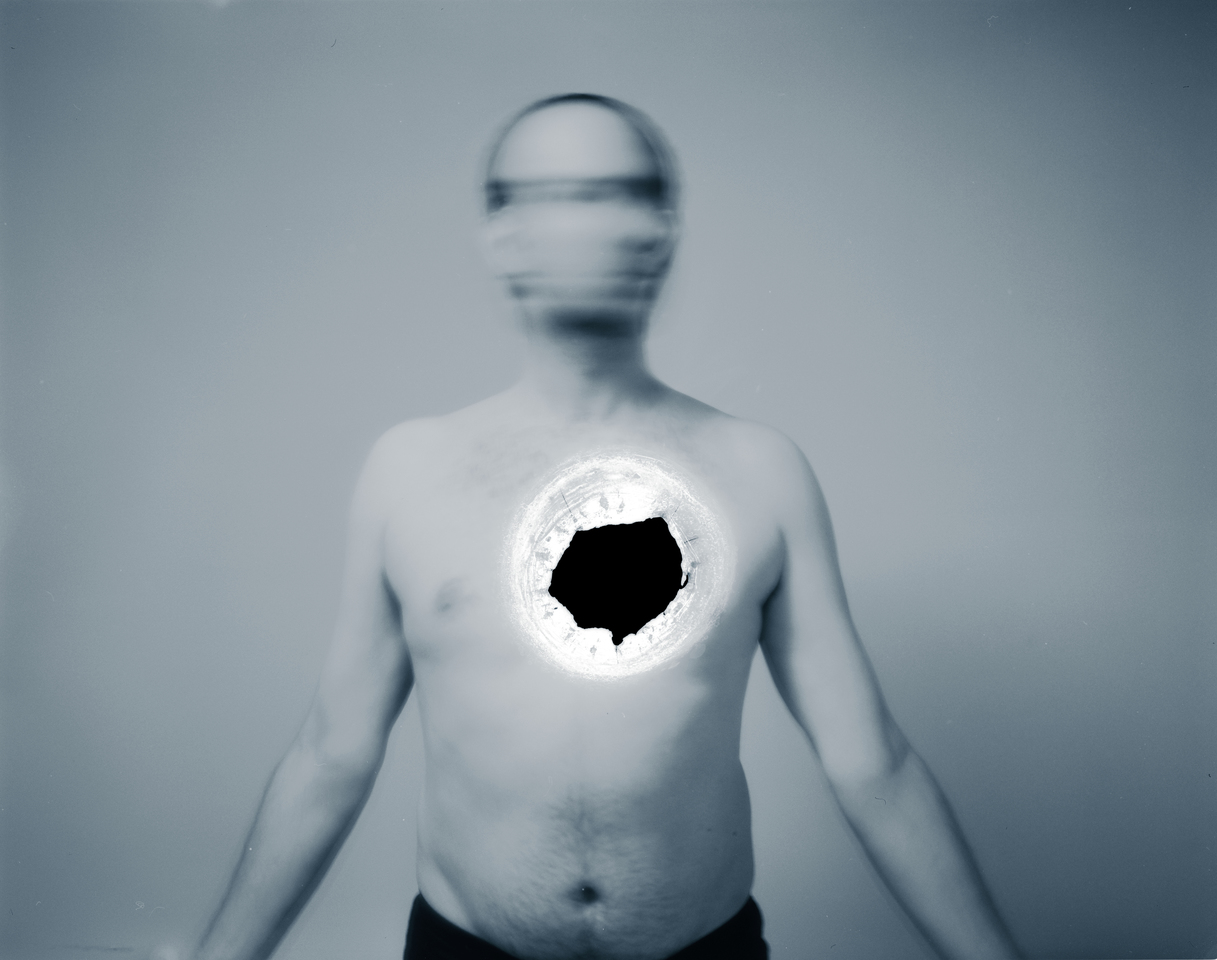
Last week I published a picture entitled The Black Dog, which was a reflective piece on the subject of depression. I’ve had a few people ask how it was done, and while a magician never reveals his tricks, fortunately I am a photographer rather than a magician, so here goes.
In order for this idea to work, I needed the largest negative possible so I chose my Horseman 45HD which takes negatives 5×4″ in size. I wanted to shoot with the aperture wide open for a softly-focused image. I also needed motion blur for the picture (moving my head to obscure my face) so it was important to keep the lighting relatively low to allow a long exposure. I used normal room lighting in the bedroom. I chose a Schneider-Kreuznach Symmar-S 150mm f/5.6 lens which is about “normal” on the format – similar field of view to a 50mm lens on a full frame SLR or a 35mm lens on a crop-sensor DSLR.
I needed a plain, middle grey background for the picture. We’d just redecorated the bedroom – the walls were a pleasant, warm shade of pale brown and all the furniture had been removed so I had space to work. Without autofocus, you can’t focus on yourself so I placed a light stand where I would stand and focused on that. Critical focus is not important – I wanted the finished result to be soft.
Focusing on a light stand
The Horseman 45HD does not have a self timer so the only way of taking your own picture is to use a shutter release cable. I used a pneumatic bulb so I could step on it with my foot to trigger the camera.
Shutter release
To take the picture, I set the shutter to Bulb mode, removed the dark slide, stood in the place marked by the light stand, started shaking my head, stepped on the bulb release for two seconds, and replaced the dark slide.
Then it was a matter of developing the film. To achieve the “hole in the heart” effect, I burnt a hole in the negative with a small chef’s blowtorch. It’s easier than a lighter because the flame is narrower and doesn’t move around. The film burns quickly and easily so you have to apply the flame in just the right place and then blow it out before the flame spreads. The film curls up rapidly when burning, and I ruined one negative which screwed itself up. On the second attempt at burning, I held the film flat in a large format negative carrier.
Burnt negative
On this occasion, I decided to scan the negative in with an Epson V700 scanner and tint it blue using a digital cyanotype effect. I could just as easily have made a darkroom print and used iron blue toner to achieve the same effect. The vignette is a natural side effect of shooting a large format lens wide open.
This week’s Photo Challenge was entitled The Black Dog and it asked participants to take a picture on the theme of depression. This is my entry.
The Black Dog
This is a self-portrait with a two-second exposure time so I could move my head and blur my face. The negative was taken with a large format camera (my Horseman 45HD) and is 5×4″ in size – big enough for me to burn a hole through my heart with a chef’s blowtorch. I scanned the negative and applied a cyanotype effect digitally.
A couple of members of the Vintage Camera Collectors group persuaded me to concentrate on where my two main hobbies (photography and audio recording) meet, and record the sounds of some of my cameras.
Quite a lot of my cameras currently have film in them so I started with just a small selection. Unfortunately all the motor-drive cameras and my Super-8 camera are tied up with film. All of the Canon A-series have the same shutter so I only recorded the Canon AV-1.
In most of these clips I fired the camera a couple of times at ¹/60 and then again at 1″. It sounds like my Pellix is running very fast!
These clips were recorded with a Sontronics STC-1 condenser microphone. Next time I would probably do this in stereo with two microphones.
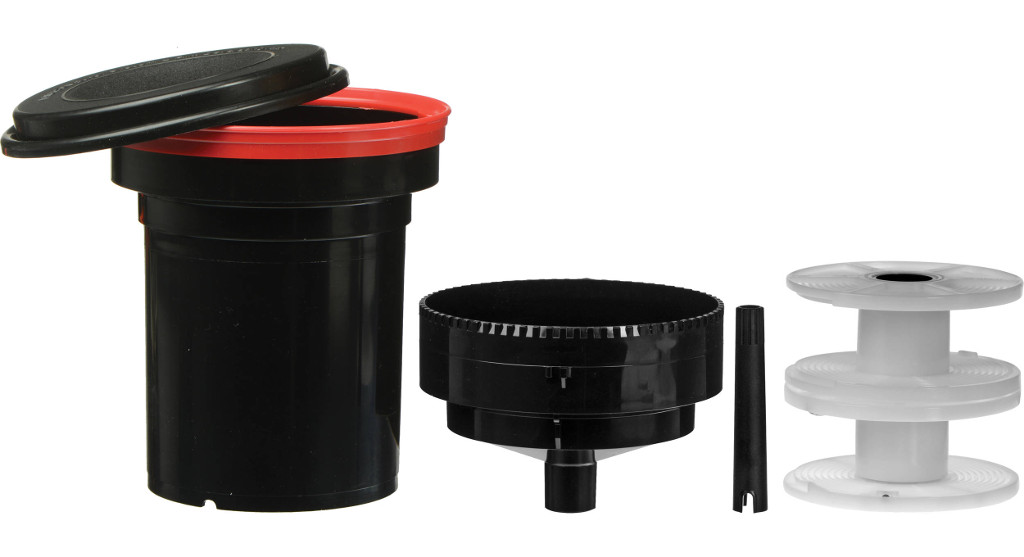
Processing your own black & white film is not too difficult and very rewarding, but lots of people don’t know quite where to start. This guide will help you get set up, get the right equipment on a budget, and be well on your way to developing your first film.
Equipment
There are various kits available which provide “everything” you need. Some provide more than you need, and some miss out on one or two key components. This is my “bare minimum” kit list from experience. Wherever possible I use general household items but I’ve also linked to my favourite UK supplier of photographic equipment where relevant.
Film tank & reel
This is the only “specialist” piece of equipment you need. Can be purchased new for about £20 or second-hand for less.
Dark place
You don’t need a complete darkroom to process film. You need a completely dark place to load the film into the film tank. If you have a windowless bathroom or a cupboard under the stairs, this is fine. You can use a towel to block off the gap under the door. Otherwise, you can buy a lightproof changing bag which allows you to load the film in a normal room.
Bottle opener
To open the film canister. Much cheaper than a dedicated film canister opener!
Scissors
To cut the film. Paper scissors are fine.
Timer
Timing is important but you can use a normal kitchen timer, or the timer on your phone. Even better, use an app called Dev Chart which figures out appropriate timings for each stage.
Clothes pegs
To hang up the film to dry, and to peg onto the bottom of the film to stop it from curling.
Somewhere to hang the film
A 36-exposure film is about six feet long, so you need some sort of washing line above head height. Or just bang a nail into the top of a doorframe and peg the film to that.
Thermometer
Temperature is critical to film processing. There are dedicated photographic thermometers which are most accurate over the useful range of temperatures (10-50°C) but any basic scientific thermometer (-10-110°C) will be fine.
Measuring jugs
You need about 300ml of each chemical so the standard one-litre plastic jugs from the supermarket are ideal. You need 3-4 jugs and remember to write on them that they must not be used for food.
Gloves
Some of the chemicals are unpleasant to get on your hands and wearing gloves also prevents getting fingerprints on the film when loading. Buy some single-use latex or nitrile gloves and keep them handy.
Notepad & pencil
Take careful notes about your temperatures and timings as you learn what works and what doesn’t.
How to do it
Methods of processing black & white film have been discussed millions of times, so I’m not going to cover this in detail. In my opinion the best guide to starting is Ilford’s guide “Processing your first black & white film“. A very basic summary is:
In a dark place, open the film canister, wind the film onto a reel and put the reel in a tank
Measure the temperature of your developer, work out the times, and write them down
Pour the developer in, wait for the right time, pour it out
Pour the stop bath in, wait for the right time, pour it out
Pour the fixer in, wait for the right time, pour it out
Wash the film in tap water
Hang the film to dry
The black & white process is very forgiving and if you get the temperatures or timings wrong you will still get an image – it might be a bit pale or a bit dark. You have to really get something wrong to get a completely blank film.
What next
Once you’ve got the dried negatives, what can you do with them? Traditionally you would make prints in a darkroom. This is more complex and expensive to set up so I recommend getting the hang of film processing first before you move onto printing.
For the time being, I suggest scanning in your negatives, either using a dedicated film scanner or by photographing the negatives with a digital camera on a light box.
Most of all, have fun! Film processing and printing is extremely rewarding, and there’s always something new to learn.
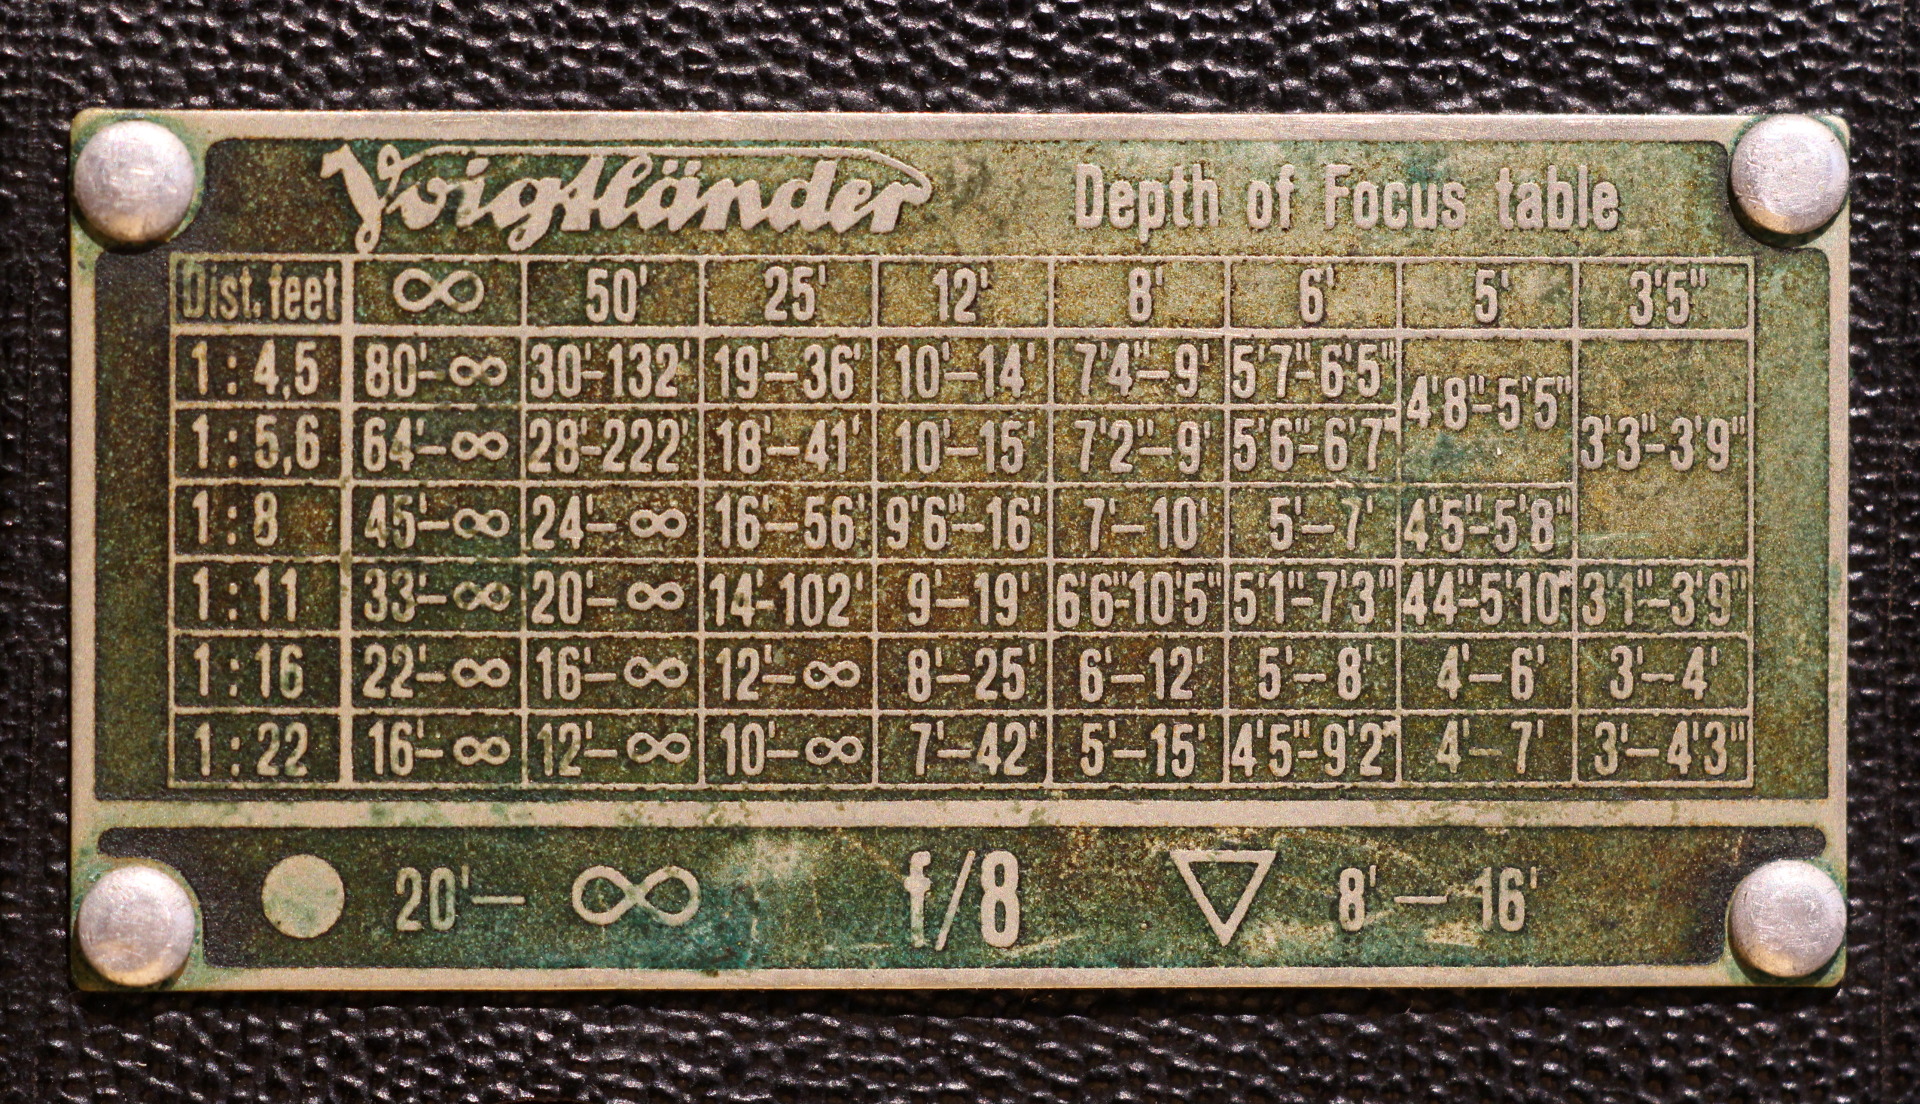
This Voigtländer Bessa 6×9 from around 1947 has an embossed metal table on the back which allows the photographer to calculate the depth of field based on the aperture and the focus distance. It’s still as accurate today as it ever was, provided you are using a 110mm lens.
If you’re not sure how to read the table, here’s an example. With the aperture set to f/5.6 and the lens focused at 12′ away, the whole distance between 10-15′ will be in sharp focus. You can see that focusing will be tricky with the lens wide open at f/4.5 and the camera focused at 3’5″. The depth of field is only six inches and this Bessa has no focusing aids such as a rangefinder or ground glass. You just have to read the scale and guess the distance (or use a tape measure).
The circle and triangle symbols at the bottom are to do with the hyperfocal distance. To compromise and simplify operation for the photographer, you set the aperture to f/8 and turn the focusing ring to the circle. Now everything between 20′ and infinity will be in reasonable focus, which is probably fine for all landscape photography. Likewise if to turn the ring to the triangle, everything 8-16′ away will be reasonably sharp which is probably fine for most portraits.
The Bessa is in pretty bad shape with leatherette peeling off, rust on the bodywork and the shutter sticking at slow speeds. It still works though! This Bessa is equipped with a Voigtar F=11cm 1:4.5 lens which was the bottom of the range at the time, but still nice to use.
Photography has been around for a long time now and a lot of cool things have been invented or discovered as side-effects of photography. There are many websites about the history of photography which will give a complete picture (excuse the pun) but I wanted to pick out my favourite innovation of each decade since the first permanent photograph. Yes, I said my favourite, not necessarily the most important 🙂
1820s: First permanent photograph
View from the Window at Le Gras (1826-7)
Both the camera obscura and the fact that some materials are affected by light had been known about for centuries beforehand, but they were brought together for the first time in 1826 or 1827 by Nicéphore Niépce. This photograph was created by coating a pewter plate with bitumen and using sunlight to selectively harden the bitumen, allowing the rest to be washed away with lavender oil. The results were crude and exposures typically required several days. However, the seeds were sown for people to work at improving the process.
1830s: First short-exposure photograph
Still life with plaster casts (1837)
In the late 1830s, Louis Daguerre, a former partner of Niépce invented the Daguerrotype. The Daguerrotype process produced one-of-a-kind positives in camera. The process was complex and required unpleasant chemicals but exposure times could be as short as a couple of minutes in sunlight. This leap in technology made it much easier for professional photographers to take portraits.
1840s: Petzval portrait lens
Petzval portrait lens
While the Daguerrotype had gone some of the way towards decreasing the length of exposures by inventing a more sensitive plate, the next breakthrough was to address the other half of the equation: a faster lens. The Petzval portrait lens had a fast aperture of f/3.6, about four stops faster than the previous generations of meniscus lens which usually clocked in at between f/14 and f/16. It wasn’t without its flaws, and as its name suggests, the Petzval portrait lens was used mostly for portraiture. Landscape and still life photographers, for whom speed wasn’t an issue, still used slower lenses with fewer aberrations.
1850s: Collodion
British veteran (c1860)
The invention of the wet-plate collodion process in the 1850s enabled negatives to be made on transparent glass plates for the first time, rather than translucent paper or opaque metal plates. This meant it was possible to take one negative in the camera and then contact-print as many identical positives as required. The collodion process was also faster than anything before it, requiring mere seconds to expose a wet plate. The ability to produce many positives from one negative is the cool bit here, and underpins practically all darkroom developments that follow.
1860s: First colour photograph using filtered B&W
Tartan ribbon (1861)
Colour photography has been around for a lot longer than many people realise. In 1861, Thomas Sutton took the first colour photograph, using a three-colour process with glass filters and black & white plates. Negatives were made by photographing the same subject three times through red, green and blue filters. The three black & white plates were then recombined by projecting them on top of each other with three projectors, each having a red, green or blue filter. The experiment was a partial success, limited by the fact that glass plate negatives of the day were not really sensitive to red light. Points for trying, though.
1870s: Dry plate photography
Advertisement for dry plates
Up until the 1870s, wet photographic plates had to be prepared immediately before exposure, used before they dried, and developed immediately after. This meant that photographers were usually constrained to their studios and darkrooms, and if they wanted to take photos outside they needed to take a portable darkroom in a tent or caravan. By the end of the 1870s, George Eastman (who would go on to found Kodak) was manufacturing pre-prepared dry gelatin plates which could simply be purchased, exposed and developed later. The enormously simplified workflow allowed photographers to be more productive and to work further from the studio.
1880s: Film
Kodak film
The innovation of dry plates in the 1870s had made it a lot easier to take photographs on the move but it got a whole lot easier again in the 1880s with the invention of film. In the past, photographic plates had been made of glass or metal, and were heavy. They would have been carried around in lightproof wooden boxes and a photographer would have been limited by the number of shots they could take. Film had a very similar emulsion to dry plates, but was coated on a flexible base which was much thinner and lighter. It was available in sheets (cut film) and on rolls (roll film).
When roll film was invented, it was only what we now know as medium format roll film. Compared to the large glass plates and cut film that were in regular use at the time, medium format roll film was small and did not have the same resolution and so found itself targeted at the consumer market (more on that soon). However, it was now possible for a photographer to carry many more exposures around.
1890s: Cooke triplet
Cooke triplet design (1893)
In 1893, the Cooke triplet was patented. It was the first major advancement on the Petzval portrait lens from the 1840s and improved on the design by correcting most distortions and aberrations from the outer edges of the image. The design was so good that it is still used in inexpensive cameras today – including some phone cameras.
1900s: Kodak Brownie
Kodak Brownie
The Kodak Brownie is probably one of the best known brands in photography. It was a low-quality camera made from cardboard and equipped with a meniscus lens but it was sold for only $1, putting photography into the hands of amateurs for the first time. It used roll film for convenience and ultimately led to our culture today where everybody was able to carry a camera in their pocket.
1910s: First 35mm camera
Ur-Leica (1913)
Up until the 1910s, most cameras had been large, heavy cameras that needed a tripod. The ones that weren’t heavy were mostly low quality consumer cameras, like the Kodak Brownie. The modern trend of high-precision miniaturisation started as several manufacturers dabbled with prototype cameras that borrowed 35mm motion picture film and used it for still images. By this time, films were improving in resolution all the time and “miniature” negatives were becoming acceptable in quality.
The most well-known (although not the first) of these early 35mm cameras was the Ur-Leica, which was prototyped in 1913 by Oskar Barnack, although not produced until 1923. The Ur-Leica and other contemporary models paved the way for small but extremely high quality cameras, lenses and film which would set the scene for almost the next century.
1920s: First flash bulb
Flash bulb
We’ve already discussed various advances in lenses and in film/plate technology which helped bring exposure time down from days to seconds over the previous 50 years. Still most photographs were taken using sunlight though – either outdoors, or relying on large windows in photographic studios. Some photographers were able to use electric “hot lights” or magnesium flash powder indoors but these were expensive, impractical and the latter was quite dangerous.
In the 1920s, the first single-use flash bulbs were invented. They burned magnesium or aluminium foil in a glass bulb safely and without fumes. Suddenly, indoor photography was much more accessible. The use of flash bulbs continued for several decades until they were replaced by the electronic flash we know today.
1930s: Kodachrome colour film
Kodachrome
There were various attempts at colour photography going back to the 1860s, some better than others. Technicolor, dating from 1916, was a successful method of making colour movies using multiple black & white film strips with coloured filters, using a similar technique to Sutton in 1861, and requiring special equipment.
Kodachrome was one of the first successful single-strip colour films for use in normal cameras, which found widespread adoption in motion picture and still photography from its introduction in 1935 until its discontinuation in 2010. Kodachrome offered saturated colours and excellent archival properties which made it a firm favourite.
1940s: Lens coatings
Coated lenses
According to the laws of optics, every piece of glass in an optical system comes with aberrations. Good quality lenses must use several glass elements to cancel out each other’s aberrations. The simplest meniscus lenses have just one element and suffer from very soft images. The Petzval portrait has four and the Cooke triplet has three. More complex lenses have more – modern zoom lenses have anywhere between 10 and 20 elements. With just bare glass, each element loses about 4% of the light going through it is reflected back. With multiple elements, suddenly the light loss through the whole lens can become significant and internal reflections can ruin the contrast in an image, especially when shooting towards the sun.
In the late 1930s, a scientist working for Zeiss discovered interference-based lens coatings which reduced the light loss to 1%. These coatings were used on German binoculars and other military optics and remained a military secret until after the war, when they quickly found their way into camera lenses.
Coated lenses offered better light transmission, higher contrast and less flare, massively improving the quality of photographs. As with all technologies, incremental improvements afterwards continued to improve lens coatings and today, almost all lenses have multiple coatings on each element, tailored to the specific needs.
1950s: Retrofocus lenses
Angenieux Retrofocus
When we consider a theoretical lens of focal length 50mm, the optical centre of the lens has to be 50mm away from the film. To zoom out, you use a lens of shorter focal length, and this also means moving the lens closer to the film. To make matters worse, the optical centre of the lens is usually about in the middle of the lens barrel – meaning for a 50mm lens you actually have to get the lens closer to the film than 50mm – this is called the flange focal distance. With the classic (mirrorless) rangefinder design, you can’t make a lens with a focal length much shorter than 35mm without the lens touching the shutter.
In 1950, Pierre Angénieux introduced a new retrofocus lens design that uses an inverted telephoto layout, meaning the distance between the optical centre of the lens and the film can actually be greater than the focal length of the lens, for example a 28mm lens can be 40mm away from the film. This breakthrough meant it was possible to make lenses of shorter focal lengths that don’t touch the shutter, and for the first time the SLR (invented about 15 years earlier) became a viable option with a range of lenses to compete with rangefinders.
Without retrofocus lenses, the shortest focal length possible for an SLR was about 50mm. With retrofocus, it was possible to make SLR lenses with focal lengths of less than 20mm. The retrofocus design is still in widespread use today – the 18mm focal length found on many DSLR kit zoom lenses is much further from the sensor than 18mm.
1960s: TTL metering with CdS cells
CdS cell
Electronic light meters had been around since the 1930s, albeit the insensitive and inaccurate selenium type. In the 1960s, cadmium sulphide (CdS) meters became popular, which were much more sensitive. Almost all selenium meters required a match-needle and worked by having a selenium cell on top of the camera, which pointed generally in the direction of the camera.
CdS cells were just the enabler – the real innovation was through-the-lens (TTL) metering, where the CdS meter was placed somewhere inside the viewfinder assembly of an SLR and could “see” through the main lens, metering exactly what would be included in the picture. This more accurate method of metering paved the way for coupled metering and eventually full autoexposure.
1970s: Consumer zoom lens; autoexposure
Fujica AZ-1
The 1970s was a good decade for photography and I couldn’t decide between two key innovations, so I’m going to mention both.
The first zoom lens was invented in 1902 for movie cameras. Pierre Angénieux (of retrofocus lens fame) designed the first practical zoom lens for still camera use in 1958, but it wasn’t until the 1970s that zoom lenses were good enough and cheap enough to be commercially viable. In 1977, the Fujica AZ-1 was the first camera to be bundled with a kit lens that was a zoom lens rather than a prime. Today, zoom lenses are the dominant type.
Just sneaking in at the tail end of the 1970s, the first camera to be released with full autoexposure was the Canon A-1 in 1978. Coupled metering had been around for a while, but program autoexposure was able to set the aperture and the shutter speed according to light conditions, needing no involvement from the photographer.
1980s: Autofocus
Pentax ME-F
Several manufacturers started dabbling with assisted focusing technologies in the late 1970s but the first true autofocus cameras came in the early 1980s. Photographers are split whether they love or loathe autofocus but there’s no doubt it revolutionised the fields of sports and wildlife photography, and ultimately lead to making photography easier for casual shooters.
The first SLR with autofocus was the Pentax ME-F, pictured above. Early autofocus systems were slow and inaccurate and something of a gimmick but as with all cool new stuff, it was refined over time to become the fast and accurate autofocus systems we have in professional DSLRs these days.
1990s: Digital photography
Kodak DCS 100
The first ever digital camera was created in the 1970s but in the 1991 the first commercially-available digital cameras hit the consumer market – the Kodak DCS 100, which was based on a Nikon 35mm SLR with a digital back and a “portable” external processing and storage unit. Early DSLRs handled like 35mm SLRs in most respects, except that the film had been switched for a digital CCD sensor.
Early models had significantly worse resolution and noise characteristics than film, and they took a while to catch on. However the convenience couldn’t be argued with and the market was hooked, especially press photographers. Over the next few years, the technology improved and more photographers made the switch.
2000s: First CMOS DSLR
Canon 300D
Progress with DSLRs had been steady but one of the major leaps was the switch to replace CCD sensors with CMOS ones. In the past, CMOS sensors had been inferior and cheaper, and usually used in low-cost devices like webcams.
CMOS technology had come on in leaps and bounds, and when DSLRs were equipped with modern CMOS sensors they were capable of good performance at high ISO and video too, plus faster read-out.
2010s: Mirrorless cameras
Canon EOS M
The 2010s are only half done but a major theme so far is the return to mirrorless cameras, more in keeping with the rangefinders of the pre-SLR era. This design is enabled by CMOS sensors having live view ability, allowing designers to do away with the reflex mirror and prism. Mirrorless cameras have the same high quality sensors as DSLRs but with a smaller size and weight. The jury is still out whether mirrorless cameras will ever replace DSLRs, but they are definitely selling well.
So there you have it. A highlight of my favourite innovations in photographic technology over the past 190 years. I hope you enjoyed reading 🙂
Netham weir is a place I’ve been to regularly before. The water level is very variable due to the tidal Avon and often you can’t see the weir at all. This time, I checked the tide times and waited for a dry day when I would expect the greatest drop. As I hoped, the water was crashing over the weir more fiercely than usual. This is a two-minute exposure at night to smooth out the white turbulence. You can also see the lights of cars crossing the bridge.
Photo taken on my Mamiya RB67 with Sekor C 127mm f/3.8 lens on Ilford FP4+. Cyano tone added digitally, but there will be prints soon!