I happened to be in Clifton the other night, so I made a panorama of the bridge. It’s made of three frames, shot handheld.

I happened to be in Clifton the other night, so I made a panorama of the bridge. It’s made of three frames, shot handheld.
This week’s Photo Challenge is corners. I went out in search of interesting corners. There weren’t many, but I quite like this composition. I think it’s the way to square right angles of the sun shield contrast with the angle of the rest of the building.

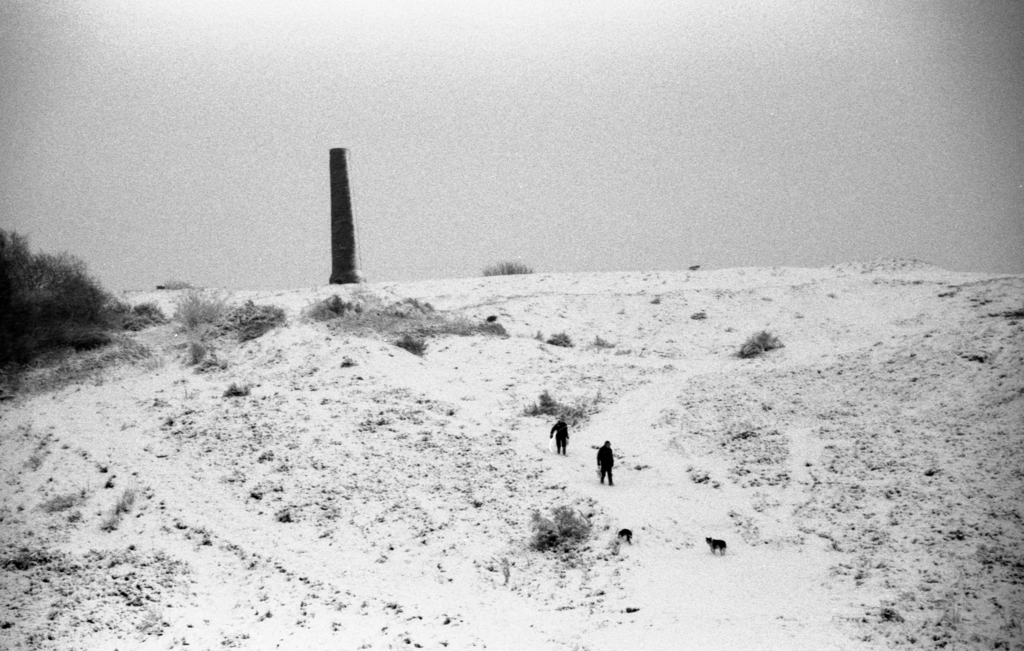
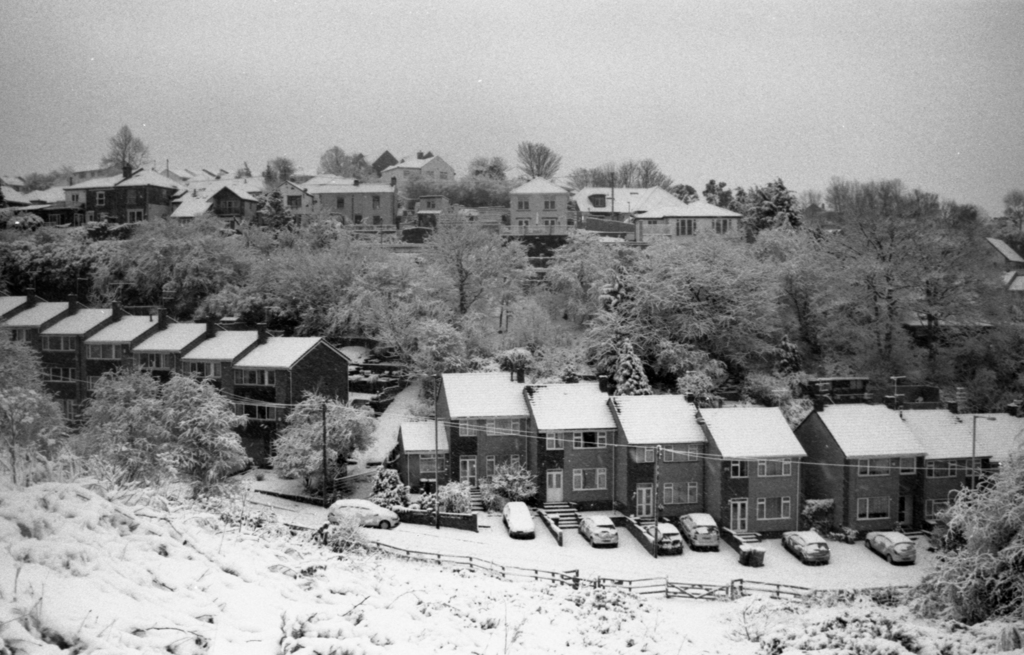
Today it snowed! We had quite a few inches, which is unusual for Bristol. After I had performed my Snow Warden duties I headed up Troopers Hill into the nature reserve to take some pictures. I started out early while there weren’t many people around and took some pictures of the unspoilt snow. Later on, there were dog walkers and children sledging down the steep slopes and the whole place had a different atmosphere.
I took my Canon T90 as it is a professional-grade camera with better weather sealing than most of my other cameras. I don’t think any of my lenses are weather sealed, but they seem to have survived. I used Ilford FP4+ film as I think snow looks great in black & white.


I’ve photographed Jupiter before with my 5″ telescope. Its focal length is 1500mm which means Jupiter is quite small on my camera’s sensor when using the prime focus method. For Christmas, Hannah bought me a 5× Barlow lens which gives me an effective focal length of 7500mm. Now, Jupiter is 5× wider and 5× taller, and 25× greater in area on the camera’s sensor.
Unfortunately, there’s a catch. Nothing in optics comes for free, and tonnes of extra magnification comes at the cost of having an image that is much dimmer, significantly harder to focus and much more susceptible to vibrations from the wind, from the camera’s mirror and shutter, and from the motorised telescope mount.
It actually took me about 25 minutes just to line up the telescope with Jupiter and get it in focus. That’s a shockingly long time – Jupiter is the brightest object in the sky except Venus, and normally it only takes a couple of minutes to get the ‘scope centred and focused on such a bright object. The focus isn’t perfect, but the focus is incredibly sensitive at this magnification and every time I touched the focus knob, the telescope took about 30 seconds to settle down again.
So this is the highest digital resolution photograph I’ve ever taken of Jupiter, but the optical resolution is worse. I think with a bit more practice, I could improve on this.

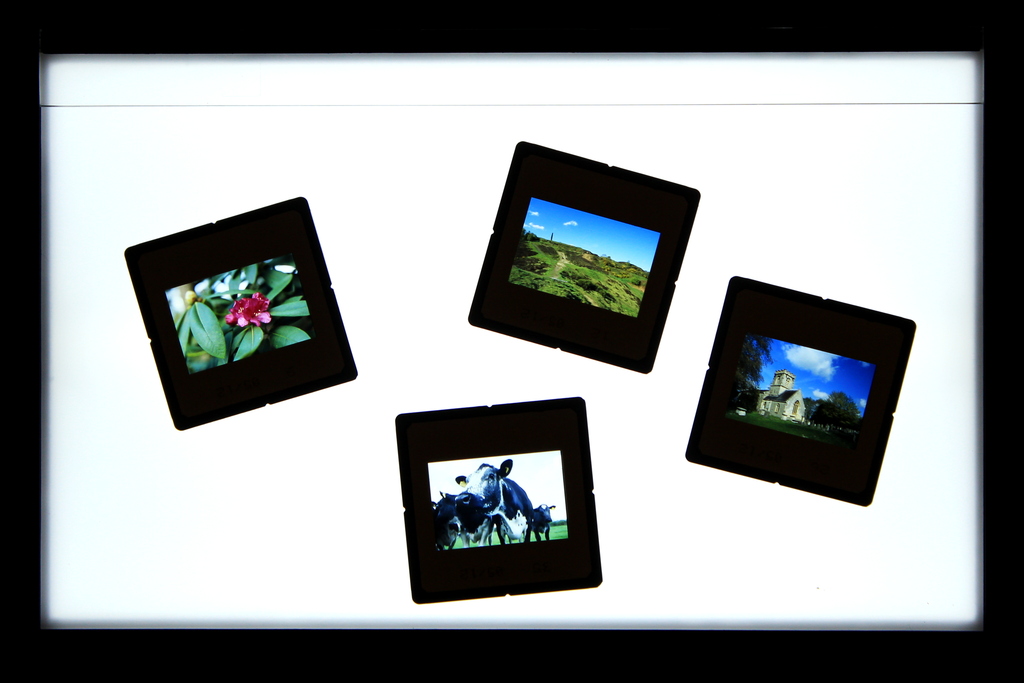
For Christmas, I asked Mummy and Daddy Father Christmas for a light box, to help me review slides and negatives before printing and scanning. Today’s the first day I’ve had a chance to try it out, and here it is.

It’s a box… with a light in. Who’d have thought! It works really well and the light is even right into the edges and corners. The slides you can see were all taken during a weekend trip to Gloucester last summer.
Now all I need is for the sun to come out again, so I can shoot some more slides! 🙂
I spent this morning at Bristol Airport, watching aeroplanes take off and land. It was cold enough that nearby puddles were frozen though, but it was the first sunny day this year, so I braved the ice and waited around with my camera. I think the wait paid off, as I caught this jet burning its tyres as it landed.

I have a Celestron NexStar SLT 127 telescope. For those who don’t know, it’s a battery-powered telescope which has a small computer to navigate around the skies and steer the telescope. It’s quite hungry for power – the telescope takes 8 AA batteries. Depending on the type of batteries you use and the temperature, these can last as little as 2 hours, which isn’t long enough for a decent evening of observation and is certainly an expensive habit if you are a regular observer.
Fortunately, the telescope has a traditional DC-in jack so an external power supply can be used. I made up a 20-metre lead with a 12V, 1A mains transformer so I can use the telescope in my garden without fear of the batteries running flat. But it’s rare that I want to use my telescope in the garden of my house in suburban Bristol – there’s so much light pollution that the sky is the colour of Fanta.
I also made up a cable to run the telescope from my car’s 12V cigarette lighter socket. This works well, but you still have to use the telescope relatively near the car and there’s always the slight risk that you might over-discharge your car battery and strand yourself in the countryside. Best avoided.
I decided that a portable power supply would be the best option. There are commercial offerings out there, but they seem expensive for what they are, sometimes have low-capacity batteries, and almost always come with crap you don’t want. So I decided to build myself a battery box which would be useful not just for the telescope, but any device you’d expect to be able to run in your car – e.g. a satnav or a phone charger.
You should preferably use a deep-cycle leisure battery rather than a car battery, since car batteries don’t like being over-discharged. It will need to be 12V but you can get various ratings of Amp-hours (Ah) which tells you how long the battery will last. My Celestron telescope has a rating of 1A maximum, which means a 6Ah battery will last for 6 hours at a draw of 1A. In reality, 1A is the worst-case power draw, so 6 hours is also the worst-case lifespan. You’ll probably get twice that. I decided to buy a 12Ah battery so I wouldn’t have to recharge it too often.
You should also make sure it is “maintenance free”, otherwise you will have to keep topping it up with water.
First things first, decide which components you’d like in your battery box. Measure them, and make the correct holes to mount them. A plastic toolbox is dead easy to drill, saw and file. I chose this particular Stanley toolbox because of the small compartments on the top, which I turned into covers for the sockets and switches.

Analogue voltmeters are more expensive than their digital counterparts, but are so much cooler. The voltmeter springs into life when I flick the TEST switch.

My charging terminals are actually 8mm bolts with a nut on both sides to keep them in place. The charging terminals can, of course, also be used to run equipment that has a spring clamps instead of a 12V plug.

The schematic is dead simple. It’s a switch to close the circuit that feeds the 12V socket and the charging terminals, and a second optional switch to close the circuit for the voltmeter, so you can keep an eye on the battery.
Don’t forget to add a fuse on the positive terminal of the battery, in case you short something later on. Choose a suitable fuse rating that is high enough that you can charge the battery without blowing the fuse. Check your battery and charger for their specs.

When working, be careful to keep your positive and negative in order, and double check everything with a continuity meter before connecting the battery. Lead acid batteries can deliver a heck of a lot of current, and you don’t want to fry a component, or let the battery boil and shoot acid in your face.
Here’s how I wired the internals of my battery box. I decided to use spade connectors for the battery as it is a consumable component, and I soldered everything else.
The battery must be fixed in place securely, or it will move around and ruin your soldered joints. I had originally intended to secure it with some hefty Velcro straps, but in the end I was lazy and I glued it to the bottom of the toolbox. The flimsy plastic sagged with the weight of the battery, so I attached self-adhesive rubber feet in the four corners of the toolbox, and under the four corners of the battery so its weight would be supported when on a flat surface. I glued some of the longer runs of cable into place, to prevent them from being trapped in the hinge.

And finally, the finished product, complete with carry handle and weather-resistant flaps!

Released 1887
The Instantograph is a quarter-plate view camera, first introduced in 1887 and produced until 1910, although it underwent several evolutions in that time. I think my example dates from about 1897. It takes glass plates in the quarter plate format, although you can use sheet film or photographic paper too.
I’ve written some notes about the camera, and some notes about how to handle film & paper for it.
See all photos taken with the Instantograph.

| Lens | Fixed achromat 127mm (5″) f10 |
|---|---|
| Film | Quarter plate |
| Focus | Focal plane ground glass |
| Meter | None |
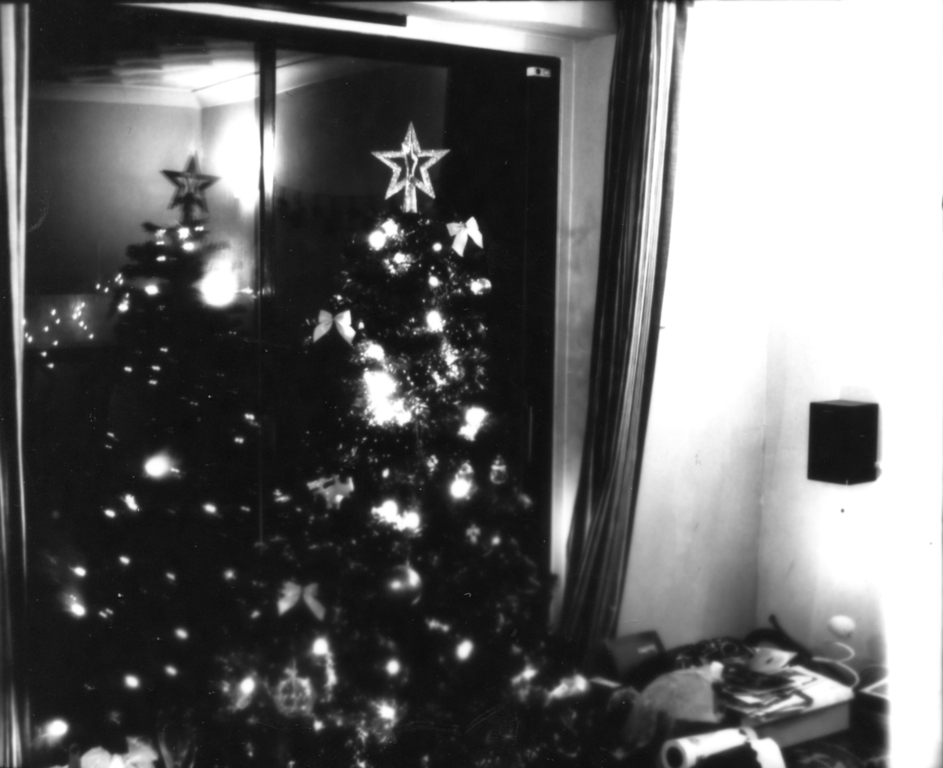
Yesterday I posted excitedly about my newest (and oldest) camera, the Instantograph. I discussed three options for getting film into it: cutting down glass plates, cutting down film, or cutting down printing paper.

I don’t currently have large enough film to cut down, and I found that the glass plates I had hoped to use don’t cut properly with a glass cutter. So I went with option 3, and cut up some regular 8×10″ resin-coated photographic paper. I did a little research online and found the speed of Kentmere VC Select is rated at approximately ISO 6. With that number to hand, I was able to take light meter readings in the usual way.
This exposure of my Christmas tree was made with the lens wide open at f/10, requiring an exposure time of 4 minutes! It is inverted left-to-right, because it is an opaque paper negative that has to be looked at from the side that was facing the Christmas tree, rather than looked through like a transparent negative, from the side that was facing away from the Christmas tree.

The negative has a bit too much contrast. This is probably because photographic paper has a lower dynamic range than film. In future I can get less contrast by using a yellow filter over the camera lens at the time of exposure – just as you can get less contrast in the darkroom by using multigrade filters.
As it is an opaque paper negative, it isn’t possible to print it like a traditional negative – by projecting it onto light-sensitive paper using an enlarger. I tried two methods of making a positive image. The first method is cheating – I simply inverted the negative scan above, to make it positive. Easy with a computer, but still cheating!

The second attempt was made by making a contact print – pressing the paper negative against a blank piece of printing paper, holding the two together using a sheet of glass, and shining a bright light through for a few seconds. This one was made with my enlarger lens wide open at f/3.5, and with the multigrade filter set to strong yellow to achieve grade 00 and soften the image a bit. It took about 5 seconds exposure to make a reasonable print.

Contact prints made from paper negatives lack some of the fine resolution due to the diffuse texture of the paper so inevitably the final print is not quite as sharp as the paper negative, but perfectly acceptable. With a bit more careful measurement of exposure in-camera and in the darkroom, I reckon I could get a really nice print.
So there you have it – a photograph from a camera that’s almost 120 years old, made using traditional techniques. Next time I take a picture, I promise it will be more interesting than my Christmas tree! That was just a test, and now I’ve proven the technique, I plan to take some pictures of historic sights around Bristol – probably starting with the floating harbour.
For Christmas, my father-in-law-to-be gave me a Victorian mahogany and brass view camera. It’s an Instantograph, manufactured by J Lancaster & Son of Birmingham. Despite its name, there’s nothing instant about this camera! The Instantograph was first introduced in 1882 and evolved through various design iterations until the last ones were made some time in the early 1900s.
I’m not exactly sure which year mine is from. All of the Lancaster cameras carry a small plate engraved with the year of manufacture, but on my example the plate carries some Cyrillic markings instead of a date – perhaps this was an export model, or has been customised since manufacture. Judging by notes and pictures on various websites, some time around 1897 seems likely.
The condition is good – the wood and brass are lacquered and varnished and in nice condition. The leather bellows are starting to show their age a little. There are no cracks or tears but there are a couple of small pinholes. I will probably “repair” these with some black tape.
One or two of the screws needed tightening up a bit and I had to add a handle to one of the darkslides as the original had snapped off. I don’t have any mahogany lying around, so I used pine, painted with mahogany-effect woodstain. It’ll have to do!
The lens is a 5″ (127mm) f/10. The aperture diaphragm is continuously variable from f/10 to f/30, and the front of the lens carries markings to show the exposure compensation factor needed for each aperture.
It’s a single achromat, meaning it has two glass elements cemented together in one group – a doublet. It ought to be reasonably well corrected for chromatic aberration but will suffer from coma, spherical aberration, curvature of field and other effects which will cause the edges of the image to be unsharp. It should be a nice effect compared to today’s ultra-precision engineered lenses. The glass elements in this lens are not coated, so I would expect the lens to flare in direct sunlight and to offer low contrast in difficult situations. We shall find out when I take some pictures!

The camera takes glass photographic plates in the quarter-plate format – that’s 4¼”×3¼” or 108×83mm, making it larger than 6×9 medium format, and the smallest of the large format sizes. For the digitally-minded, it’s a crop factor of approximately 0.3, and has 27 times the area of an APS-C sensor. Win.
These days it is hard to get hold of photographic plates, although by chance I happen to have some lying around. I wrote about them a couple of years ago. They are too large to fit the camera, so I have ordered a glass cutter so I can cut the plates in two and be able to use them in this camera. Using a glass cutter in a darkroom? Sounds safe to me! 😀 Fortunately the plates are so slow that I’ll be able to use a red safelight and hopefully avoid chopping my fingers off.
When I run out of plates I’ll have to resort to sheet film. To use film it has to be sandwiched with a piece of plain glass from a picture frame, to make it the right thickness for the plate holder and prevent it from curling. The greater challenge is finding sheet film the right size. Quarter-plate is an obsolete format but I can still buy 5″×4″ and trim it down in the darkroom with a guillotine.
The camera lacks a shutter, because at the time the ISO speed of glass plates would have been very slow (several minutes for a portrait) and exposures were usually controlled by the photographer placing his hat over the lens.
However, to expose modern film properly I’ll need some sort of shutter. It seems that these cameras could be purchased with an optional shutter when they were new, for those wealthy Victorians who wanted to show off that they could afford a shutter rather than using a hat. I might be able to find a compatible shutter on eBay, or perhaps I could fit a modern view camera shutter to the existing lens. We’ll see – I’ll be sure to post about my experiences here.
Possibly a happy medium would be to cut up some photographic printing paper to the right size and make paper negatives. You can’t really do much with a paper negative in the darkroom, but it can be scanned and inverted on the computer. It seems that Ilford MG IV has an equivalent ISO speed of approximately 6, so that makes it slow enough to expose without a shutter – simply using the lens cap.
Whichever of the three options I choose (cut down glass plates, cut up some roll film, use paper negatives) I’ll be sure to write about it and post pictures here 🙂