Trial and error

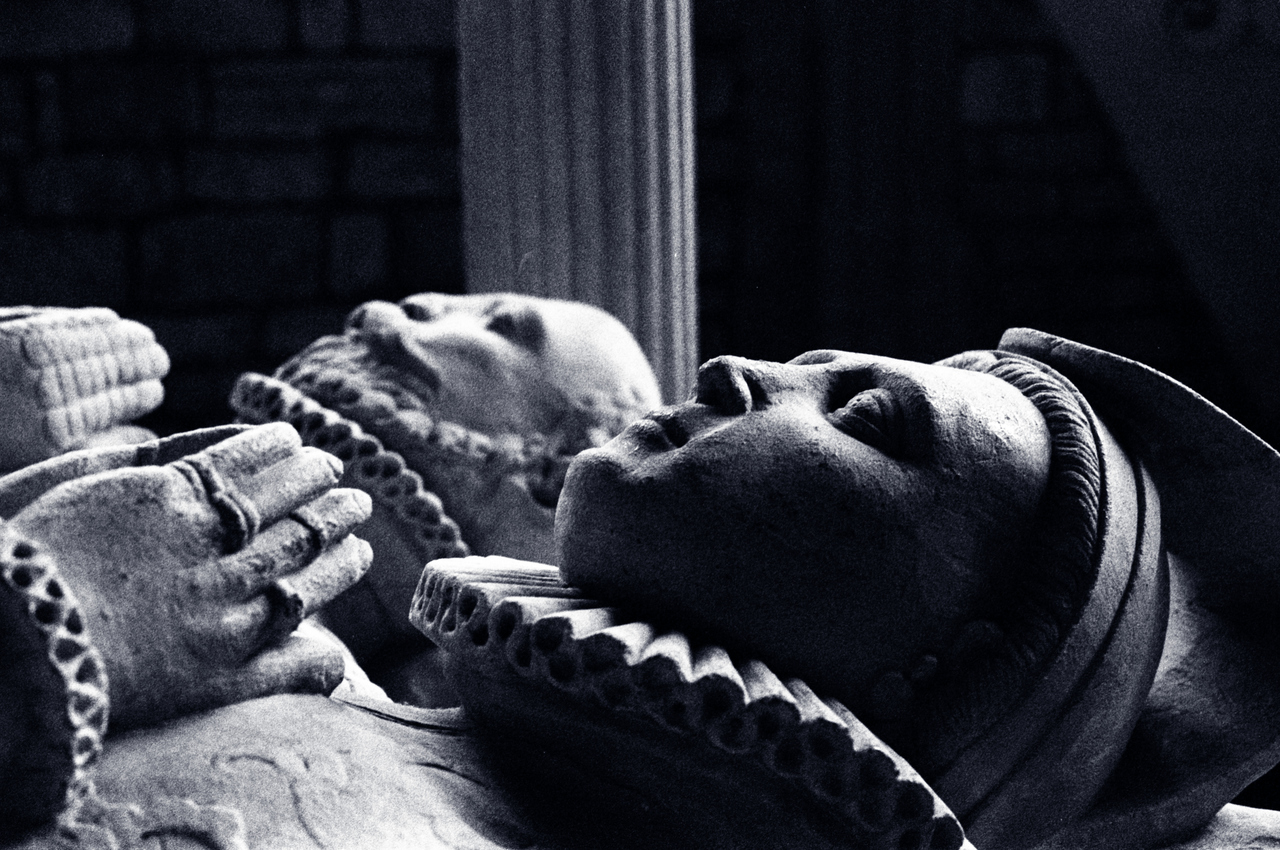
The other day I posted some pictures I’d taken in Sherborne Abbey. They were shot on black & white film, scanned and edited digitally. I had envisaged a pale blue tone to emphasise the coolness of the stone building. At the time, I found the blue look I wanted digitally.

Choir
Choir

With that image in mind, I did some toner tests using Fotospeed BT20 iron blue toner. I found it quite hard to tame at first and I made a lot of small test prints until I got more-or-less the look I wanted after diluting it 1+2.

Test prints
Test prints
  • Test 12 is probably the best, but I’m still not quite happy with the shade. It’s too turquoise.
  • Test 5 has nice shadows but is too blue.
  • Test 3 is an interesting effect and one I might use again.
  • Test 9 is also an interesting effect, which definitely gives the impression of light

More experimentation is definitely needed, but I fear the look I wasn’t isn’t attainable with this blue toner. It has been recommended to me to use gold toner (which comes out blue) but that is quite expensive – about £60 per litre.

Victorian selfie

I had a brainwave about a better way of using my 1890s Lancaster Instantograph. It has no shutter so only very slow films can be used. Until now, I’ve been using paper negatives which are very slow, but can’t be enlarged – only contact-printed.

I remembered I had a box of Kodalith 5×4″ lith film which expired before I was born. Long-expired film loses its sensitivity and contrast, so I wondered if this film was now insensitive enough to be used without a shutter. I did a few brief tests and found that it can be exposed quite nicely at ISO 25, and that it develops well in paper developer. Lith film usually produces a hard black-and-white (not greyscale) image, but as this Kodalith is so old, it seems less aggressive.

I’ve invented the perfect recipe for a Victorian-style split sepia selfie – just 37 simple steps.

  1. Go into the darkroom. Switch off the light and work under red safelight.
  2. Use scissors to cut 5×4″ lith film down to 4¼×3¼” quarter-plate format
  3. Load cut film into film holder
  4. Emerge from the darkroom.
  5. Using a dark-cloth, position, adjust and focus the camera on its tripod using a large mirror. You won’t be able to hold this camera at arm’s length!
  6. Place the lens cap on the lens (it acts as a shutter on this shutterless camera)
  7. Insert the film holder into the camera
  8. Use a light meter to determine the exposure. I used a selenium meter from the 1950s and came up with an exposure of 60 seconds at f/10 (wide open) using the artificial light in my living room
  9. Withdraw the dark slide (you can see it sticking out of the side of the camera in my picture)
  10. Remove the lens cap and immediately stand as still as possible for the exposure
  11. Replace the lens cap
  12. Replace the dark slide
  13. Return to the darkroom and work under red safelight
  14. Unload the film holder
  15. Place the film in developer for 90 seconds. I used Ilford PQ Universal.
  16. Place the film in the stop bath for 30 seconds
  17. Place the film in the fixer bath for 60 seconds
  18. Switch on the light
  19. Wash the film
  20. Hang it up to dry
  21. When dry, load the film into the enlarger’s negative carrier. I don’t have a quarter-plate negative carrier and my 5×4″ carrier is glassless, so sandwiched by quarter-plate negative between two clear sheets of unexposed but fixed 5×4″ film
  22. Switch off the light and return to red safelight
  23. Scale and focus the projected image for your paper size
  24. Set the enlarger’s filter, aperture and exposure time according to your exposure tests
  25. Expose the print
  26. Place the print in developer for 90 seconds. I used Ilford PQ Universal.
  27. Place the print in the stop bath for 30 seconds
  28. Place the print in the fixer bath for 60 seconds
  29. Switch on the light
  30. Wash the print
  31. Place the print in the bleach bath for 30 seconds to bleach back the highlights
  32. Wash the print
  33. Place the print in the sepia toner for 60 seconds to replace the bleached highlight areas with sepia colour
  34. Wash the print
  35. Place the print in the selenium toner for 60 seconds to blacken the shadow areas
  36. Wash the print
  37. Hang it up to dry
Victorian selfie
Victorian selfie

Most of the flaws in this image are actually from using a a cheap and dirty mirror. It flexes, so the room appears distorted. It has fingerprints and dust on it, which causes the strange halos around the lights.

For anyone who is interested in darkroom processes, I recently published a video on YouTube which shows steps 21-34.

A weekend in Dunster

For our first wedding anniversary, Hannah and I spend a long weekend in Dunster, West Somerset. We first visited Dunster in the winter, and vowed to come back when the weather was nicer. It’s a small medieval village with a castle, a church and an ancient yarn market in the middle of the road.

Dunster High Street
Dunster High Street
Dunster yarn market
Dunster yarn market
Dunster Castle
Dunster Castle
St George's Priory, Dunster
St George’s Priory, Dunster
Dunster High Street
Dunster High Street

We stayed at the Luttrell Arms. It’s quaint and cosy and perfect for a quiet getaway. As we booked early, we had the pick of the rooms and we chose one with a four-poster bed and a tiny little study that overlooks the high street.

Our room at the Luttrell Arms
Our study at the Luttrell Arms
Our room at the Luttrell Arms

We weren’t there for many days but we packed a lot in. On the Saturday we took the West Somerset Railway from Dunster to Bishop’s Lydeard and back. We stopped at several of the stations en route.

Steam train at Bishop's Lydeard
Steam train at Bishop’s Lydeard
Coal tender
Coal tender
Diesel engines
Diesel engines
Watchet harbour
Watchet harbour

On the Sunday we drove to Lynton and Lynmouth, a pair of towns at the top and bottom of a cliff, connected by a funicular railway.

Lynton & Lynmouth Cliff Railway
West Lyn River at Lynmouth
Lynmouth harbour
Lynmouth harbour

On the way back to Dunster, we drove across Exmoor. It was stunningly beautiful but the narrow road didn’t offer many places to stop and take pictures. I managed a couple!

Exmoor
Exmoor
Exmoor
Exmoor

Finally, we called in at Minehead in the evening. It was a bit late for sunbathing but we went for a stroll on the beach as the sun set. I photographed this footprint in the sand, and then we went wild at the amusement arcade.

Footprint at Minehead

These photos are from a variety of different cameras: Mamiya RB67 Professional, Canon T90, Canon AE-1 (which turned out to have a light leak) and Canon AV-1.

Lenses used were Sekor C 90mm f/3.8, Sekor C 127mm f/3.8 on the Mamiya RB67 and FD 24mm f/2.8, FD 35mm f/2.8, FD 50mm f/1.4, FD 70-210mm f/4 on the Canon SLRs.

Sherborne Abbey

A few weeks ago, I visited Sherborne Abbey with some friends who were singing with the choir In Ecclesia Exon. While they rehearsed, I photographed the beautiful building and some of its contents. I’ve photographed cathedrals and abbeys many times before but on this occasion I was trying to find something a bit different from my usual.

It was a hot day but the inside of the abbey was cool and refreshing. I decided that a subtle blue tone on these photographs would reflect the coolness of the stone as it felt to me at the time. Not so long ago I wrote about testing photographic toners to see what they do. These images are scanned from black & white negatives and toned digitally, although now I’ve seen that I like the blue tone I will make some blue prints the old fashioned way.

All of these pictures were shot with a Canon T90 on Ilford Delta 3200 film. I tend to like wide lenses when shooting in churches and these photos were taken with a Canon FD 17mm f/4 and a Canon FD 50mm f/1.4. Other photos on the roll were taken with a Canon FD 24mm f/2.8 but they didn’t make the cut.

Canon AT-1

Released 1976

The AT-1 is the only one of Canon’s A-series that does not have automatic exposure. It’s a nice SLR but I mostly bought it to get a step closer to owning all of the A-series. Now I just need the AL-1!

Canon AT-1
Canon AT-1

At a glance

Lens Canon FD mount
Film 135
Focus SLR split screen & microprism
Meter CdS with manual exposure

Canon Auto Zoom 814 Electronic

Released 1972

I’ve dabbled in Super 8 film-making before with my budget-level Mayoral Super 8 camera. It was rather point-and-shoot and I found it quite limiting. For my latest project, I decided to buy this Canon Super 8 camera which has more manual controls, variable frame rate, TTL viewing and other useful stuff.

Canon Auto Zoom 814 Electronic

Canon EOS 600D (modified)

Released 2011

This 600D is just like the other one, except that it has been modified for full-spectrum astrophotography and is now sensitive to infra-red and ultraviolet light as well as visible light. The primary purpose is astrophotography, although I have also used it to make a video under the dim red safelight in my darkroom.

Canon EOS 600D
Canon EOS 600D

At a glance

Lens Canon EF & EF-S mount
Film Digital!
Focus SLR auto
Meter Digital

Somerset Towers update

I’ve been busy this summer so I haven’t spent as much time as I would like taking pictures of the Somerset Towers for my project. Yesterday I went out for the first time in over two months and I photographed four churches. I’ve now got 32 of the 73 churches on my list.

This is my favourite picture of the day – the church of St Peter & St Paul in Charlton Horethorne. The church is nice but I also like the the stormy clouds behind it.

Church of St Peter & St Paul, Charlton Horethorne

This picture was taken with a Horseman 45HD camera, equipped with a Schneider-Kreuznach Super Angulon 90mm f/8 wide angle lens. Exposure was 1/4s at f/22 on Ilford FP4+ film, pulled to EI 50.

As a side point, I’ve also been tracking the distance I travel to get to these churches across the county. So far I’ve driven 987km and I’ve not even done half of the towers!

Shackman Auto Camera mk3

Released 1945

This is a rather interesting scientific and military camera that was manufactured between approximately 1945-1955 in Britain. It is powered by clockwork but also designed to be controlled by an external trigger to take pictures automatically. The intended use is to take periodic photographs of scientific equipment or the dials on an aircraft. Think of it as a 1940s data logger.

It takes 35mm film in bulk 20′ reels (which is still available) and takes square pictures. The camera is focused manually but cannot be focused mid-roll since to focus it, you need to remove the film. It is not really a hand-held camera!

My example of this camera has a shutter and a Dallmeyer Anastigmat 1⅜” f/3.5 lens.

Shackman Auto Camera mk3

At a glance

Lens 1⅝” screw thread
Film 135
Focus Manual
Meter None