A lot of people have asked me about my home Kubernetes cluster, and so I have decided to put together a series of blog posts about the architecture. I’m going to split it into sections, with each section focusing on a specific area. If you haven’t read the other parts of this guide, I recommend you check those out too.
This is Part 1, a general overview of the hardware, the architecture and the base OS install. It is not intended as a set of instructions, but as some notes about my design choices.
Architecture
First, let’s have a look at the architecture. I’m using the MicroK8s distribution of Kubernetes, which can run on a single node, supports clustering, but needs at least 3 nodes for high availability. I’m running on 4 nodes because that gives me plenty of memory.
I chose to use HP EliteDesk 800 G2 Mini PC systems, because they are tiny, use very little power, release very little heat, and make very little noise. There are several other manufacturers who also make ultra small form factor PCs (Lenovo, Dell, Intel) but it just happened that HP were the cheapest at the time I looked.
Each EliteDesk node is equipped with an Intel Core i5-6500T CPU (4 cores and 4 threads at 2.50 GHz), 16GB DDR4 memory, a 240GB SATA SSD for the OS, and a 240GB M.2 NVMe SSD for storage (more on that later).
I also have a NAS to provide off-cluster shared storage. This is an HP MicroServer N40L with 4x4TB disks, running TrueNAS. We’ll look at this in detail in a later section.
Networking is dead simple – everything is connected to an unmanaged gigabit Ethernet switch and is in the same RFC1918 /24 network. A router provides Internet connectivity via NAT.

In case you were wondering what this looks like, it’s all neatly tucked away in the bottom of a closet. I built a rack for the nodes from plywood. Each node is screwed to a small plywood panel by its VESA mount screws, and the plywood panel slides into a pair of grooves. This means the nodes are rack mounted, have good airflow, and it’s easy to slide one out for maintenance etc.
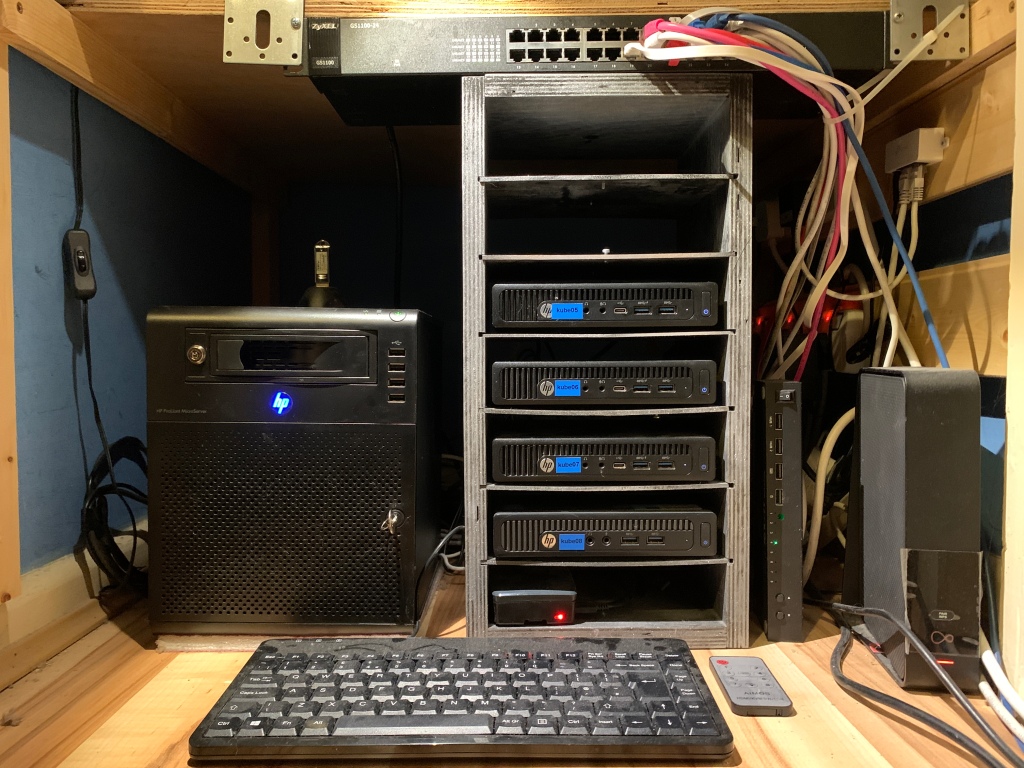
The small box with the red light at the bottom of the rack is a Raspberry Pi, which provides DNS and DHCP for the LAN with Pi-hole. This allows me to easily set static reservations for the Kubernetes nodes.
Also visible is a slim KVM and the cable modem/router. To save space, the monitor is mounted on the inside of the closet door.
Operating System
As MicroK8s is maintained by Canonical, it made sense to run it on its native Ubuntu platform. I’m running Ubuntu Server 22.04 LTS, installed as a Minimal installation.
It is almost entirely a default installation and the only customisation I made to the OS was to disable swap and delete the swap file.
After this, MicroK8s can be installed on all the nodes using snap. By default, packages installed via snap auto-update to every release in the future, whether major or minor. This is potentially dangerous as Kubernetes releases often add and deprecate features that you may be using. So I strongly recommend pinning your MicroK8s release to a specific version, like this. Make sure to check what the latest release of MicroK8s is at the time – don’t just blindly copy my 1.25 example in case it’s out of date!
sudo snap install microk8s --classic --channel=1.25/stableOnce installed, I started MicroK8s running on each node and followed the instructions for clustering the nodes. It doesn’t matter which node you start with – just pick one, and add the rest to it one by one.
When all the nodes are ready, you’re done provisioning a simple Kubernetes cluster! There are a few more steps to make the cluster actually useful, and we’ll cover these in subsequent posts, where I’ll take a deep dive into the other components.

4 thoughts on “Kubernetes Homelab Part 1: Overview”