A while ago I blogged about the possibilities of using Ceph to provide hyperconverged storage for Kubernetes. It works, but I never really liked the solution so I decided to look at dedicated storage solutions for my home lab and a small number of production sites, which would escape the single-node limitation of the MicroK8s storage addon and allow me to scale to more than one node.
In the end I settled upon TrueNAS (which used to be called FreeNAS but was recently renamed) as it is simple to set up and provides a number of storage options that Kubernetes can consume, both as block storage via iSCSI and file storage via NFS.
The key part is how to integrate Kubernetes with TrueNAS. It’s quite easy to mount an existing NFS or iSCSI share into a Kubernetes pod but the hard part is automating the creation of these storage resources with a provisioner. After some searching, I found a project called democratic-csi which describes itself as
democratic-csiimplements thecsi(container storage interface) spec providing storage for various container orchestration systems (ie: Kubernetes).
I was unfamiliar with Kubernetes storage and TrueNAS, but I found it quite easy to get started and the lead developer was super helpful while answering my questions. I thought it would be helpful to document and share my experience, so here’s my rough guide on how to set up storage on TrueNAS Core 12 with MicroK8s and democratic-csi.
TrueNAS
Pools
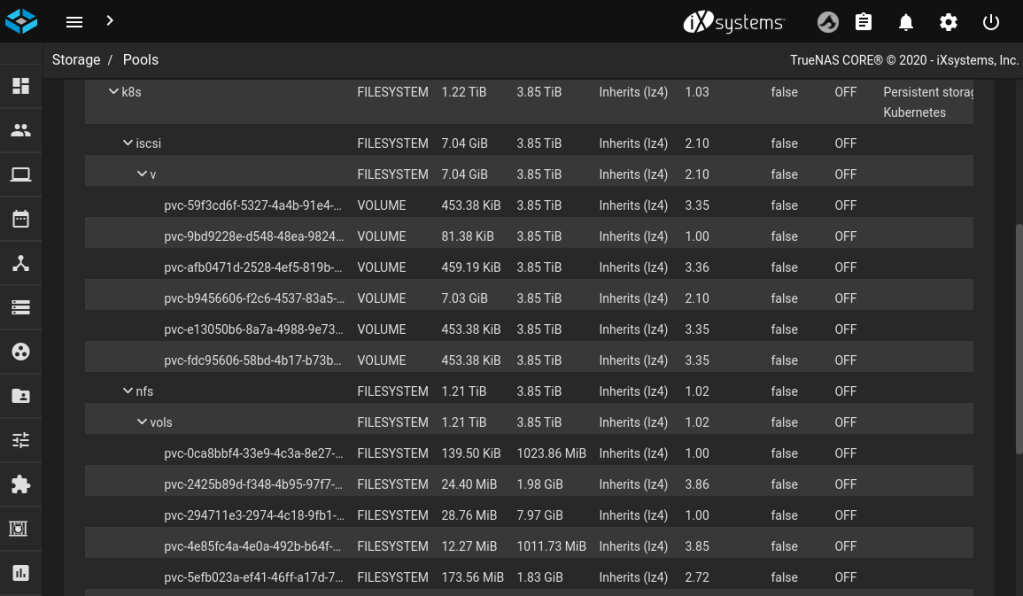
A complete guide to TrueNAS is outside the scope of this article, but basically you’ll need a working pool. This is configured in the Storage / Pools menu. In my case, this top-level pool is called hdd. I’ve got various things on my TrueNAS box so under hdd I created a dataset k8s. I wanted to provide both iSCSI and NFS, so under k8s I created more sub datasets iscsi and nfs. Brevity is important here, as we’ll see later.
Here’s what my dataset structure looks like – ignore backup and media:

With your storage pools in place, it’s time to enable the services you need. I’m using both iSCSI and NFS, and I’ve started them running and also set them to start automatically (e.g. if the TrueNAS box is rebooted). Also check that SSH is enabled.

SSH
Kubernetes will need access to the TrueNAS API with a privileged user. This guide uses the root user for simplicity but in a production environment you should create a separate user with either a strong password, or a certificate.
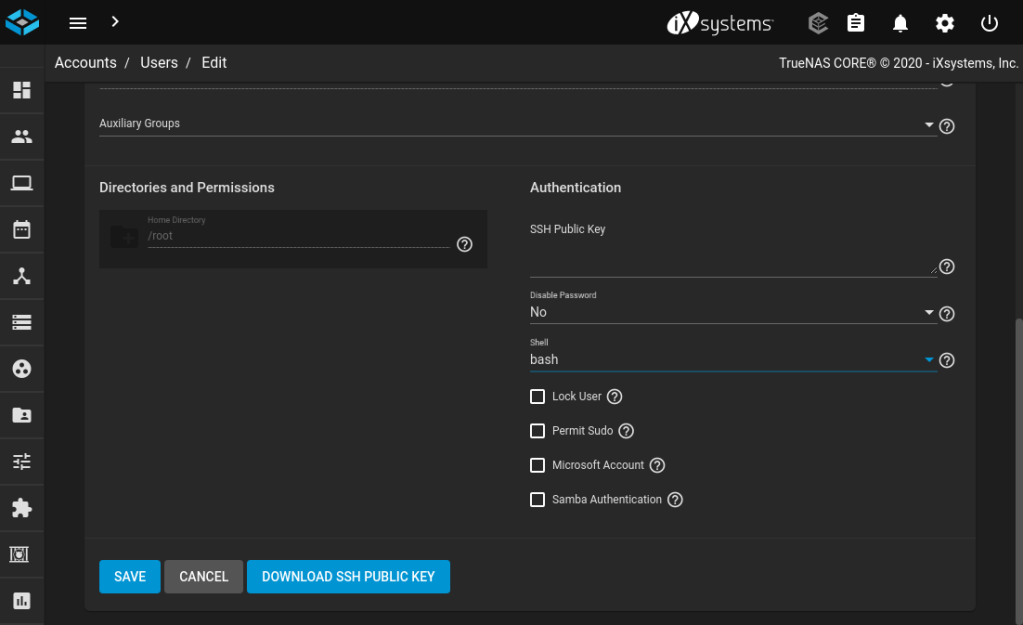
You will also need to ensure that the user account used by Kubernetes to SSH to TrueNAS has a supported shell. The author of democratic-csi informs me it should be set to bash or sh, and on recent deployments of TrueNAS it defaults to csh, which won’t work.
To set the shell for your user, go to Accounts / Users and click on the user you’ll be using. Set the Shell to bash and hit Save.
NFS
The NFS service requires a little tweaking to make it work properly with Kubernetes. Access the NFS settings by clicking on the pencil icon in the Services menu. You must select Enable NFSv4, NFSv3 ownership model for NFSv4 and Allow non-root mount.

iSCSI
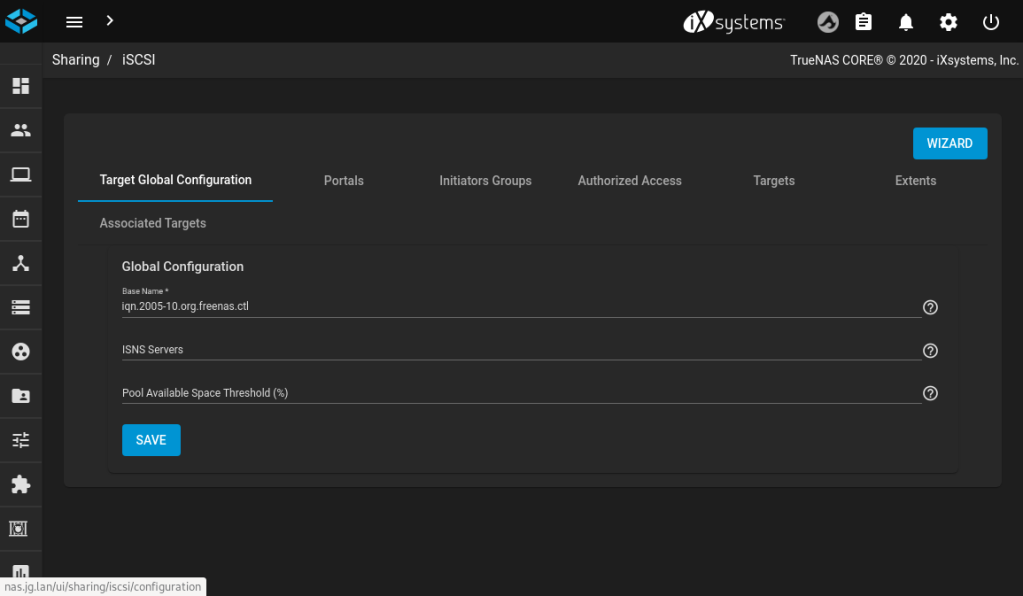
The iSCSI service needs a little bit more setting up than NFS, and the iSCSI settings are in a different place, too. Look under Sharing / Block Shares (iSCSI). In short, you need to accept the default settings for almost everything until you have basic settings for Target Global Configuration, Portals and Initiator Groups until you have something that resembles these screenshots.
This was my first encounter with iSCSI and I found some of the terminology confusing to begin with. Roughly speaking:
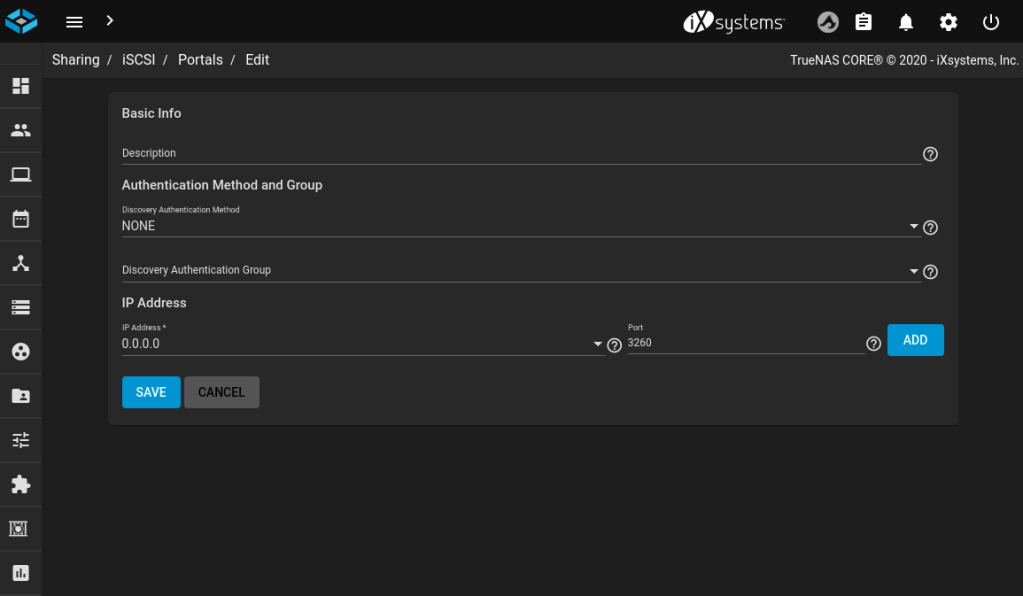
- a Portal is what would normally be called a server or a listener, i.e. you define the IP address and port to bind to. In this simple TrueNAS setup, we bind to all IPs (
0.0.0.0) and accept the default port (3260). Authentication can also be set up here, but that is outside the scope of this guide. - an Initiator is what would normally be called a client
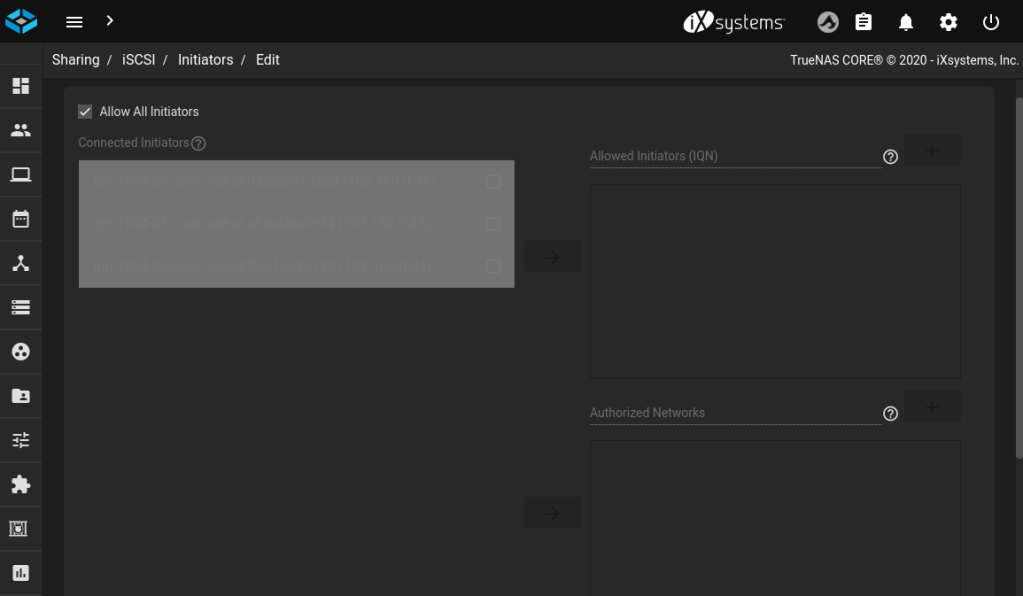
- an Initiator Group allows you to define which Targets an Initiator can connect to. Here we will allow everything to connect, but you may wish to restrict that in the future.
- a Target is a specific storage resource, analogous to a hard disk controller. These will be created automatically by Kubernetes as needed.
- an Extent is the piece of storage that is referenced by a Target, analogous to a hard disk. These will be created automatically by Kubernetes as needed.
Kubernetes
There are no special requirements on the Kubernetes side of things, except a Helm 3 client. I have set this up on MicroK8s on single-node and multi-node clusters. It’s especially useful on multi-node clusters because the default MicroK8s storage addon allocates storage via hostPath on the node itself, which then ties your pod to that node forever.
In preparation for both the NFS and iSCSI steps, prepare your helm repo:
helm repo add democratic-csi https://democratic-csi.github.io/charts/
helm repo update
helm search repo democratic-csi/
NFS
First, we need to prepare all the nodes in the cluster to be able to use the NFS protocol.
# Fedora, CentOS, etc
sudo dnf -y install nfs-utils

# Ubuntu, Debian, etc
sudo apt install libnfs-utils
On Fedora/CentOS/RedHat you will either need to disable SELinux (not recommended) or load this custom SELinux policy to allow pods to mount storage:
# nfs-provisioner.te
module nfs-provisioner 1.0;

require {
	type snappy_t;
	type container_file_t;
	class dir { getattr open read rmdir };
}

#============= snappy_t ==============
allow snappy_t container_file_t:dir { getattr open read rmdir };
# Compile the above policy into a binary object
checkmodule -M -m -o nfs-provisioner.mod nfs-provisioner.te
# Package it
semodule_package -o nfs-provisioner.pp -m nfs-provisioner.mod
# Install it
semodule -i nfs-provisioner.ppFinally we can install the FreeNAS NFS provisioner from democratic-csi! First fetch the example config so we can customise it for our environment:
wget https://raw.githubusercontent.com/democratic-csi/charts/master/stable/democratic-csi/examples/freenas-nfs.yamlMost of the key values to change are all in the driver section. Anywhere where you see 192.168.0.4 here, replace with the IP or hostname of your TrueNAS server. Be sure to set nfsvers=4.
Note about NFSv4: it is possible to use NFSv3 here with democratic-csi and TrueNAS. In fact it is often recommended due to simpler permissions. However, on Fedora I ran into an issue with NFSv3 where in order for the client to work, the systemd unit rpc-statd has to be running. This cannot be enabled to start on boot, and it says it will automatically start when needed. However this did not happen for me, meaning if any of my nodes rebooted, they would come back unable to mount any NFS volumes. As a workaround, I opted to use NFSv4 which has a simpler daemon configuration.
If you have followed my naming convention for TrueNAS pools, you can also use my values for datasetParentName and detachedSnapshotsDatasetParentName. Otherwise, adjust to suit your environment. I found this a little confusing but in this simple case, these two values should be direct children of whatever your nfs dataset is. They will be created automatically – don’t create them yourself.
csiDriver:
  # should be globally unique for a given cluster
  name: "org.democratic-csi.nfs"

storageClasses:
- name: freenas-nfs-csi
  defaultClass: false
  reclaimPolicy: Delete
  volumeBindingMode: Immediate
  allowVolumeExpansion: true
  parameters:
    fsType: nfs

  mountOptions:
  - noatime
  - nfsvers=4
  secrets:
    provisioner-secret:
    controller-publish-secret:
    node-stage-secret:
    node-publish-secret:
    controller-expand-secret:

driver:
  config:
    driver: freenas-nfs
    instance_id:
    httpConnection:
      protocol: http
      host: 192.168.0.4
      port: 80
      username: root
      password: ************
      allowInsecure: true
    sshConnection:
      host: 192.168.0.4
      port: 22
      username: root
      # use either password or key
      password: "***********"
        #      privateKey: |
        #        -----BEGIN RSA PRIVATE KEY-----
        #        ...
        #        -----END RSA PRIVATE KEY-----
    zfs:
      datasetParentName: hdd/k8s/nfs/vols
      detachedSnapshotsDatasetParentName: hdd/k8s/nfs/snaps
      datasetEnableQuotas: true
      datasetEnableReservation: false
      datasetPermissionsMode: "0777"
      datasetPermissionsUser: root
      datasetPermissionsGroup: wheel
    nfs:
      shareHost: 192.168.0.4
      shareAlldirs: false
      shareAllowedHosts: []
      shareAllowedNetworks: []
      shareMaprootUser: root
      shareMaprootGroup: wheel
      shareMapallUser: ""
      shareMapallGroup: ""
Now we can install the NFS provisioner using Helm, based on the config file we’ve just created:
helm upgrade \
--install \
--create-namespace \
--values freenas-nfs.yaml \
--namespace democratic-csi \
--set node.kubeletHostPath="/var/snap/microk8s/common/var/lib/kubelet"  \
zfs-nfs democratic-csi/democratic-csi
iSCSI
First, we need to prepare all the nodes in the cluster to be able to use the iSCSI protocol.
# Fedora, CentOS, etc
sudo dnf install -y lsscsi iscsi-initiator-utils sg3_utils device-mapper-multipath
sudo mpathconf --enable --with_multipathd y
sudo systemctl enable --now iscsid multipathd
sudo systemctl enable --now iscsi

# Ubuntu, Debian, etc
sudo apt-get install -y open-iscsi lsscsi sg3-utils multipath-tools scsitools

sudo tee /etc/multipath.conf <<-'EOF'
defaults {
    user_friendly_names yes
    find_multipaths yes
}
EOF

sudo systemctl enable multipath-tools.service
sudo service multipath-tools restart
sudo systemctl enable open-iscsi.service
sudo service open-iscsi start
Finally we can install the FreeNAS iSCSI provisioner from democratic-csi! First fetch the example config so we can customise it for our environment:
wget https://raw.githubusercontent.com/democratic-csi/charts/master/stable/democratic-csi/examples/freenas-iscsi.yamlThe key values to change are all in the driver section. Anywhere where you see 192.168.0.4 here, replace with the IP or hostname of your TrueNAS server.
If you have followed my naming convention for TrueNAS pools, you can also use my values for datasetParentName and detachedSnapshotsDatasetParentName. Otherwise, adjust to suit your environment. I found this a little confusing but these two values should be direct children of whatever your iscsi dataset is. They will be created automatically.
Note that iSCSI imposes a limit on the length of the volume name. The total volume name (zvol/<datasetParentName>/<pvc name>) length cannot exceed 63 characters. The standard volume naming overhead is 46 characters, so datasetParentName should therefore be 17 characters or less.
csiDriver:
  # should be globally unique for a given cluster
  name: "org.democratic-csi.iscsi"

# add note here about volume expansion requirements
storageClasses:
- name: freenas-iscsi-csi
  defaultClass: false
  reclaimPolicy: Delete
  volumeBindingMode: Immediate
  allowVolumeExpansion: true
  parameters:
    # for block-based storage can be ext3, ext4, xfs
    fsType: xfs

  mountOptions: []
  secrets:
    provisioner-secret:
    controller-publish-secret:
    node-stage-secret:
    node-publish-secret:
    controller-expand-secret:

driver:
  config:
    driver: freenas-iscsi
    instance_id:
    httpConnection:
      protocol: http
      host: 192.168.0.4
      port: 80
      username: root
      password: *************
      allowInsecure: true
      apiVersion: 2
    sshConnection:
      host: 192.168.0.4
      port: 22
      username: root
      # use either password or key
      password: ******************
        #      privateKey: |
        #        -----BEGIN RSA PRIVATE KEY-----
        #        ...
        #        -----END RSA PRIVATE KEY-----
    zfs:
      # the example below is useful for TrueNAS 12
      cli:
        paths:
          zfs: /usr/local/sbin/zfs
          zpool: /usr/local/sbin/zpool
          sudo: /usr/local/bin/sudo
          chroot: /usr/sbin/chroot
      # total volume name (zvol/<datasetParentName>/<pvc name>) length cannot exceed 63 chars
      # https://www.ixsystems.com/documentation/freenas/11.2-U5/storage.html#zfs-zvol-config-opts-tab
      # standard volume naming overhead is 46 chars
      # datasetParentName should therefore be 17 chars or less
      datasetParentName: hdd/k8s/iscsi/v
      detachedSnapshotsDatasetParentName: hdd/k8s/iscsi/s
      # "" (inherit), lz4, gzip-9, etc
      zvolCompression:
      # "" (inherit), on, off, verify
      zvolDedup:
      zvolEnableReservation: false
      # 512, 1K, 2K, 4K, 8K, 16K, 64K, 128K default is 16K
      zvolBlocksize:
    iscsi:
      targetPortal: "192.168.0.4:3260"
      targetPortals: []
      # leave empty to omit usage of -I with iscsiadm
      interface:
      namePrefix: csi-
      nameSuffix: "-cluster"
      # add as many as needed
      targetGroups:
        # get the correct ID from the "portal" section in the UI
        - targetGroupPortalGroup: 1
          # get the correct ID from the "initiators" section in the UI
          targetGroupInitiatorGroup: 1
          # None, CHAP, or CHAP Mutual
          targetGroupAuthType: None
          # get the correct ID from the "Authorized Access" section of the UI
          # only required if using Chap
          targetGroupAuthGroup:
      extentInsecureTpc: true
      extentXenCompat: false
      extentDisablePhysicalBlocksize: true
      # 512, 1024, 2048, or 4096,
      extentBlocksize: 4096
      # "" (let FreeNAS decide, currently defaults to SSD), Unknown, SSD, 5400, 7200, 10000, 15000
      extentRpm: "7200"
      # 0-100 (0 == ignore)
      extentAvailThreshold: 0
Testing
There are a few sanity checks you should do. First make sure all the democratic-csi pods are healthy across all your nodes:
[jonathan@zeus ~]$ kubectl get pods -n democratic-csi -o wide
NAME                                                   READY   STATUS    RESTARTS   AGE     IP             NODE
zfs-iscsi-democratic-csi-node-pdkgn                    3/3     Running   6          7d3h    192.168.0.44   zeus-kube02
zfs-iscsi-democratic-csi-node-g25tq                    3/3     Running   12         7d3h    192.168.0.45   zeus-kube03
zfs-iscsi-democratic-csi-node-mmcnm                    3/3     Running   0          2d15h   192.168.0.2    zeus.jg.lan
zfs-iscsi-democratic-csi-controller-5888fb7c46-hgj5c   4/4     Running   0          2d15h   10.1.27.131    zeus.jg.lan
zfs-nfs-democratic-csi-controller-6b84ffc596-qv48h     4/4     Running   0          24h     10.1.27.136    zeus.jg.lan
zfs-nfs-democratic-csi-node-pdn72                      3/3     Running   0          24h     192.168.0.2    zeus.jg.lan
zfs-nfs-democratic-csi-node-f4xlv                      3/3     Running   0          24h     192.168.0.44   zeus-kube02
zfs-nfs-democratic-csi-node-7jngv                      3/3     Running   0          24h     192.168.0.45   zeus-kube03
Also make sure your storageClasses are present, and set one as the default if you like:
[jonathan@zeus ~]$ kubectl get sc
NAME                        PROVISIONER                RECLAIMPOLICY   VOLUMEBINDINGMODE   ALLOWVOLUMEEXPANSION   AGE
microk8s-hostpath           microk8s.io/hostpath       Delete          Immediate           false                  340d
freenas-iscsi-csi           org.democratic-csi.iscsi   Delete          Immediate           true                   26d
freenas-nfs-csi (default)   org.democratic-csi.nfs     Delete          Immediate           true                   26d
Now we’re ready to create some test volumes:
# test-claim-iscsi.yaml
kind: PersistentVolumeClaim
apiVersion: v1
metadata:
  name: test-claim-iscsi
  annotations:
    volume.beta.kubernetes.io/storage-class: "freenas-iscsi-csi"
spec:
  storageClassName: freenas-iscsi-csi
  accessModes:
    - ReadWriteOnce
  resources:
    requests:
      storage: 1Gi
# test-claim-nfs.yaml
kind: PersistentVolumeClaim
apiVersion: v1
metadata:
name: test-claim-nfs
annotations:
volume.beta.kubernetes.io/storage-class: "freenas-nfs-csi"
spec:
storageClassName: freenas-nfs-csi
accessModes:
- ReadWriteOnce
resources:
requests:
storage: 1GiUse the above test manifests to create some persistentVolumeClaims:
[jonathan@zeus ~]$ kubectl -n democratic-csi create -f test-claim-iscsi.yaml -f test-claim-nfs.yaml
persistentvolumeclaim/test-claim-iscsi created
persistentvolumeclaim/test-claim-nfs created
Then check that your PVCs are showing as Bound. This should only take a few seconds, so if your PVCs are showing as Pending, something has probably gone wrong.
[jonathan@zeus ~]$ kubectl -n democratic-csi get pvc
NAME               STATUS   VOLUME                                     CAPACITY   ACCESS MODES   STORAGECLASS        AGE
test-claim-nfs     Bound    pvc-0ca8bbf4-33e9-4c3a-8e27-6a3022194ec3   1Gi        RWX            freenas-nfs-csi     119s
test-claim-iscsi   Bound    pvc-9bd9228e-d548-48ea-9824-2b96daf29cd3   1Gi        RWO            freenas-iscsi-csi   119s
Verify that the new volumes or filesystems are showing up as datasets in TrueNAS:
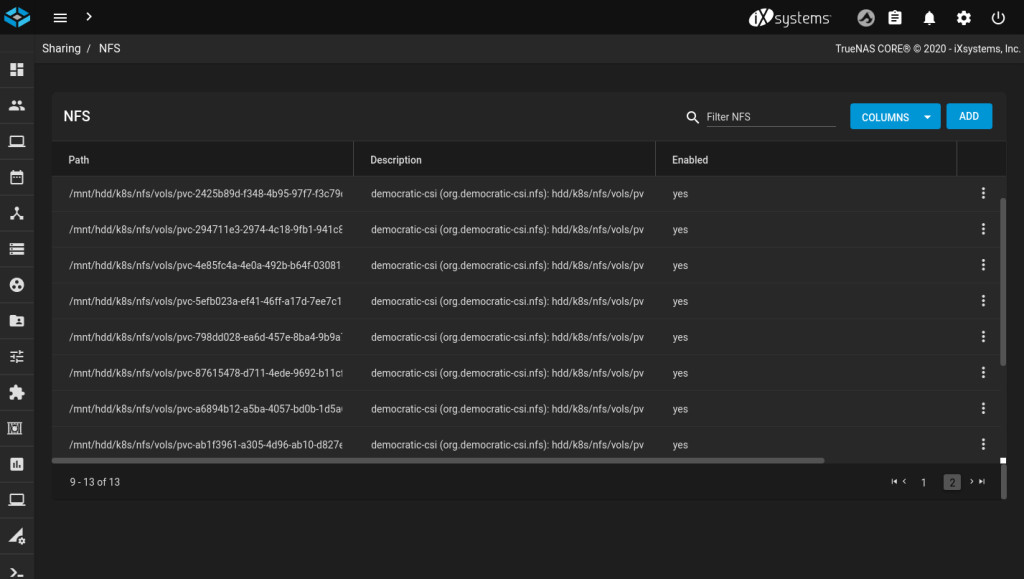
Likewise verify that NFS shares, or iSCSI targets and extents have been created:


Clean up your test PVCs:
[jonathan@zeus ~]$ kubectl -n democratic-csi delete -f test-claim-iscsi.yaml -f test-claim-nfs.yaml
persistentvolumeclaim "test-claim-iscsi" deleted
persistentvolumeclaim "test-claim-nfs" deleted
Double-check that the volumes, shares, targets and extents have been cleaned up.

Wow, thanks for that awesome walkthrough!!!
Just one thing though: the yaml file # test-claim-nfs.yaml isn’t the right one. It will deploy the iscsi pvc 😉
LikeLike
Glad you found it helpful – and well done for finding my deliberate mistake. I was just making sure you were reading it properly 😉 (I’ve fixed my copypasta now…)
LikeLike
Hey thank you for the walkthrough.
It helped me a lot setting up my kubernetes homelab.
Note for people that would come here. There is a strange behavior with TrueNAS’s portal id assignement. If you have a previous portal that was removed, the portal id shown in the UI is not the real id. You end up having a perfectly valid claim (kubectl get pvc shows it up and bound) but it is impossible to bind it to a container.
If you encounter this behavior, check https://github.com/democratic-csi/democratic-csi/issues/56
It will probably get fixed in upcoming releases of TrueNAS. At least 12.0-U2 and previous versions are affected.
I wasted a lot of time troubleshooting this.If this comment helps more people, I’ll be happy 🙂
LikeLike
I’m glad this was useful to you, and thanks for the tip 👍
LikeLike
Nice job Jonathan, thanks a lot
LikeLiked by 1 person
So cool Jonathan, few changes I had to make to make it would with a kubeadm install. With a little hacking of course (e.g. –set node.kubeletHostPath=”/var/lib/kubelet” from the microk8s one). Also checked the box in Services/SSH “Log in as Root with Password” (a homelab in a secure place so should be fine).
Also, haggled through the helm command to do the zfs-iscsi part, seems to be missing or I can’t seem locate it between your example and TESTING section. Either way, was able to hack through it and ge things working.
Thanks for sharing, this is exactly the kick in the head I was looking for to get me some persistent non-local volumes! Thank you!
L
LikeLike
Thanks! I’ll double check this and clear up the mistakes 😃
LikeLike
Hi Jonathan, everything works as indicated. Thank you.
quick question, what if I have two freenas/truenas and I want them both as PV for the cluster that way I do not have to put every deployments on one NFS server? what values should I replace on the freenas-nfs.yml? Appreciate your help.
LikeLike
Hi. If you’re running two TrueNAS boxes, you need to do the Helm install step twice. Customise the freenas-nfs.yml and you will need to make sure the name is unique in csiDriver.name, storageClasses.name and driver.config.driver. Also change the IP address in both places within driver.config.
LikeLike
Awesome guide Johathan, thank you!
Make sure to include the iscsi helm upgrade script as well (before testing):
“`
helm upgrade \
–install \
–create-namespace \
–values freenas-iscsi.yaml \
–namespace democratic-csi \
–set node.kubeletHostPath=”/var/snap/microk8s/common/var/lib/kubelet” \
zfs-iscsi democratic-csi/democratic-csi
“`
LikeLike
I noticed in iSCSI you defined this:
“detachedSnapshotsDatasetParentName: hdd/k8s/iscsi/s”
But it does not look like you include the snapshot support or did any testing on the snapshots. Did you cover that someplace else?
LikeLike
Ah yes. I have since enabled snapshot support on my cluster and it seems to be working. I don’t have access to that cluster today but I’ll try and remember to share the updated config tomorrow.
LikeLike
Still don’t see the snapshot support coverage. Would be interested to see how you got that working. The democratic-csi git hub page didn’t have much on the topic.
LikeLike
You’ll need Kubernetes v1.20 or newer to use volume snapshots: https://kubernetes.io/blog/2020/12/10/kubernetes-1.20-volume-snapshot-moves-to-ga/
In your `values.yaml` for democratic-csi, uncomment this line and redeploy. You shouldn’t need anything else.
“`yaml
volumeSnapshotClasses:
– name: freenas-iscsi
“`
After that, you should be able to see a `volumeSnapshotClass` on your cluster:
“`
$ kubectl get volumesnapshotclass
NAME DRIVER DELETIONPOLICY AGE
freenas-iscsi org.democratic-csi.iscsi Delete 165d
freenas-nfs org.democratic-csi.nfs Delete 165d
“`
Then you can create actual snapshots, referencing your `volumeSnapshotClass` and a `persistentVolumeClaim`:
“`yaml
apiVersion: snapshot.storage.k8s.io/v1
kind: VolumeSnapshot
metadata:
name: new-snapshot-test
spec:
volumeSnapshotClassName: freenas-iscsi
source:
persistentVolumeClaimName: pvc-test
“`
I haven’t really used this feature, but you should find everything you need here:
* https://kubernetes.io/docs/concepts/storage/volume-snapshots/
* https://kubernetes.io/docs/concepts/storage/volume-snapshot-classes/
LikeLike
Hi Jonathan, thanks for the great set of instructions. I am a newbie and not very familiar with linux nor kubernetes and so did have some questions on this which I would appreciate your thoughts on. You will have to excuse my ignorance! Btw I am using rancher for managing the kubernetes.
1. I’m using Truenas scale – would it work and would the setup be pretty much the same?
2. In the architecture, is the provisioner running on the TrueNas server or in the Kubernetes cluster?
3. Where you refer to “prepare helm repo”, are those commands run on the Truenas server?
Appreciate your assistance.
LikeLike
Thanks for your comment. Let me respond to each part:
I actually hadn’t heard of TrueNAS Scale before, but it sounds like it has a lot of commonality with TrueNAS so it might be possible. That’s probably a question for the author of Democratic CSI, which is the driver I’m using here.
2. The provisioner runs on the kubernetes cluster. It watches for PersistentVolumeClaims and when it sees one, it contacts the TrueNAS box, creates a volume, and then tells kubernetes about the new volume, so it can be mounted.
3. All the Helm commands are run on your local PC
LikeLike
Thank you so much, Jonathan – I appreciate the quick response. I will try it out this evening (Sydney time!).
It appears that Scale is recent. I first installed TrueNAS but all the recent videos were going on about the strengths of Scale, so I though I might as well go straight for the new product – could be a mistake!
LikeLike
I checked the Democratic CSI GitHub page and it says it does have beta support for Scale, using a different provider name. So make sure you use those, rather than copying my example verbatim
LikeLike
Regarding snapshots – Running K3s Kubernetes v1.23.5+k3s1
Added to values.yaml:
volumeSnapshotClasses:
– name: freenas-iscsi
Gives message:
Error: unable to build kubernetes objects from release manifest: unable to recognize “”: no matches for kind “VolumeSnapshotClass” in version “snapshot.storage.k8s.io/v1”
Do you recall having to add CRDs or installing a snapshot controller? The Github page does reference this, but you seemed pretty confident you didn’t do anything but above.
I have nothing with this:
$ kubectl get crd | grep snapshot
LikeLike
Snapshots are a standard feature in vanilla kubernetes v1.20 and greater, but I guess some distributions may choose to exclude it. I didn’t have to add it to my platform (MicroK8s v1.22) but if you don’t have it then you’ll need to run the installer
LikeLike
I’ve been using truenas and iscsi for a few months now with almost no issues. It’s an awesome solution except, the file locking is not perfect … which can be seen by deploying plex or nextcloud. In my setup I had to use a local share and target deployments to specific worker nodes. So now I am going to wipe one of my truenas servers and deploy a kubernetes cluster on it with rook / ceph, then going to try to consume that ceph setup from other clusters.
Looks like I’m not the first to have the idea:
https://github.com/rook/rook/blob/master/design/ceph/ceph-external-cluster.md
Ceph is supposed to support RWX & have perfect file locking. Should know soon enough, plex generally fails with a corrupt database within a week or so without a local share, I’m hoping a cephfs share won’t have that problem… and I need RWX because otherwise updating a pod will never finish if using RWO.
LikeLike
Thanks for the guide. Small change that needs to be made for NFS following the v1.5.3 release:
“support for running freenas-iscsi and freenas-nfs sudo-less (see #151)
BREAKING CHANGE for freenas-nfs, if set datasetPermissionsUser and datasetPermissionsGroup must be numeric user/group IDs, alpha values such as root and wheel will no longer work”
if using the root user and wheel group, you must set datasetPermissionsUser and datasetPermissionsGroup to 0.
LikeLike
Good spot – thanks for sharing
LikeLike
Thank you for the helpful guide Jonathan. I’m giving the plugin a try.
I’m curious though why your iscsi slice is provisioned as FILESYSTEM and not VOLUME. Isn’t a block device that should be a Zvol?
LikeLike
Good question, and one that I don’t have an answer to! I think it’s because the iscsi slice isn’t directly served up itself, only the sub-volumes that start with pvc-.
LikeLike
This is a great tutorial! Made it effortless to setup on my Truenas Scale 12 + Ubuntu server 22.04!
Thanks Jonathan!
LikeLiked by 1 person
Thanks alot jonathan ! this tutorial is very helpful.
LikeLike
Thanks for an excellent tutorial! Couple of points I noted during my own installation:
* Since [this version](https://github.com/democratic-csi/democratic-csi/blob/master/CHANGELOG.md#v153) of `democratic-csi`, `driver.zfs.datasetPermissions{User,Group}` need to be numeric, not names
* `multipath-tools` are not strictly necessary for iSCSI setup – I was running into the same error detailed [here](https://github.com/raspberrypi/linux/issues/4886), and wasn’t able to install it (and didn’t fancy rebuilding my Raspberries Pi), but iSCSI provisioning and attachment worked just fine. I don’t have a good understand of what that package does, but I think it’s only necessary for enterprise setups where there might be multiple routes to the storage.
LikeLiked by 1 person
Thanks for the feedback. I noticed the default values for the democratic-csi helm chart have changed quite a lot over time too. When I upgraded over a major release I had to grab and re-edit the default values again because several things were different.
And yes you’re right about multipathing – I don’t think your typical home lab is going to have that 😃 I guess it might be required to optimise bandwidth if you have bonded Ethernet connections to your NAS.
Also thanks for contributing Raspberries Pi as the correct plural of Raspberry Pi. I enjoyed that 😆
LikeLike
Glad the internal pluralization amused 🙂
LikeLike
This is an excellent guide even in 2025 but I was stuck with some errors when following this guide with latest TrueNAS. After hours of debugging I have worked this out, so I will leave a comment here to save someone else the trouble:
Notice that since TrueNAS 25, the TrueNAS API no longer returns “SCALE” in the version string which will stop democractic-csi controller starting up properly. A fix has been applied in the “next” branch of the democratic-csi repository. As a result, you should add the following to your nfs.yaml:
controller:
driver:
image:
tag: next
This will change the csi-driver image from the “latest” tag to “next” tag.
LikeLike