On my Kubernetes homelab, I am running a handful of workloads that support GPU hardware acceleration, so I decided to look into it.
I had to do a lot of reading different sources to figure out how to put this together, and so I present my findings here so hopefully someone else can benefit. Many of the existing documents also recommend installing components by simply applying kube manifests from GitHub to their cluster. I don’t like doing this, so wherever possible I will use Helm charts to do managed installations.
My hardware consists of HP EliteDesk 800 G2 mini PCs, which have an Intel i5-6500T CPU and the integrated Intel HD Graphics 530. This onboard chip is hardly going to offer mind-blowing performance, but it’s better to use it than for it to sit idle! And it may even offer reasonable performance for some tasks, while freeing up the CPU.
People who are serious about their GPU acceleration will presumably have discrete GPUs, most likely from NVIDIA or AMD. This guide will focus specifically on Intel GPUs, because that is what I have, and because the documentation around an end-to-end Intel GPU acceleration in Kubernetes seems lacking.
node-feature-discovery
The first component we need is Node Feature Discovery (NFD). This is an add-on published by a Kubernetes SIG which collects details about the hardware available on each node, and exposes that information as node labels. NFD is a framework, and allows adding custom rules to discover and advertise arbitrary features.
As usual, I’m installing it with the official Helm chart.
helm upgrade -i --create-namespace \
    -n node-feature-discovery node-feature-discovery \
    node-feature-discovery/node-feature-discovery
Now we need to supply node-feature-discovery with some extra detection rules so it can recognise Intel hardware. Unfortunately this is just a manifest that has to be applied.
kubectl apply -f https://raw.githubusercontent.com/intel/intel-device-plugins-for-kubernetes/main/deployments/nfd/overlays/node-feature-rules/node-feature-rules.yamlCheck that the nodes with GPUs are now labelled. There will be a set of new feature.node.kubernetes.io labels, but the additional detection rules we added should also create some intel.feature.node.kubernetes.io and gpu.intel.com labels – provided your system has an Intel GPU.
[jonathan@poseidon ~]$ kubectl get no kube04 -o json | jq .metadata.labels
{
  "autonodelabel.io/cpuFamily": "Core-i5",
  "autonodelabel.io/cpuGeneration": "6",
  "autonodelabel.io/cpuModel": "Core-i5-6500",
  "autonodelabel.io/cpuString": "Intel-Core-i5-6500",
  "autonodelabel.io/cpuVendor": "Intel",
  "beta.kubernetes.io/arch": "amd64",
  "beta.kubernetes.io/os": "linux",
  "feature.node.kubernetes.io/cpu-cpuid.ADX": "true",
  "feature.node.kubernetes.io/cpu-cpuid.AESNI": "true",
  "feature.node.kubernetes.io/cpu-cpuid.AVX": "true",
  "feature.node.kubernetes.io/cpu-cpuid.AVX2": "true",
  "feature.node.kubernetes.io/cpu-cpuid.CMPXCHG8": "true",
  "feature.node.kubernetes.io/cpu-cpuid.FLUSH_L1D": "true",
  "feature.node.kubernetes.io/cpu-cpuid.FMA3": "true",
  "feature.node.kubernetes.io/cpu-cpuid.FXSR": "true",
  "feature.node.kubernetes.io/cpu-cpuid.FXSROPT": "true",
  "feature.node.kubernetes.io/cpu-cpuid.IA32_ARCH_CAP": "true",
  "feature.node.kubernetes.io/cpu-cpuid.IBPB": "true",
  "feature.node.kubernetes.io/cpu-cpuid.LAHF": "true",
  "feature.node.kubernetes.io/cpu-cpuid.MD_CLEAR": "true",
  "feature.node.kubernetes.io/cpu-cpuid.MOVBE": "true",
  "feature.node.kubernetes.io/cpu-cpuid.MPX": "true",
  "feature.node.kubernetes.io/cpu-cpuid.OSXSAVE": "true",
  "feature.node.kubernetes.io/cpu-cpuid.RTM_ALWAYS_ABORT": "true",
  "feature.node.kubernetes.io/cpu-cpuid.SPEC_CTRL_SSBD": "true",
  "feature.node.kubernetes.io/cpu-cpuid.SRBDS_CTRL": "true",
  "feature.node.kubernetes.io/cpu-cpuid.STIBP": "true",
  "feature.node.kubernetes.io/cpu-cpuid.SYSCALL": "true",
  "feature.node.kubernetes.io/cpu-cpuid.SYSEE": "true",
  "feature.node.kubernetes.io/cpu-cpuid.VMX": "true",
  "feature.node.kubernetes.io/cpu-cpuid.X87": "true",
  "feature.node.kubernetes.io/cpu-cpuid.XGETBV1": "true",
  "feature.node.kubernetes.io/cpu-cpuid.XSAVE": "true",
  "feature.node.kubernetes.io/cpu-cpuid.XSAVEC": "true",
  "feature.node.kubernetes.io/cpu-cpuid.XSAVEOPT": "true",
  "feature.node.kubernetes.io/cpu-cpuid.XSAVES": "true",
  "feature.node.kubernetes.io/cpu-cstate.enabled": "true",
  "feature.node.kubernetes.io/cpu-hardware_multithreading": "false",
  "feature.node.kubernetes.io/cpu-model.family": "6",
  "feature.node.kubernetes.io/cpu-model.id": "94",
  "feature.node.kubernetes.io/cpu-model.vendor_id": "Intel",
  "feature.node.kubernetes.io/cpu-pstate.scaling_governor": "powersave",
  "feature.node.kubernetes.io/cpu-pstate.status": "active",
  "feature.node.kubernetes.io/cpu-pstate.turbo": "true",
  "feature.node.kubernetes.io/kernel-config.NO_HZ": "true",
  "feature.node.kubernetes.io/kernel-config.NO_HZ_IDLE": "true",
  "feature.node.kubernetes.io/kernel-version.full": "6.5.0-26-generic",
  "feature.node.kubernetes.io/kernel-version.major": "6",
  "feature.node.kubernetes.io/kernel-version.minor": "5",
  "feature.node.kubernetes.io/kernel-version.revision": "0",
  "feature.node.kubernetes.io/pci-0300_8086.present": "true",
  "feature.node.kubernetes.io/storage-nonrotationaldisk": "true",
  "feature.node.kubernetes.io/system-os_release.ID": "ubuntu",
  "feature.node.kubernetes.io/system-os_release.VERSION_ID": "22.04",
  "feature.node.kubernetes.io/system-os_release.VERSION_ID.major": "22",
  "feature.node.kubernetes.io/system-os_release.VERSION_ID.minor": "04",
  "feature.node.kubernetes.io/usb-ff_0bda_8156.present": "true",
  "gpu.intel.com/device-id.0300-1912.count": "1",
  "gpu.intel.com/device-id.0300-1912.present": "true",
  "intel.feature.node.kubernetes.io/gpu": "true",
  "kubernetes.io/arch": "amd64",
  "kubernetes.io/hostname": "kube04",
  "kubernetes.io/os": "linux",
  "microk8s.io/cluster": "true",
  "node.kubernetes.io/microk8s-controlplane": "microk8s-controlplane"
}
P.S. the autonodelabel.io labels come from my own project.
intel-device-plugin
Now we need to install the Intel device plugin. This is a two-part operation. First we need to install Intel’s device plugins operator. Default values are fine.
helm upgrade -i --create-namespace \
    -n intel-device-plugins-gpu intel-device-plugins-operator \
    intel/intel-device-plugins-operator
Once the operator has fired up, we can use it to install Intel’s GPU plugin. This time we do need to provide a minimal values file to tell the plugin to run only on nodes which have an Intel GPU (based on the labels added by node-feature-discovery in the previous step):
# values.yaml
name: gpudeviceplugin

sharedDevNum: 1
logLevel: 2
resourceManager: false
enableMonitoring: true
allocationPolicy: "none"

nodeSelector:
  intel.feature.node.kubernetes.io/gpu: 'true'

nodeFeatureRule: true
helm upgrade -i --create-namespace \
-n intel-device-plugins-gpu intel-device-plugins-gpu \
-f values.yaml \
intel/intel-device-plugins-gpuWhen the driver is initialised, we can see that the nodes with compatible GPUs now have GPU as a requestable resource, along with the CPU and memory. Note this isn’t a generic gpu key, but specific to the Intel i915 driver. You would see something different here if you were using NVIDIA or AMD GPUs.
[jonathan@poseidon ~]$ kubectl get no kube04 -o json | jq .status.capacity
{
  "cpu": "4",
  "ephemeral-storage": "226487696Ki",
  "gpu.intel.com/i915": "1",
  "gpu.intel.com/i915_monitoring": "1",
  "hugepages-1Gi": "0",
  "hugepages-2Mi": "0",
  "memory": "32736012Ki",
  "pods": "110"
}
Codecs
Once Kubernetes is aware of the GPU hardware and able to expose it to pods, we need to verify which codecs and APIs are available. This is all new to me so I had a lot of learning to do, but each specific hardware platform needs a suitable driver, and the driver interfaces with an API which is presented to workloads.
In my particular case, running the vainfo command on the nodes reveals that I’m running the Intel iHD driver, which supports both Intel QSV and VA-API as APIs to present to the application.
jonathan@kube07:~$ sudo vainfo --display drm --device /dev/dri/renderD128
libva info: VA-API version 1.14.0
libva info: Trying to open /usr/lib/x86_64-linux-gnu/dri/iHD_drv_video.so
libva info: Found init function __vaDriverInit_1_14
libva info: va_openDriver() returns 0
vainfo: VA-API version: 1.14 (libva 2.12.0)
vainfo: Driver version: Intel iHD driver for Intel(R) Gen Graphics - 22.3.1 ()
vainfo: Supported profile and entrypoints
      VAProfileMPEG2Simple            :	VAEntrypointVLD
      VAProfileMPEG2Main              :	VAEntrypointVLD
      VAProfileH264Main               :	VAEntrypointVLD
      VAProfileH264Main               :	VAEntrypointEncSliceLP
      VAProfileH264High               :	VAEntrypointVLD
      VAProfileH264High               :	VAEntrypointEncSliceLP
      VAProfileJPEGBaseline           :	VAEntrypointVLD
      VAProfileJPEGBaseline           :	VAEntrypointEncPicture
      VAProfileH264ConstrainedBaseline:	VAEntrypointVLD
      VAProfileH264ConstrainedBaseline:	VAEntrypointEncSliceLP
      VAProfileVP8Version0_3          :	VAEntrypointVLD
      VAProfileHEVCMain               :	VAEntrypointVLD
Workload
Finally, we can starting deploying workloads that can use these APIs to request GPU acceleration for some tasks. These examples are just arbitrary apps that I happen to be using at home.
Jellyfin
Jellyfin is an open source media server, similar to Plex. It can use a GPU to perform realtime transcoding when streaming video.
I deploy Jellyfin using a Helm chart of my own creation. This minimal values.yaml shows the bare minimum config to set to enable hardware transcoding.
---
# Jellyfin requests 1 GPU so it gets scheduled on a compatible node
resources:
  jellyfin:
    requests:
      cpu: 1000m
      memory: 1Gi
      gpu.intel.com/i915: "1"
    limits:
      cpu: 3500m
      memory: 6Gi
      gpu.intel.com/i915: "1"

# Generous permissions to allow Jellyfin to access GPU hardware
podSecurityContext:
  runAsNonRoot: false
  fsGroup: 64710
  seccompProfile:
    type: RuntimeDefault
  runAsUser: 64710
  runAsGroup: 64710
  supplementalGroups:
    - 109
containerSecurityContext:
  privileged: true
  allowPrivilegeEscalation: true
  capabilities:
    drop:
      - ALL
  readOnlyRootFilesystem: true
  runAsNonRoot: false
  runAsUser: 64710
  runAsGroup: 64710

# Tell Jellyfin to mount the GPU device from the host
jellyfin:
  extraDevices:
    - /dev/dri/renderD128
Deploy with this command:
helm upgrade -i \
    -n jellyfin jellyfin \
    -f values.yaml \
    djjudas21/jellyfin
Finally, with the Jellyfin deployment made, we need to go into the administration settings in the web console and enable hardware acceleration. These onboard Intel GPUs support both QSV and VA-API so either should work. There is a lot of debate about performance vs quality online, but I’ve been using QSV and it has been fine on this modest hardware. If you have only one GPU, there is no need to set the QSV device.

It is a bit difficult to verify that your Jellyfin hardware acceleration is working. The Jellyfin pod logs are messy, but look for a line that mentions Transcoding when starting to play a video. See that it mentions -codec:v:0 h264_qsv which means the video codec to transcode to is h264_qsv, so it is using QSV on the GPU to perform this transcode.
Be aware that not every playback results in a video being transcoded! If your client supports the codec that the video is already in, it won’t transcode. Check the transcoding docs for more details.
[17:31:04] [INF] [59] MediaBrowser.MediaEncoding.Transcoding.TranscodeManager: /usr/lib/jellyfin-ffmpeg/ffmpeg -analyzeduration 200M -probesize 1G -f matroska -init_hw_device vaapi=va:,vendor_id=0x8086,driver=iHD -init_hw_device qsv=qs@va -filter_hw_device qs -canvas_size 1920x1080 -i file:"/media/videos/Family Movies/Lilo & Stitch (2002).mkv" -map_metadata -1 -map_chapters -1 -threads 0 -map 0:0 -map 0:1 -map -0:0 -codec:v:0 h264_qsv -preset veryfast -b:v 9817753 -maxrate 9817753 -bufsize 19635506 -profile:v:0 high -level 51 -g:v:0 72 -keyint_min:v:0 72 -filter_complex "[0:2]scale,scale=-1:1080:fast_bilinear,crop,pad=max(1816\,iw):max(1080\,ih):(ow-iw)/2:(oh-ih)/2:black@0,crop=1816:1080[sub];[0:0]setparams=color_primaries=bt709:color_trc=bt709:colorspace=bt709,scale=trunc(min(max(iw\,ih*a)\,min(1816\,1080*a))/2)*2:trunc(min(max(iw/a\,ih)\,min(1816/a\,1080))/2)*2,format=yuv420p[main];[main][sub]overlay=eof_action=pass:repeatlast=0" -start_at_zero -codec:a:0 copy -copyts -avoid_negative_ts disabled -max_muxing_queue_size 2048 -f hls -max_delay 5000000 -hls_time 3 -hls_segment_type mpegts -start_number 0 -hls_segment_filename "/cache/transcodes/15510a109bd975b7a7caf513858c5c9f%d.ts" -hls_playlist_type vod -hls_list_size 0 -y "/cache/transcodes/15510a109bd975b7a7caf513858c5c9f.m3u8"For full details, be sure to check out Jellyfin’s hardware acceleration guide.
Immich
Immich is a self-hosted photo gallery app. It can make use of a GPU in a couple of ways.
Hardware transcoding
Firstly, Immich can use a GPU to transcode video clips in your library, much the same as Jellyfin can.
I am deploying Immich from their own Helm chart. It’s a fairly complex deployment, but the relevant section of values.yaml to enable hardware transcoding is this section below. This just tells Kubernetes to schedule the Immich server on a node with a GPU.
server:
  enabled: true
  resources:
    requests:
      memory: 1Gi
      cpu: 1
      gpu.intel.com/i915: 1
    limits:
      gpu.intel.com/i915: 1
As with Jellyfin, we need to actually configure hardware acceleration in the Immich GUI. Click your user avatar, go to Administration, Settings, scroll down to Video Transcoding Settings, and go to Hardware Acceleration. Once again, we have the choice of QSV or VA-API, and I have chosen QSV.

Correct behaviour is a bit harder to verify in Immich. I uploaded some videos to my library but wasn’t able to trigger any transcoding. Maybe it only does that for longer videos – I’m not sure.
For full details, check out Hardware Transcoding.
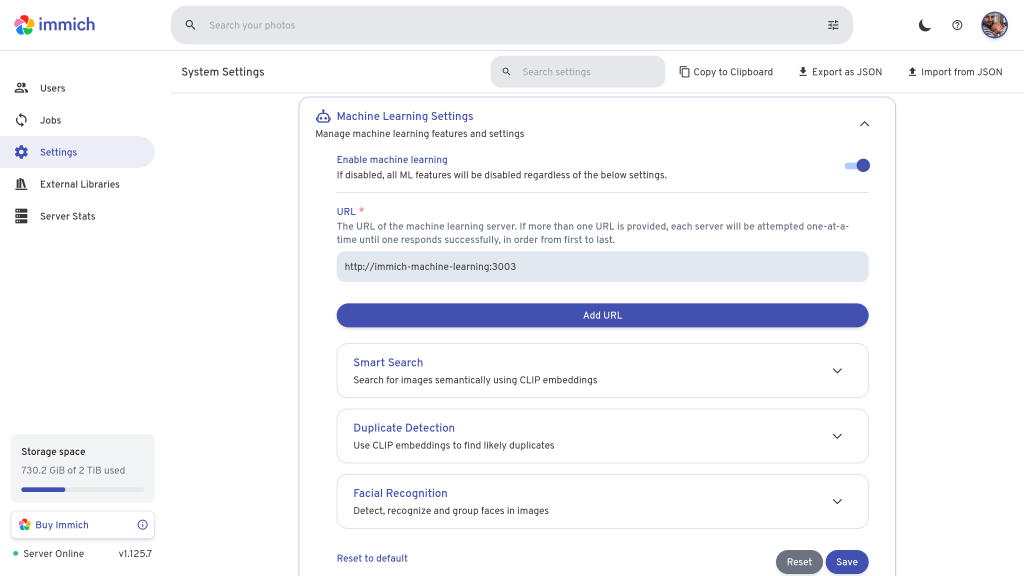
Machine learning
The more interesting use of GPU acceleration in Immich is machine learning, which it uses for facial recognition and auto tagging images based on their content. The ML component of Immich runs as a separate pod with its own config. This means if you are running a single node cluster, you will need to share the GPU between the server pod and the ML pod, by setting requests to 500m each.
The relevant part of the values.yaml to share is below. Here we have to make three changes.
- Firstly we have to run an alternative version of the ML image with support for OpenVINO, which is the ML framework for Intel GPUs (the default ML image targets NVIDIA hardware).
- Secondly, we specify the Intel GPU in the
resourcessection as usual - Thirdly, and optionally, we set a couple of environment variables to tell the pod to preload the ML models at container startup and set some more generous startup probes, as it takes a little bit of time to preload. If you don’t do this step, the pod will load the ML models the first time it needs them.
machine-learning:
  enabled: true
  image:
    # Specify OpenVINO image variant for Intel
    tag: main-openvino
  env:
    # Load ML models up front
    MACHINE_LEARNING_PRELOAD__CLIP: ViT-B-32__openai
    MACHINE_LEARNING_PRELOAD__FACIAL_RECOGNITION: buffalo_l
  resources:
    requests:
      memory: 4Gi
      cpu: 750m
      gpu.intel.com/i915: 1
    limits:
      gpu.intel.com/i915: 1
  # Override probes to allow slow ML startup
  probes:
    liveness:
      spec:
        initialDelaySeconds: 120
    readiness:
      spec:
        initialDelaySeconds: 120
There are fewer settings for ML hardware acceleration. In fact, all we need to do is enable ML in Immich settings and it will automatically pick up any available GPU.
Verification of correct hardware acceleration config for ML is easy to spot. When the ML pod starts up, it prints an message like this. If the message has OpenVINOExecutionProvider first, it’s working. If you only have CPUExecutionProvider, it hasn’t worked.
[02/11/25 19:12:36] INFO Setting execution providers to ['OpenVINOExecutionProvider','CPUExecutionProvider'], in descending order of preferenceBe sure to check out Immich’s guide on Hardware-Accelerated Machine Learning.
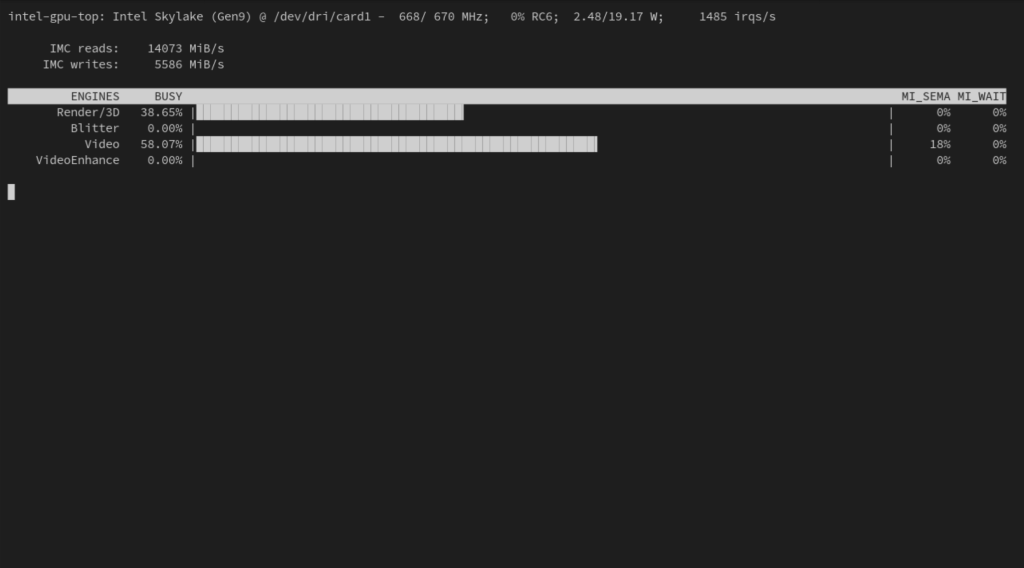
Monitoring
There is a tool called intel_gpu_top which works the same spirit as Linux’s top command. It shows what the GPU is up to and which of the filters are being used, so it’s handy for observing the node that your workloads are on, to make sure they are using hardware acceleration.
It can be installed on the Kubernetes node (not in the cluster) with:
# Ubuntu
sudo apt install intel-gpu-tools

# Fedora
sudo dnf install igt-gpu-tools
The output looks like this. This screenshot shows typical GPU usage while Jellyfin is transcoding a movie during playback.

I have recently set up a similar deployment but stumbled over the problem that when requesting a single GPU resource with only a single iGPU I cannot schedule any other workloads which also request a GPU as setting gpu.intel.com/i915 requests exclusive GPU access
LikeLike
Interesting. Is this true even if you set both the request and the limit to 0.5 or 500m?
LikeLike
Unfortunately yes, its only possible to specify “1” as a ressource; But there’s another fix available:
One could configure the intel device plugin to allow a custom number of pods at one gpu ressource. For this I added the following in the gpu plugin daemonset (I used the NFD + Kustomized daemonset method):
The -shared-dev-num=<n> was the essential option; I took it from the documentation:
https://intel.github.io/intel-device-plugins-for-kubernetes/cmd/gpu_plugin/README.html#modes-and-configuration-options
LikeLike